トップレベルウィンドウの管理
Compose Multiplatform for desktop は、ウィンドウを管理するためのさまざまな機能を提供します。ウィンドウをシステムトレイに格納したり、ドラッグ可能にしたり、サイズの調整、位置の変更などを行うことができます。
ウィンドウを開く・閉じる
Window() 関数を使用して、通常のウィンドウを作成できます。コンポーザブルなスコープに配置するには、application エントリーポイント内で Window() を使用します。
import androidx.compose.ui.window.Window
import androidx.compose.ui.window.application

fun main() = application {
    Window(onCloseRequest = ::exitApplication) {
        // ウィンドウのコンテンツ
    }
}コンポーザブル関数として、Window() はそのプロパティを宣言的に変更できます。たとえば、あるタイトルでウィンドウを開き、後でそのタイトルを変更することができます。
import androidx.compose.material.Button
import androidx.compose.material.Text
import androidx.compose.runtime.getValue
import androidx.compose.runtime.mutableStateOf
import androidx.compose.runtime.remember
import androidx.compose.runtime.setValue
import androidx.compose.ui.window.Window
import androidx.compose.ui.window.application

fun main() = application {
    var fileName by remember { mutableStateOf("Untitled") }

    Window(onCloseRequest = ::exitApplication, title = "$fileName - Editor") {
        Button(onClick = { fileName = "note.txt" }) {
            Text("Save")
        }
    }
}
条件の追加
単純な if 条件を使用してウィンドウを開いたり閉じたりすることもできます。次のコードサンプルでは、タスクの完了後にアプリケーションウィンドウが自動的に閉じられます。
import androidx.compose.material.Text
import androidx.compose.runtime.LaunchedEffect
import androidx.compose.runtime.getValue
import androidx.compose.runtime.mutableStateOf
import androidx.compose.runtime.remember
import androidx.compose.runtime.setValue
import androidx.compose.ui.window.Window
import androidx.compose.ui.window.application
import kotlinx.coroutines.delay

fun main() = application {
    var isPerformingTask by remember { mutableStateOf(true) }

    LaunchedEffect(Unit) {
        // 重い処理を実行する
        delay(2000)
        isPerformingTask = false
    }
    if (isPerformingTask) {
        Window(
            onCloseRequest = ::exitApplication,
            title = "Window 1"
        )
        {
            Text("Performing some tasks. Please wait!")
        }
    } else {
        Window(
            onCloseRequest = ::exitApplication,
            title = "Window 2"
        ) {
            Text("Hello, World!")
        }
    }
}
アプリケーションの終了時にダイアログを表示するなど、カスタムロジックを使用したい場合は、onCloseRequest コールバックを使用して終了アクションをオーバーライドできます。 次のコードサンプルでは、命令的なアプローチ (window.close()) の代わりに宣言的なアプローチを使用し、状態の変化 (isOpen = false) に応じてウィンドウを閉じています。
import androidx.compose.material.Button
import androidx.compose.material.Text
import androidx.compose.runtime.getValue
import androidx.compose.runtime.mutableStateOf
import androidx.compose.runtime.remember
import androidx.compose.runtime.setValue
import androidx.compose.ui.window.DialogWindow
import androidx.compose.ui.window.Window
import androidx.compose.ui.window.application

fun main() = application {
    var isOpen by remember { mutableStateOf(true) }
    var isAskingToClose by remember { mutableStateOf(false) }

    if (isOpen) {
        Window(
            onCloseRequest = { isAskingToClose = true },
            title = "Important document"
        ) {
            if (isAskingToClose) {
                DialogWindow(
                    onCloseRequest = { isAskingToClose = false },
                    title = "Close without saving?"
                ) {
                    Button(
                        onClick = { isOpen = false }
                    ) {
                        Text("Yes")
                    }
                }
            }
        }
    }
}
"}
複数のウィンドウを扱う
アプリケーションに複数のウィンドウがある場合、アプリケーションの状態用に別のクラスを作成し、mutableStateListOf の変更に応じてウィンドウを開いたり閉じたりすることができます。
import androidx.compose.runtime.Composable
import androidx.compose.runtime.key
import androidx.compose.runtime.mutableStateListOf
import androidx.compose.runtime.remember
import androidx.compose.ui.window.MenuBar
import androidx.compose.ui.window.Window
import androidx.compose.ui.window.application

fun main() = application {
    val applicationState = remember { MyApplicationState() }

    for (window in applicationState.windows) {
        key(window) {
            MyWindow(window)
        }
    }
}

@Composable
private fun MyWindow(
    state: MyWindowState
) = Window(onCloseRequest = state::close, title = state.title) {
    MenuBar {
        Menu("File") {
            Item("New window", onClick = state.openNewWindow)
            Item("Exit", onClick = state.exit)
        }
    }
}

private class MyApplicationState {
    val windows = mutableStateListOf<MyWindowState>()

    init {
        windows += MyWindowState("Initial window")
    }

    fun openNewWindow() {
        windows += MyWindowState("Window ${windows.size}")
    }

    fun exit() {
        windows.clear()
    }

    private fun MyWindowState(
        title: String
    ) = MyWindowState(
        title,
        openNewWindow = ::openNewWindow,
        exit = ::exit,
        windows::remove
    )
}

private class MyWindowState(
    val title: String,
    val openNewWindow: () -> Unit,
    val exit: () -> Unit,
    private val close: (MyWindowState) -> Unit
) {
    fun close() = close(this)
}
より複雑な例については、Code Viewer サンプルを参照してください。
ウィンドウをシステムトレイに最小化する
ウィンドウを閉じる代わりに非表示にするには、windowState.isVisible 状態を変更します。
import androidx.compose.material.Text
import androidx.compose.runtime.LaunchedEffect
import androidx.compose.runtime.getValue
import androidx.compose.runtime.mutableStateOf
import androidx.compose.runtime.remember
import androidx.compose.runtime.setValue
import androidx.compose.ui.geometry.Size
import androidx.compose.ui.graphics.Color
import androidx.compose.ui.graphics.drawscope.DrawScope
import androidx.compose.ui.graphics.painter.Painter
import androidx.compose.ui.window.Tray
import androidx.compose.ui.window.Window
import androidx.compose.ui.window.application
import kotlinx.coroutines.delay

fun main() = application {
    var isVisible by remember { mutableStateOf(true) }

    Window(
        onCloseRequest = { isVisible = false },
        visible = isVisible,
        title = "Counter",
    ) {
        var counter by remember { mutableStateOf(0) }
        LaunchedEffect(Unit) {
            while (true) {
                counter++
                delay(1000)
            }
        }
        Text(counter.toString())
    }

    if (!isVisible) {
        Tray(
            TrayIcon,
            tooltip = "Counter",
            onAction = { isVisible = true },
            menu = {
                Item("Exit", onClick = ::exitApplication)
            },
        )
    }
}

object TrayIcon : Painter() {
    override val intrinsicSize = Size(256f, 256f)

    override fun DrawScope.onDraw() {
        drawOval(Color(0xFFFFA500))
    }
}
,"}
singleWindowApplication() 関数
singleWindowApplication() 関数を呼び出すことで、シングルウィンドウのアプリケーションを作成できます。
singleWindowApplication() 関数はより簡単に使用できますが、以下の制限があります。
- アプリケーションはウィンドウを 1 つしか持てません。
- カスタムの終了ロジックを追加できません。
- 実行時にウィンドウの属性を変更できません。
import androidx.compose.ui.window.singleWindowApplication

fun main() = singleWindowApplication {
    // ウィンドウのコンテンツ
}代替案として、application エントリーポイント内で Window() コンポーザブル を使用できます。
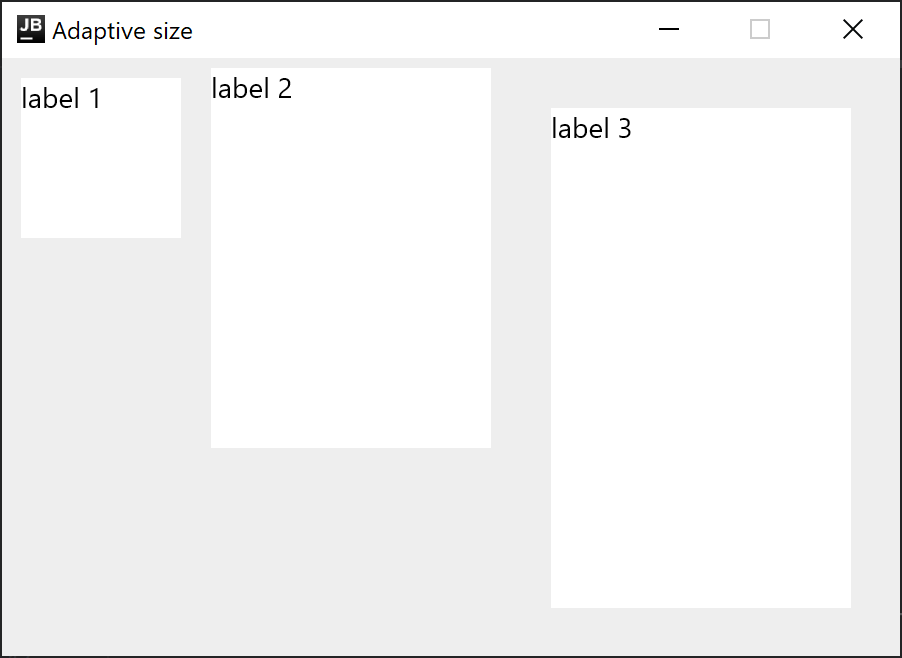
アダプティブなウィンドウサイズ
期待されるコンテンツのサイズがわからず、最適なウィンドウ寸法を事前指定できない場合は、WindowSize の一方または両方の寸法を Dp.Unspecified に設定できます。Compose Multiplatform for desktop は、コンテンツに合わせてウィンドウの初期サイズを自動的に調整します。
import androidx.compose.foundation.background
import androidx.compose.foundation.layout.Column
import androidx.compose.foundation.layout.Row
import androidx.compose.foundation.layout.padding
import androidx.compose.foundation.layout.size
import androidx.compose.material.Text
import androidx.compose.ui.Modifier
import androidx.compose.ui.graphics.Color
import androidx.compose.ui.unit.Dp
import androidx.compose.ui.unit.dp
import androidx.compose.ui.window.Window
import androidx.compose.ui.window.application
import androidx.compose.ui.window.rememberWindowState

fun main() = application {
    Window(
        onCloseRequest = ::exitApplication,
        state = rememberWindowState(width = Dp.Unspecified, height = Dp.Unspecified),
        title = "Adaptive size",
        resizable = false
    ) {
        Column(Modifier.background(Color(0xFFEEEEEE))) {
            Row {
                Text("label 1", Modifier.size(100.dp, 100.dp).padding(10.dp).background(Color.White))
                Text("label 2", Modifier.size(150.dp, 200.dp).padding(5.dp).background(Color.White))
                Text("label 3", Modifier.size(200.dp, 300.dp).padding(25.dp).background(Color.White))
            }
        }
    }
}
ウィンドウの状態の変更
WindowState は、ウィンドウの配置(placement)、現在の位置、およびサイズのための独立した API クラスです。配置(placement)属性を使用すると、ウィンドウを画面上でどのように配置するかを指定できます(フローティング、最大化/最小化、またはフルスクリーン)。 状態が変更されると、自動的に再コンポジション(recomposition)がトリガーされます。ウィンドウの状態を変更するには、コールバックを使用するか、コンポーザブル内でそれを監視します。
import androidx.compose.foundation.clickable
import androidx.compose.foundation.layout.Column
import androidx.compose.foundation.layout.Row
import androidx.compose.material.Checkbox
import androidx.compose.material.Text
import androidx.compose.ui.Alignment
import androidx.compose.ui.Modifier
import androidx.compose.ui.unit.dp
import androidx.compose.ui.window.Window
import androidx.compose.ui.window.WindowPlacement
import androidx.compose.ui.window.WindowPosition
import androidx.compose.ui.window.application
import androidx.compose.ui.window.rememberWindowState

fun main() = application {
    val state = rememberWindowState(placement = WindowPlacement.Maximized)

    Window(onCloseRequest = ::exitApplication, state, title = "Window state") {
        Column {
            Row(verticalAlignment = Alignment.CenterVertically) {
                Checkbox(
                    state.placement == WindowPlacement.Fullscreen,
                    {
                        state.placement = if (it) {
                            WindowPlacement.Fullscreen
                        } else {
                            WindowPlacement.Floating
                        }
                    }
                )
                Text("isFullscreen")
            }

            Row(verticalAlignment = Alignment.CenterVertically) {
                Checkbox(
                    state.placement == WindowPlacement.Maximized,
                    {
                        state.placement = if (it) {
                            WindowPlacement.Maximized
                        } else {
                            WindowPlacement.Floating
                        }
                    }
                )
                Text("isMaximized")
            }

            Row(verticalAlignment = Alignment.CenterVertically) {
                Checkbox(state.isMinimized, { state.isMinimized = !state.isMinimized })
                Text("isMinimized")
            }

            Text(
                "Position ${state.position}",
                Modifier.clickable {
                    val position = state.position
                    if (position is WindowPosition.Absolute) {
                        state.position = position.copy(x = state.position.x + 10.dp)
                    }
                }
            )

            Text(
                "Size ${state.size}",
                Modifier.clickable {
                    state.size = state.size.copy(width = state.size.width + 10.dp)
                }
            )
        }
    }
}
ウィンドウの状態をリッスンする
状態の変化に反応して、その値をデータベースに書き込むなど、非コンポーザブルなアプリケーション層に値を送る必要がある場合は、snapshotFlow() 関数を使用できます。この関数は、コンポーザブルの状態の現在の値をキャプチャします。
import androidx.compose.runtime.LaunchedEffect
import androidx.compose.runtime.snapshotFlow
import androidx.compose.ui.unit.DpSize
import androidx.compose.ui.window.Window
import androidx.compose.ui.window.WindowPosition
import androidx.compose.ui.window.application
import androidx.compose.ui.window.rememberWindowState
import kotlinx.coroutines.flow.filter
import kotlinx.coroutines.flow.launchIn
import kotlinx.coroutines.flow.onEach

fun main() = application {
    val state = rememberWindowState()

    Window(onCloseRequest = ::exitApplication, state) {
        LaunchedEffect(state) {
            snapshotFlow { state.size }
                .onEach(::onWindowResize)
                .launchIn(this)

            snapshotFlow { state.position }
                .filter { it.isSpecified }
                .onEach(::onWindowRelocate)
                .launchIn(this)
        }
    }
}

private fun onWindowResize(size: DpSize) {
    println("onWindowResize $size")
}

private fun onWindowRelocate(position: WindowPosition) {
    println("onWindowRelocate $position")
}
.onEach(::onWindowResize)"}
ダイアログ
Window() コンポーザブルを使用して通常のウィンドウを作成し、DialogWindow() コンポーザブルを使用して、ユーザーがモーダルウィンドウを閉じるまで親ウィンドウをロックするモーダルウィンドウを作成できます。
次のコードサンプルは、これらのコンポーザブルを使用して通常のウィンドウとモーダルウィンドウを組み合わせる方法を示しています。
import androidx.compose.material.Button
import androidx.compose.material.Text
import androidx.compose.runtime.getValue
import androidx.compose.runtime.mutableStateOf
import androidx.compose.runtime.remember
import androidx.compose.runtime.setValue
import androidx.compose.ui.Alignment
import androidx.compose.ui.window.DialogWindow
import androidx.compose.ui.window.Window
import androidx.compose.ui.window.WindowPosition
import androidx.compose.ui.window.application
import androidx.compose.ui.window.rememberDialogState

fun main() = application {
    Window(
        onCloseRequest = ::exitApplication,
    ) {
        var isDialogOpen by remember { mutableStateOf(false) }

        Button(onClick = { isDialogOpen = true }) {
            Text(text = "Open dialog")
        }

        if (isDialogOpen) {
            DialogWindow(
                onCloseRequest = { isDialogOpen = false },
                state = rememberDialogState(position = WindowPosition(Alignment.Center))
            ) {
                // ウィンドウのコンテンツ
            }
        }
    }
}
,"}
ドラッグ可能なウィンドウ領域
装飾なし(undecorated)のウィンドウにカスタムのドラッグ可能なタイトルバーを追加したり、ウィンドウ全体をドラッグ可能にしたりするには、WindowDraggableArea() コンポーザブルを使用できます。
import androidx.compose.foundation.background
import androidx.compose.foundation.layout.Box
import androidx.compose.foundation.layout.fillMaxWidth
import androidx.compose.foundation.layout.height
import androidx.compose.foundation.window.WindowDraggableArea
import androidx.compose.ui.Modifier
import androidx.compose.ui.graphics.Color
import androidx.compose.ui.unit.dp
import androidx.compose.ui.window.Window
import androidx.compose.ui.window.application

fun main() = application {
    Window(onCloseRequest = ::exitApplication, undecorated = true) {
        WindowDraggableArea {
            Box(Modifier.fillMaxWidth().height(48.dp).background(Color.DarkGray))
        }
    }
}
"}
WindowDraggableArea() は、singleWindowApplication()、Window()、および DialogWindow() コンポーザブル内でのみ使用できます。別のコンポーザブル関数で呼び出すには、レシーバースコープとして WindowScope を使用します。
import androidx.compose.foundation.background
import androidx.compose.foundation.layout.Box
import androidx.compose.foundation.layout.fillMaxWidth
import androidx.compose.foundation.layout.height
import androidx.compose.foundation.window.WindowDraggableArea
import androidx.compose.runtime.Composable
import androidx.compose.ui.Modifier
import androidx.compose.ui.graphics.Color
import androidx.compose.ui.unit.dp
import androidx.compose.ui.window.Window
import androidx.compose.ui.window.WindowScope
import androidx.compose.ui.window.application

fun main() = application {
    Window(onCloseRequest = ::exitApplication, undecorated = true) {
        AppWindowTitleBar()
    }
}

@Composable
private fun WindowScope.AppWindowTitleBar() = WindowDraggableArea {
    Box(Modifier.fillMaxWidth().height(48.dp).background(Color.DarkGray))
}
透明なウィンドウとその他のカスタマイズ
透明なウィンドウを作成するには、Window() 関数に transparent=true と undecorated=true の 2 つのパラメータを渡します。透明なウィンドウを装飾することはできないため、ウィンドウは undecorated(装飾なし)である必要があります。
次のコードサンプルは、コンポーザブルを組み合わせて角の丸い透明なウィンドウを作成する方法を示しています。
import androidx.compose.foundation.layout.fillMaxSize
import androidx.compose.foundation.layout.padding
import androidx.compose.foundation.shape.RoundedCornerShape
import androidx.compose.material.Surface
import androidx.compose.runtime.mutableStateOf
import androidx.compose.runtime.remember
import androidx.compose.ui.Modifier
import androidx.compose.ui.draw.shadow
import androidx.compose.ui.graphics.Color
import androidx.compose.ui.unit.dp
import androidx.compose.ui.window.Window
import androidx.compose.ui.window.application
import androidx.compose.material.Text
import androidx.compose.runtime.*

fun main() = application {
    var isOpen by remember { mutableStateOf(true) }
    if (isOpen) {
        Window(
            onCloseRequest = { isOpen = false },
            title = "Transparent Window Example",
            transparent = true,
            // 透明なウィンドウは装飾なしである必要があります
            undecorated = true,
        ) {
            Surface(
                modifier = Modifier.fillMaxSize().padding(5.dp).shadow(3.dp, RoundedCornerShape(20.dp)),
                color = Color.Transparent,
                // 角の丸いウィンドウ
                shape = RoundedCornerShape(20.dp)
            ) {
                Text("Hello World!", color = Color.White)
            }
        }
    }
}
Swing との相互運用性
Compose Multiplatform for desktop は内部で Swing を使用しているため、Swing を直接使用してウィンドウを作成することもできます。
import androidx.compose.ui.awt.ComposeWindow
import java.awt.Dimension
import javax.swing.JFrame
import javax.swing.SwingUtilities

fun main() = SwingUtilities.invokeLater {
    ComposeWindow().apply {
        size = Dimension(300, 300)
        defaultCloseOperation = JFrame.DISPOSE_ON_CLOSE
        setContent {
            // ウィンドウのコンテンツ
        }
        isVisible = true
    }
}また、Window() コンポーザブルのスコープを使用することもできます。次のコードサンプルにおいて、window は Window() 内で作成された ComposeWindow です。
import androidx.compose.runtime.LaunchedEffect
import androidx.compose.ui.window.singleWindowApplication
import java.awt.datatransfer.DataFlavor
import java.awt.dnd.DnDConstants
import java.awt.dnd.DropTarget
import java.awt.dnd.DropTargetAdapter
import java.awt.dnd.DropTargetDropEvent

fun main() = singleWindowApplication {
    LaunchedEffect(Unit) {
        window.dropTarget = DropTarget().apply {
            addDropTargetListener(object : DropTargetAdapter() {
                override fun drop(event: DropTargetDropEvent) {
                    event.acceptDrop(DnDConstants.ACTION_COPY)
                    val fileName = event.transferable.getTransferData(DataFlavor.javaFileListFlavor)
                    println(fileName)
                }
            })
        }
    }
}
Swing で実装されたダイアログを使用する必要がある場合は、それをコンポーザブル関数にラップできます。
import androidx.compose.runtime.Composable
import androidx.compose.runtime.getValue
import androidx.compose.runtime.mutableStateOf
import androidx.compose.runtime.remember
import androidx.compose.runtime.setValue
import androidx.compose.ui.window.AwtWindow
import androidx.compose.ui.window.application
import java.awt.FileDialog
import java.awt.Frame

fun main() = application {
    var isOpen by remember { mutableStateOf(true) }

    if (isOpen) {
        FileDialog(
            onCloseRequest = {
                isOpen = false
                println("Result $it")
            }
        )
    }
}

@Composable
private fun FileDialog(
    parent: Frame? = null,
    onCloseRequest: (result: String?) -> Unit
) = AwtWindow(
    create = {
        object : FileDialog(parent, "Choose a file", LOAD) {
            override fun setVisible(value: Boolean) {
                super.setVisible(value)
                if (value) {
                    onCloseRequest(file)
                }
            }
        }
    },
    dispose = FileDialog::dispose
)
次のステップ
その他のデスクトップコンポーネント に関するチュートリアルをご覧ください。