UIKit フレームワークとの統合
Compose Multiplatform は UIKit フレームワークと相互運用可能です。 UIKit アプリケーション内に Compose Multiplatform を埋め込むことも、Compose Multiplatform UI 内にネイティブの UIKit コンポーネントを埋め込むこともできます。このページでは、UIKit アプリケーション内での Compose Multiplatform の使用と、Compose Multiplatform UI 内への UIKit コンポーネントの埋め込みの両方の例を紹介します。
SwiftUI の相互運用性については、SwiftUI フレームワークとの統合の記事を参照してください。
UIKit アプリケーション内で Compose Multiplatform を使用する
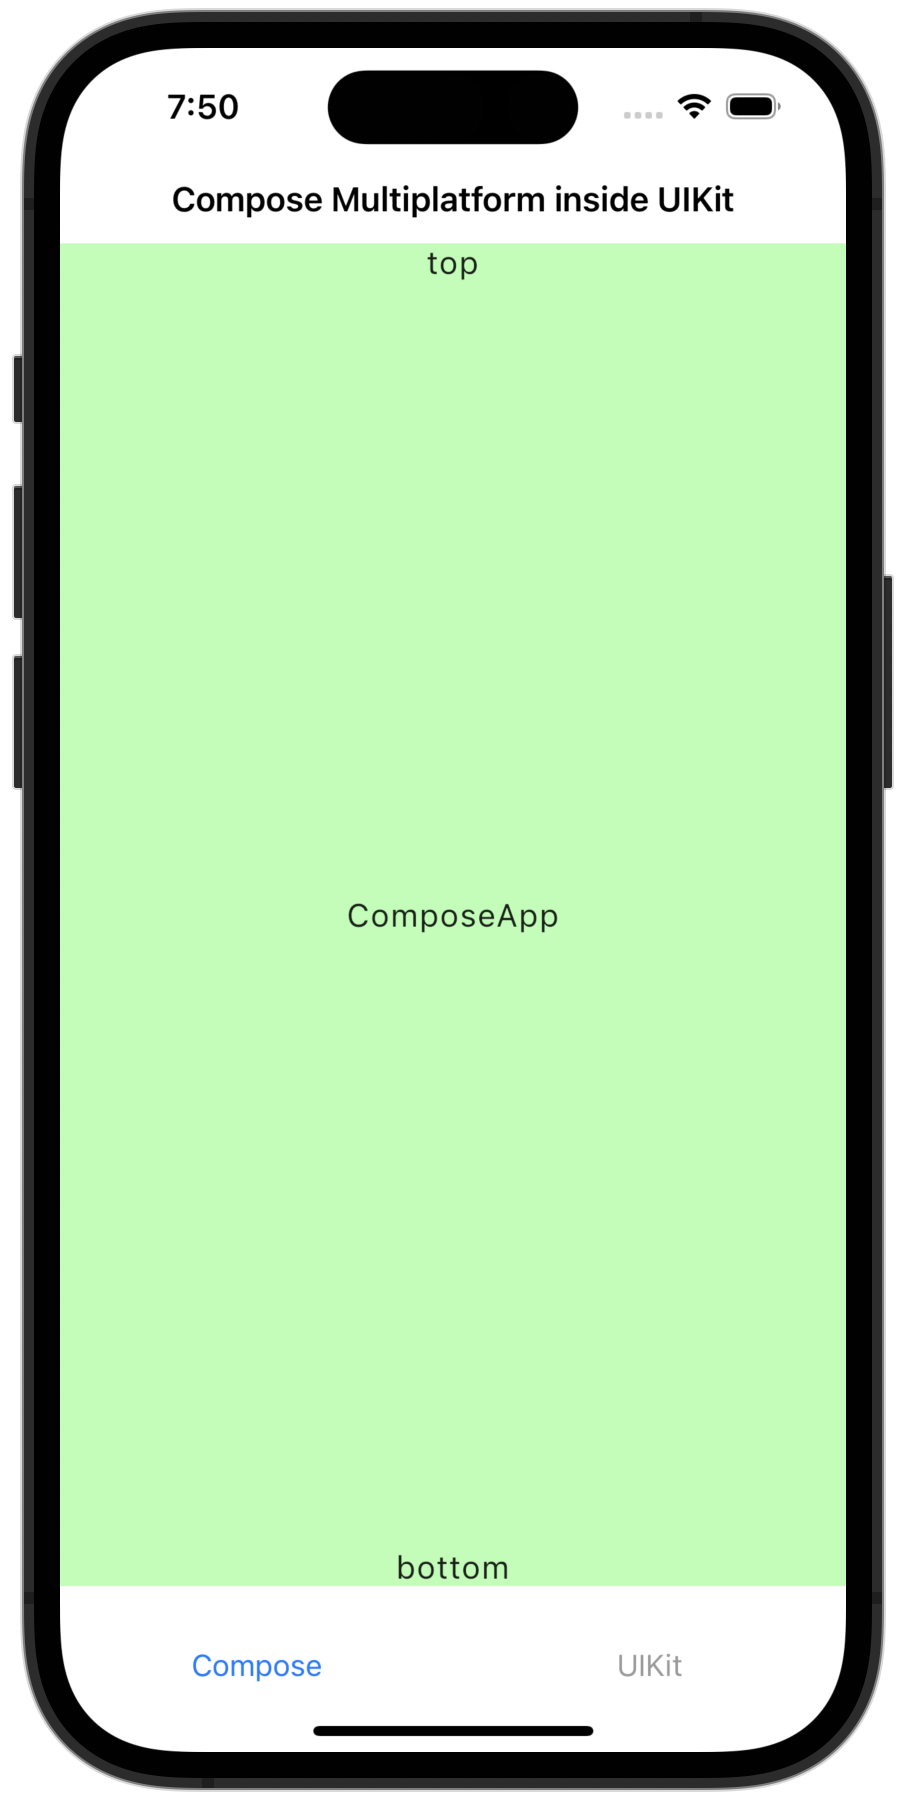
UIKit アプリケーション内で Compose Multiplatform を使用するには、任意の コンテナビューコントローラ(container view controller) に Compose Multiplatform のコードを追加します。 この例では、UITabBarController クラス内で Compose Multiplatform を使用しています。
let composeViewController = Main_iosKt.ComposeOnly()
composeViewController.title = "Compose Multiplatform inside UIKit"

let anotherViewController = UIKitViewController()
anotherViewController.title = "UIKit"

// UITabBarController をセットアップする
let tabBarController = UITabBarController()
tabBarController.viewControllers = [
    // タイトルを設定するために、作成した ViewController を UINavigationController でラップする
    UINavigationController(rootViewController: composeViewController),
    UINavigationController(rootViewController: anotherViewController)
]
tabBarController.tabBar.items?[0].title = "Compose"
tabBarController.tabBar.items?[1].title = "UIKit"
このコードにより、アプリケーションは以下のようになります。
Compose Multiplatform のレンダリングには、高リフレッシュレートを明示的に有効にする必要があります: アプリの
Info.plistファイルにCADisableMinimumFrameDurationOnPhoneキーを追加してください。 これがないと、アプリは実行時にクラッシュします。
このコードの詳細は サンプルプロジェクト で確認できます。
Compose Multiplatform 内で UIKit を使用する
Compose Multiplatform 内で UIKit 要素を使用するには、使用したい UIKit 要素を Compose Multiplatform の UIKitView に追加します。このコードは完全に Kotlin で記述することも、Swift を併用することもできます。
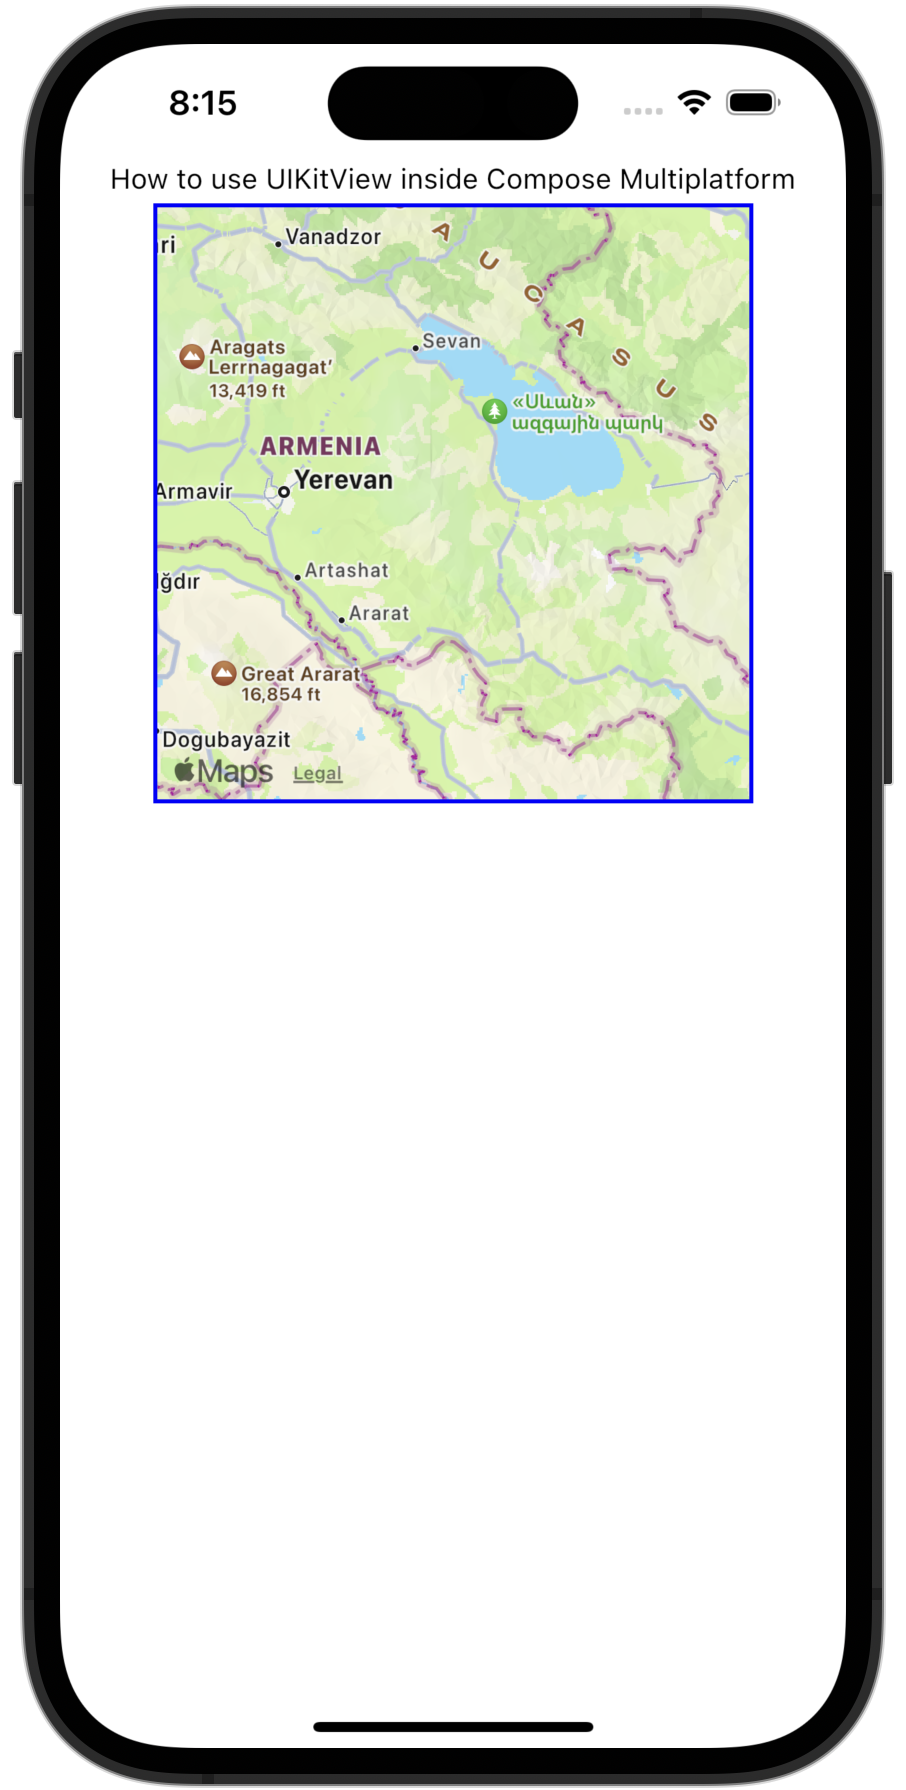
マップビュー
UIKit の MKMapView コンポーネントを使用して、Compose Multiplatform でマップビューを実装できます。コンポーネントのサイズは、Compose Multiplatform の Modifier.size() または Modifier.fillMaxSize() 関数を使用して設定します。
UIKitView(
    factory = { MKMapView() },
    modifier = Modifier.size(300.dp),
)
このコードにより、アプリケーションは以下のようになります。
次に、高度な例を見てみましょう。このコードは、UIKit の UITextField を Compose Multiplatform でラップします。
@OptIn(ExperimentalForeignApi::class)
@Composable
fun UseUITextField(modifier: Modifier = Modifier) {
    // Compose 内のテキストの状態を保持します
    var message by remember { mutableStateOf("Hello, World!") }

    UIKitView(
        factory = {
            // Compose の状態と統合された UITextField を作成します
            val textField = object : UITextField(CGRectMake(0.0, 0.0, 0.0, 0.0)) {
                @ObjCAction
                fun editingChanged() {
                    // UITextField でテキストが変更されたときに Compose の状態を更新します
                    message = text ?: ""
                }
            }
            // UITextField 内のテキスト変更を検知するためのリスナーを追加します
            textField.addTarget(
                target = textField,
                action = NSSelectorFromString(textField::editingChanged.name),
                forControlEvents = UIControlEventEditingChanged
            )
            textField
        },
        modifier = modifier.fillMaxWidth().height(30.dp),
        update = { textField ->
            // Compose の状態から UITextField のテキストを更新します
            textField.text = message
        }
    )
}factoryパラメータには、editingChanged()関数と、UITextFieldへの変更を検出するためのtextField.addTarget()リスナーが含まれています。editingChanged()関数には@ObjCActionアノテーションが付与されており、Objective-C コードと相互運用できるようになっています。addTarget()関数のactionパラメータはeditingChanged()関数の名前を渡し、UIControlEventEditingChangedイベントに応じてそれをトリガーします。UIKitView()のupdateパラメータは、監視可能なmessage状態の値が変更されたときに呼び出されます。- この関数は
UITextFieldのtext属性を更新し、ユーザーに更新された値が表示されるようにします。
この例のコードは、サンプルプロジェクト で確認できます。
カメラビュー
UIKit の AVCaptureSession および AVCaptureVideoPreviewLayer コンポーネントを使用して、Compose Multiplatform でカメラビューを実装できます。
これにより、アプリケーションでデバイスのカメラにアクセスし、ライブプレビューを表示できるようになります。
基本的なカメラビューの実装例を以下に示します。
UIKitView(
    factory = {
        val session = AVCaptureSession().apply {
            val device = AVCaptureDevice.defaultDeviceWithMediaType(AVMediaTypeVideo)!!
            val input = AVCaptureDeviceInput.deviceInputWithDevice(device, null)!!
            addInput(input)
        }
        val previewLayer = AVCaptureVideoPreviewLayer(session)
        session.startRunning()

        object : UIView() {
            override fun layoutSubviews() {
                super.layoutSubviews()
                previewLayer.frame = bounds
            }
        }.apply {
            layer.addSublayer(previewLayer)
        }
    },
    modifier = Modifier.size(300.dp)
)
次に、高度な例を見てみましょう。このコードは写真を撮影し、GPS メタデータを付加し、ネイティブの UIView を使用してライブプレビューを表示します。
@OptIn(ExperimentalForeignApi::class)
@Composable
fun RealDeviceCamera(
    camera: AVCaptureDevice,
    onCapture: (picture: PictureData.Camera, image: PlatformStorableImage) -> Unit
) {
    // 写真撮影用に AVCapturePhotoOutput を初期化します
    val capturePhotoOutput = remember { AVCapturePhotoOutput() }
    // ...
    // キャプチャコールバック用のデリゲートを定義します:画像データの処理、GPS の付加、onCapture のセットアップ
    val photoCaptureDelegate = remember {
        object : NSObject(), AVCapturePhotoCaptureDelegateProtocol {
            override fun captureOutput(
                output: AVCapturePhotoOutput,
                didFinishProcessingPhoto: AVCapturePhoto,
                error: NSError?
            ) {
                val photoData = didFinishProcessingPhoto.fileDataRepresentation()
                if (photoData != null) {
                    val gps = locationManager.location?.toGps() ?: GpsPosition(0.0, 0.0)
                    val uiImage = UIImage(photoData)
                    onCapture(
                        createCameraPictureData(
                            name = nameAndDescription.name,
                            description = nameAndDescription.description,
                            gps = gps
                        ),
                        IosStorableImage(uiImage)
                    )
                }
                capturePhotoStarted = false
            }
        }
    }
    // ...
    // 写真撮影用に AVCaptureSession をセットアップします
    val captureSession: AVCaptureSession = remember {
        AVCaptureSession().also { captureSession ->
            captureSession.sessionPreset = AVCaptureSessionPresetPhoto
            val captureDeviceInput: AVCaptureDeviceInput =
                deviceInputWithDevice(device = camera, error = null)!!
            captureSession.addInput(captureDeviceInput)
            captureSession.addOutput(capturePhotoOutput)
        }
    }
    // ライブカメラプレビュー用に AVCaptureVideoPreviewLayer をセットアップします
    val cameraPreviewLayer = remember {
        AVCaptureVideoPreviewLayer(session = captureSession)
    }
    // ...
    // ネイティブのカメラプレビューレイヤーを持つネイティブの UIView を作成します
    UIKitView(
        modifier = Modifier.fillMaxSize().background(Color.Black),
        factory = {
            val cameraContainer = object: UIView(frame = CGRectZero.readValue()) {
                override fun layoutSubviews() {
                    CATransaction.begin()
                    CATransaction.setValue(true, kCATransactionDisableActions)
                    layer.setFrame(frame)
                    cameraPreviewLayer.setFrame(frame)
                    CATransaction.commit()
                }
            }
            cameraContainer.layer.addSublayer(cameraPreviewLayer)
            cameraPreviewLayer.videoGravity = AVLayerVideoGravityResizeAspectFill
            captureSession.startRunning()
            cameraContainer
        },
    )
    // ...
    // 押されたときに capturePhotoWithSettings コールバックを実行する Compose ボタンを作成します
    CircularButton(
        imageVector = IconPhotoCamera,
        modifier = Modifier.align(Alignment.BottomCenter).padding(36.dp),
        enabled = !capturePhotoStarted,
    ) {
        capturePhotoStarted = true
        val photoSettings = AVCapturePhotoSettings.photoSettingsWithFormat(
            format = mapOf(AVVideoCodecKey to AVVideoCodecTypeJPEG)
        )
        if (camera.position == AVCaptureDevicePositionFront) {
            capturePhotoOutput.connectionWithMediaType(AVMediaTypeVideo)
                ?.automaticallyAdjustsVideoMirroring = false
            capturePhotoOutput.connectionWithMediaType(AVMediaTypeVideo)
                ?.videoMirrored = true
        }
        capturePhotoOutput.capturePhotoWithSettings(
            settings = photoSettings,
            delegate = photoCaptureDelegate
        )
    }
}
"}
RealDeviceCamera コンポーザブルは以下のタスクを実行します。
AVCaptureSessionとAVCaptureVideoPreviewLayerを使用してネイティブのカメラプレビューをセットアップします。- カスタム
UIViewサブクラスをホストするUIKitViewを作成し、レイアウトの更新を管理してプレビューレイヤーを埋め込みます。 AVCapturePhotoOutputを初期化し、写真撮影を処理するためのデリゲートを構成します。CLLocationManager(locationManager経由)を使用して、撮影時の GPS 座標を取得します。- 撮影した画像を
UIImageに変換し、PlatformStorableImageとしてラップし、名前、説明、GPS 位置などのメタデータをonCaptureを介して提供します。 - 撮影をトリガーするための円形の Compose ボタンを表示します。
- フロントカメラを使用する場合、自然な自撮りの挙動に合わせるためにミラーリング設定を適用します。
layoutSubviews()内でCATransactionを使用してアニメーションを回避し、プレビューレイアウトを動的に更新します。
実機でテストするには、アプリの
Info.plistファイルにNSCameraUsageDescriptionキーを追加する必要があります。 これがないと、アプリは実行時にクラッシュします。
この例の完全なコードは ImageViewer サンプルプロジェクト で確認できます。
ウェブビュー
UIKit の WKWebView コンポーネントを使用して、Compose Multiplatform でウェブビューを実装できます。これにより、UI 内でウェブコンテンツを表示し、操作できるようになります。 コンポーネントのサイズは、Compose Multiplatform の Modifier.size() または Modifier.fillMaxSize() 関数を使用して設定します。
UIKitView(
    factory = {
        WKWebView().apply {
            loadRequest(NSURLRequest(URL = NSURL(string = "https://www.jetbrains.com")))
        }
    },
    modifier = Modifier.size(300.dp)
)
次に、高度な例を見てみましょう。このコードは、ナビゲーションデリゲートを使用してウェブビューを構成し、Kotlin と JavaScript 間の通信を可能にします。
@Composable
fun WebViewWithDelegate(
    modifier: Modifier = Modifier,
    initialUrl: String = "https://www.jetbrains.com",
    onNavigationChange: (String) -> Unit = {}
) {
    // ナビゲーションイベントをリッスンするためのデリゲートを作成します
    val delegate = remember {
        object : NSObject(), WKNavigationDelegateProtocol {
            override fun webView(
                webView: WKWebView,
                didFinishNavigation: WKNavigation?
            ) {
                // ナビゲーション完了後に現在の URL を更新します
                onNavigationChange(webView.URL?.absoluteString ?: "")
            }
        }
    }
    UIKitView(
        modifier = modifier,
        factory = {
            // WKWebView をインスタンス化し、デリゲートを設定します
            val webView = WKWebView().apply {
                navigationDelegate = delegate
                loadRequest(NSURLRequest(uRL = NSURL(string = initialUrl)))
            }
            webView
        },
        update = { webView ->
            // URL が変更された場合にウェブページをリロードします
            if (webView.URL?.absoluteString != initialUrl) {
                webView.loadRequest(NSURLRequest(uRL = NSURL(string = initialUrl)))
            }
        }
    )
}
WebViewWithDelegate コンポーザブルは以下のタスクを実行します。
WKNavigationDelegateProtocolインターフェースを実装する安定したデリゲートオブジェクトを作成します。このオブジェクトは Compose のrememberを使用して再構成後も保持されます。WKWebViewをインスタンス化し、UIKitViewを使用して埋め込み、保持されているデリゲートを割り当てて構成します。initialUrlパラメータで指定された初期ウェブページを読み込みます。- デリゲートを介してナビゲーションの変更を監視し、
onNavigationChangeコールバックを通じて現在の URL を渡します。 updateパラメータを使用してリクエストされた URL の変更を監視し、それに応じてウェブページをリロードします。
次のステップ
Compose Multiplatform を SwiftUI フレームワークと統合する 方法についても確認できます。