與 UIKit 框架整合
Compose Multiplatform 可與 UIKit 框架互通。您可以將 Compose Multiplatform 嵌入 UIKit 應用程式中,也可以將原生的 UIKit 元件嵌入 Compose Multiplatform 中。本頁提供了在 UIKit 應用程式中使用 Compose Multiplatform 以及將 UIKit 元件嵌入 Compose Multiplatform UI 的範例。
若要了解有關 SwiftUI 互通的資訊,請參閱與 SwiftUI 框架整合文章。
在 UIKit 應用程式中使用 Compose Multiplatform
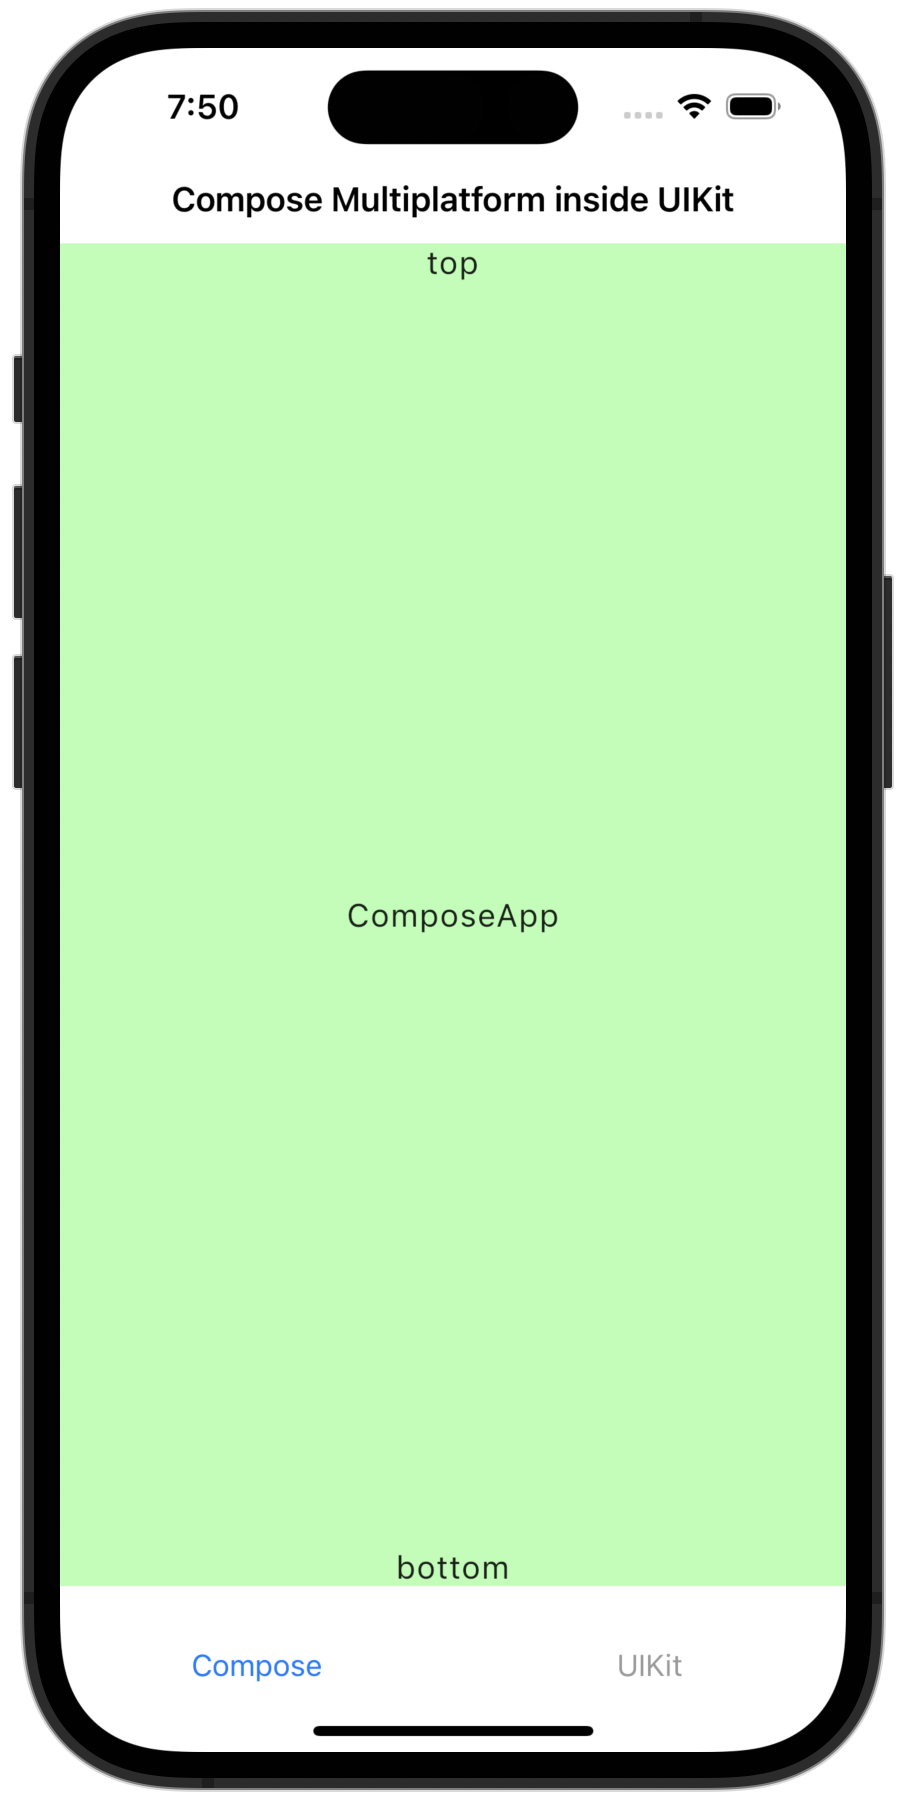
若要在 UIKit 應用程式中使用 Compose Multiplatform,請將您的 Compose Multiplatform 程式碼新增至任何容器視圖控制器中。此範例在 UITabBarController 類別內部使用了 Compose Multiplatform:
let composeViewController = Main_iosKt.ComposeOnly()
composeViewController.title = "Compose Multiplatform inside UIKit"

let anotherViewController = UIKitViewController()
anotherViewController.title = "UIKit"

// Set up the UITabBarController
let tabBarController = UITabBarController()
tabBarController.viewControllers = [
    // Wrap the created ViewControllers in a UINavigationController to set titles
    UINavigationController(rootViewController: composeViewController),
    UINavigationController(rootViewController: anotherViewController)
]
tabBarController.tabBar.items?[0].title = "Compose"
tabBarController.tabBar.items?[1].title = "UIKit"
有了這段程式碼,您的應用程式應會如下所示:

您可以在範例專案中探索這段程式碼。
在 Compose Multiplatform 中使用 UIKit
若要在 Compose Multiplatform 中使用 UIKit 元素,請將您想要使用的 UIKit 元素新增至 Compose Multiplatform 的 UIKitView。您可以純粹用 Kotlin 編寫此程式碼,也可以使用 Swift。
地圖視圖
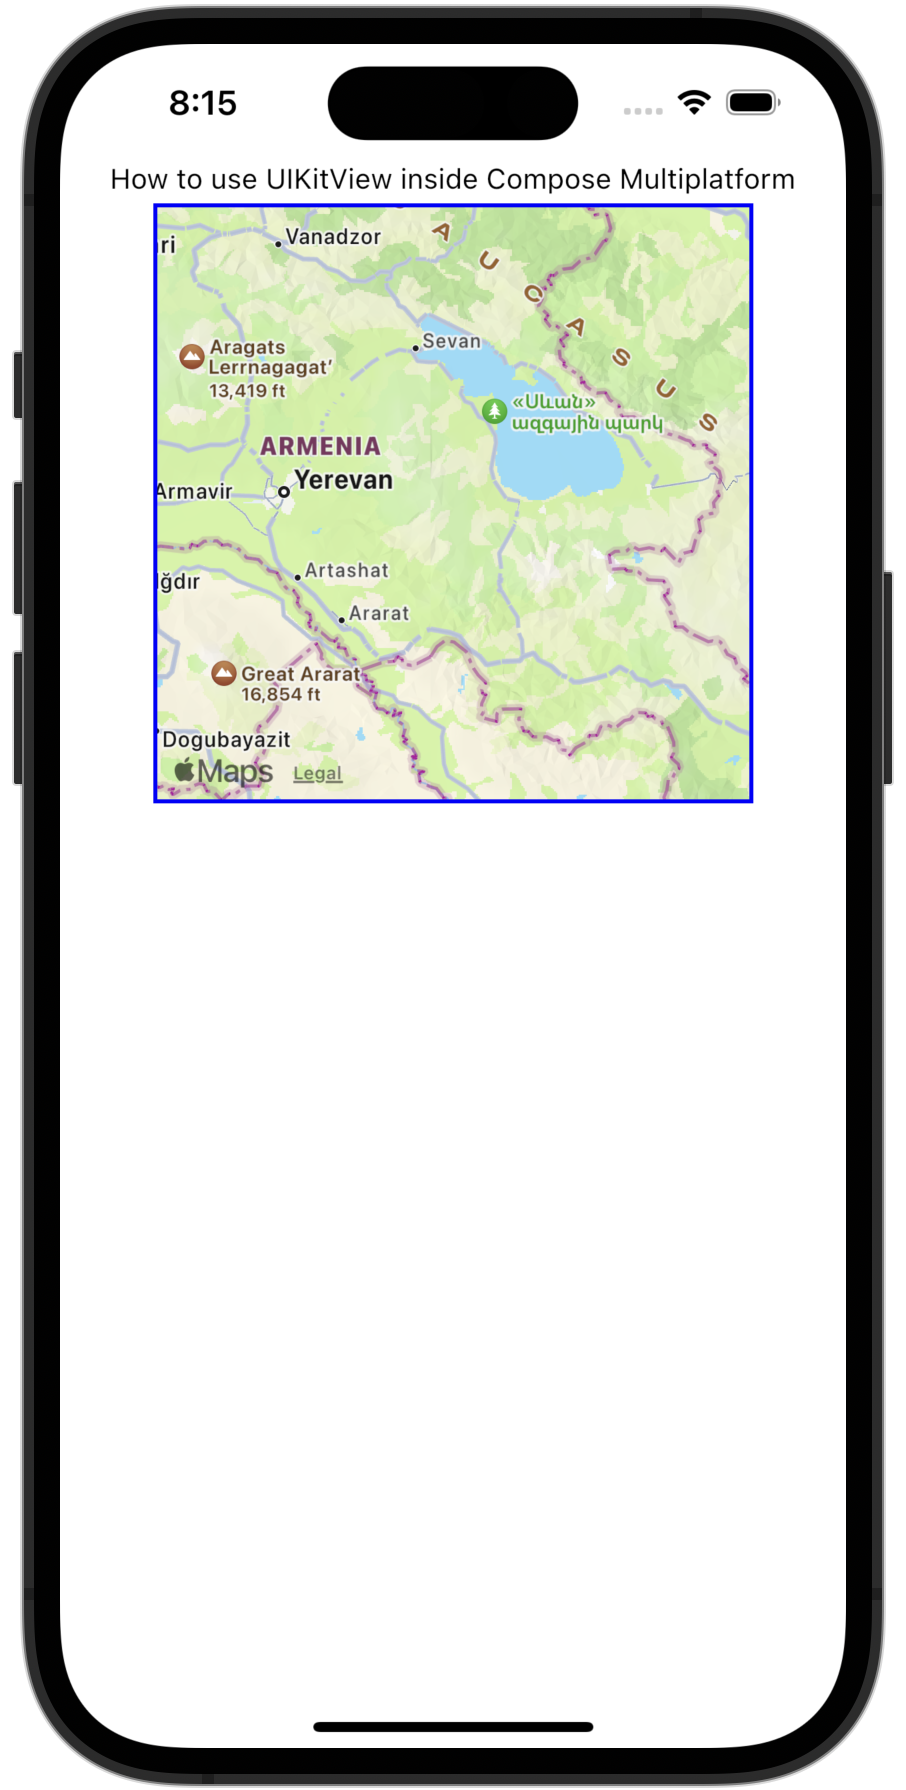
您可以使用 UIKit 的 MKMapView 元件在 Compose Multiplatform 中實作地圖視圖。透過使用 Compose Multiplatform 的 Modifier.size() 或 Modifier.fillMaxSize() 函數來設定元件大小:
UIKitView(
    factory = { MKMapView() },
    modifier = Modifier.size(300.dp),
)
有了這段程式碼,您的應用程式應會如下所示:

現在,讓我們看看一個進階範例。這段程式碼將 UIKit 的 UITextField 包裝在 Compose Multiplatform 中:
@OptIn(ExperimentalForeignApi::class)
@Composable
fun UseUITextField(modifier: Modifier = Modifier) {
    // Holds the state of the text in Compose
    var message by remember { mutableStateOf("Hello, World!") }

    UIKitView(
        factory = {
            // Creates a UITextField integrated with Compose state
            val textField = object : UITextField(CGRectMake(0.0, 0.0, 0.0, 0.0)) {
                @ObjCAction
                fun editingChanged() {
                    // Updates the Compose state when text changes in UITextField
                    message = text ?: ""
                }
            }
            // Adds a listener for text changes within the UITextField
            textField.addTarget(
                target = textField,
                action = NSSelectorFromString(textField::editingChanged.name),
                forControlEvents = UIControlEventEditingChanged
            )
            textField
        },
        modifier = modifier.fillMaxWidth().height(30.dp),
        update = { textField ->
            // Updates UITextField text from Compose state
            textField.text = message
        }
    )
}- factory 參數包含
editingChanged()函數和textField.addTarget()監聽器,用於偵測UITextField的任何變更。 editingChanged()函數使用@ObjCAction註解,以便它可以與 Objective-C 程式碼互通。addTarget()函數的action參數傳遞了editingChanged()函數的名稱,以響應UIControlEventEditingChanged事件來觸發它。- 當可觀察的訊息狀態變更其值時,會呼叫
UIKitView()的update參數。 - 該函數會更新
UITextField的text屬性,以便使用者看到更新過的值。
您可以在我們的範例專案中探索此範例的程式碼。
相機視圖
您可以使用 UIKit 的 AVCaptureSession 和 AVCaptureVideoPreviewLayer 元件在 Compose Multiplatform 中實作相機視圖。
這使得您的應用程式可以存取裝置的相機並顯示即時預覽。
以下是實作基本相機視圖的範例:
UIKitView(
    factory = {
        val session = AVCaptureSession().apply {
            val device = AVCaptureDevice.defaultDeviceWithMediaType(AVMediaTypeVideo)!!
            val input = AVCaptureDeviceInput.deviceInputWithDevice(device, null)!!
            addInput(input)
        }
        val previewLayer = AVCaptureVideoPreviewLayer(session)
        session.startRunning()

        object : UIView() {
            override fun layoutSubviews() {
                super.layoutSubviews()
                previewLayer.frame = bounds
            }
        }.apply {
            layer.addSublayer(previewLayer)
        }
    },
    modifier = Modifier.size(300.dp)
)
現在,讓我們看看一個進階範例。這段程式碼拍攝照片、附加 GPS 後設資料,並使用原生 UIView 顯示即時預覽:
@OptIn(ExperimentalForeignApi::class)
@Composable
fun RealDeviceCamera(
    camera: AVCaptureDevice,
    onCapture: (picture: PictureData.Camera, image: PlatformStorableImage) -> Unit
) {
    // Initializes AVCapturePhotoOutput for photo capturing
    val capturePhotoOutput = remember { AVCapturePhotoOutput() }
    // ...
    // Defines a delegate to capture callback: process image data, attach GPS, setup onCapture
    val photoCaptureDelegate = remember {
        object : NSObject(), AVCapturePhotoCaptureDelegateProtocol {
            override fun captureOutput(
                output: AVCapturePhotoOutput,
                didFinishProcessingPhoto: AVCapturePhoto,
                error: NSError?
            ) {
                val photoData = didFinishProcessingPhoto.fileDataRepresentation()
                if (photoData != null) {
                    val gps = locationManager.location?.toGps() ?: GpsPosition(0.0, 0.0)
                    val uiImage = UIImage(photoData)
                    onCapture(
                        createCameraPictureData(
                            name = nameAndDescription.name,
                            description = nameAndDescription.description,
                            gps = gps
                        ),
                        IosStorableImage(uiImage)
                    )
                }
                capturePhotoStarted = false
            }
        }
    }
    // ...
    // Sets up AVCaptureSession for photo capture
    val captureSession: AVCaptureSession = remember {
        AVCaptureSession().also { captureSession ->
            captureSession.sessionPreset = AVCaptureSessionPresetPhoto
            val captureDeviceInput: AVCaptureDeviceInput =
                deviceInputWithDevice(device = camera, error = null)!!
            captureSession.addInput(captureDeviceInput)
            captureSession.addOutput(capturePhotoOutput)
        }
    }
    // Sets up AVCaptureVideoPreviewLayer for the live camera preview
    val cameraPreviewLayer = remember {
        AVCaptureVideoPreviewLayer(session = captureSession)
    }
    // ...
    // Creates a native UIView with the native camera preview layer
    UIKitView(
        modifier = Modifier.fillMaxSize().background(Color.Black),
        factory = {
            val cameraContainer = object: UIView(frame = CGRectZero.readValue()) {
                override fun layoutSubviews() {
                    CATransaction.begin()
                    CATransaction.setValue(true, kCATransactionDisableActions)
                    layer.setFrame(frame)
                    cameraPreviewLayer.setFrame(frame)
                    CATransaction.commit()
                }
            }
            cameraContainer.layer.addSublayer(cameraPreviewLayer)
            cameraPreviewLayer.videoGravity = AVLayerVideoGravityResizeAspectFill
            captureSession.startRunning()
            cameraContainer
        },
    )
    // ...
    // Creates a Compose button that executes the capturePhotoWithSettings callback when pressed
    CircularButton(
        imageVector = IconPhotoCamera,
        modifier = Modifier.align(Alignment.BottomCenter).padding(36.dp),
        enabled = !capturePhotoStarted,
    ) {
        capturePhotoStarted = true
        val photoSettings = AVCapturePhotoSettings.photoSettingsWithFormat(
            format = mapOf(AVVideoCodecKey to AVVideoCodecTypeJPEG)
        )
        if (camera.position == AVCaptureDevicePositionFront) {
            capturePhotoOutput.connectionWithMediaType(AVMediaTypeVideo)
                ?.automaticallyAdjustsVideoMirroring = false
            capturePhotoOutput.connectionWithMediaType(AVMediaTypeVideo)
                ?.videoMirrored = true
        }
        capturePhotoOutput.capturePhotoWithSettings(
            settings = photoSettings,
            delegate = photoCaptureDelegate
        )
    }
}
"}
RealDeviceCamera 可組合項執行以下任務:
- 使用
AVCaptureSession和AVCaptureVideoPreviewLayer設定原生相機預覽。 - 建立一個
UIKitView,該UIKitView託管一個自訂的UIView子類別,後者管理佈局更新並嵌入預覽層。 - 初始化一個
AVCapturePhotoOutput並配置一個委派來處理照片拍攝。 - 使用
CLLocationManager(透過locationManager) 在拍攝時檢索 GPS 座標。 - 將拍攝的影像轉換為
UIImage,將其包裝為PlatformStorableImage,並透過onCapture提供諸如名稱、描述和 GPS 位置等後設資料。 - 顯示一個圓形可組合按鈕,用於觸發拍攝。
- 使用前置相機時應用鏡像設定,以符合自然自拍行為。
- 使用
CATransaction在layoutSubviews()中動態更新預覽佈局,以避免動畫。
若要在真實裝置上測試,您需要將
NSCameraUsageDescription鍵新增至應用程式的Info.plist檔案中。如果沒有它,應用程式將在執行時崩潰。
您可以在 ImageViewer 範例專案中探索此範例的完整程式碼。
網頁視圖
您可以使用 UIKit 的 WKWebView 元件在 Compose Multiplatform 中實作網頁視圖。這使得您的應用程式可以在 UI 中顯示並與網頁內容互動。透過使用 Compose Multiplatform 的 Modifier.size() 或 Modifier.fillMaxSize() 函數來設定元件大小:
UIKitView(
    factory = {
        WKWebView().apply {
            loadRequest(NSURLRequest(URL = NSURL(string = "https://www.jetbrains.com")))
        }
    },
    modifier = Modifier.size(300.dp)
)
現在,讓我們看看一個進階範例。這段程式碼配置了帶有導覽委派的網頁視圖,並允許 Kotlin 與 JavaScript 之間的通訊:
@Composable
fun WebViewWithDelegate(
    modifier: Modifier = Modifier,
    initialUrl: String = "https://www.jetbrains.com",
    onNavigationChange: (String) -> Unit = {}
) {
    // Creates a delegate to listen for navigation events
    val delegate = remember {
        object : NSObject(), WKNavigationDelegateProtocol {
            override fun webView(
                webView: WKWebView,
                didFinishNavigation: WKNavigation?
            ) {
                // Updates the current URL after navigation is complete
                onNavigationChange(webView.URL?.absoluteString ?: "")
            }
        }
    }
    UIKitView(
        modifier = modifier,
        factory = {
            // Instantiates a WKWebView and sets its delegate
            val webView = WKWebView().apply {
                navigationDelegate = delegate
                loadRequest(NSURLRequest(uRL = NSURL(string = initialUrl)))
            }
            webView
        },
        update = { webView ->
            // Reloads the web page if the URL changes
            if (webView.URL?.absoluteString != initialUrl) {
                webView.loadRequest(NSURLRequest(uRL = NSURL(string = initialUrl)))
            }
        }
    )
}
WebViewWithDelegate 可組合項執行以下任務:
- 建立一個穩定的委派物件,實作
WKNavigationDelegateProtocol介面。此物件使用 Compose 的remember在重新組合時被記住。 - 實例化一個
WKWebView,使用UIKitView嵌入它,並分配記住的委派來配置它。 - 載入由
initialUrl參數提供的初始網頁。 - 透過委派觀察導覽變更,並透過
onNavigationChange回呼傳遞目前的 URL。 - 使用
update參數來觀察請求 URL 中的變更,並相應地重新載入網頁。
接下來
您也可以探索 Compose Multiplatform 與 SwiftUI 框架整合的方式。
