將相依性新增至您的專案
本教學使用 IntelliJ IDEA,但您也可以在 Android Studio 中進行 —— 這兩款 IDE 共享相同的核心功能和 Kotlin Multiplatform 支援。
這是建立具有共享邏輯和原生 UI 的 Kotlin Multiplatform 應用程式教學的第三部分。在繼續之前,請確保您已完成前面的步驟。
![]()
您已經建立並調整了第一個 Kotlin Multiplatform 專案! 現在讓我們學習如何新增對第三方程式庫的相依性,這對於建置成功的跨平台應用程式至關重要。
相依性類型
在 Kotlin Multiplatform 專案中,您可以使用兩種類型的相依性:
多平台相依性 (Multiplatform dependencies)。這些是支援多個目標的多平台程式庫,可以在共通原始碼集
commonMain中使用。許多現代 Android 程式庫已經支援多平台,例如 Koin、Coil 和 SQLDelight。您可以在 klibs.io 上找到更多多平台程式庫,這是由 JetBrains 提供的搜尋服務,用於探索 Kotlin Multiplatform 程式庫。
原生相依性 (Native dependencies)。這些是來自特定生態系統的常規程式庫。 在原生專案中,您通常會透過平台專用工具來管理這些程式庫,例如在 Android 中使用 Gradle,在 iOS 中使用 Swift Package Manager。
當您處理多平台專案模組時,通常仍需要原生相依性來使用平台 API,例如安全儲存、系統呼叫等等。 在建置指令碼中,您可以在原生原始碼集(例如
androidMain和iosMain)的配置中指定原生相依性。
對於這兩種類型的相依性,您都可以使用本機和外部儲存庫。
新增多平台相依性
如果您有開發 Android 應用程式的經驗,新增多平台相依性與在一般 Android 專案中新增 Gradle 相依性非常相似。 唯一的區別在於您需要將其新增至特定的原始碼集,而不是整個模組。
讓我們讓問候語更具節日氛圍: 除了作業系統版本外,再新增一個功能來顯示距離元旦還有多少天。 kotlinx-datetime 程式庫具有完整的多平台支援,是在共享程式碼中處理日期的最便捷方式。
開啟
gradle/libs.versions.toml檔案,將kotlinx-datetime相依性新增至版本目錄:toml[versions] kotlinx-datetime = "0.8.0" [libraries] kotlinx-datetime = { module = "org.jetbrains.kotlinx:kotlinx-datetime", version.ref = "kotlinx-datetime" }開啟
sharedLogic/build.gradle.kts檔案,在配置共通程式碼原始碼集的區段中新增該程式庫項目的參考:kotlinkotlin { //... sourceSets { commonMain.dependencies { implementation(libs.kotlinx.datetime) } } }選取 Build | Sync Project with Gradle Files 功能表項目,或點擊建置指令碼編輯器中的 Sync Gradle Changes 按鈕以同步 Gradle 檔案:

呼叫 kotlinx-datetime API
新增相依性後,您可以在共通程式碼中加入日期和時間計算:
在
sharedLogic/src/commonMain/.../greetingkmp目錄上按右鍵,然後選取 New | Kotlin Class/File 以建立一個新檔案NewYear.kt。在
NewYear.kt中,新增兩個函式,使用datetime的日期運算來計算從今天到明年開始的天數,並組成要顯示的語句:kotlinfun daysUntilNewYear(): Int { val today = Clock.System.todayIn(TimeZone.currentSystemDefault()) val closestNewYear = LocalDate(today.year + 1, 1, 1) return today.daysUntil(closestNewYear) } fun daysPhrase(): String = "There are only ${daysUntilNewYear()} days left until New Year! 🎆"根據 IDE 的建議新增所有必要的匯入。 確保匯入的是
kotlin.time.Clock,而不是kotlinx.datetime.Clock。在
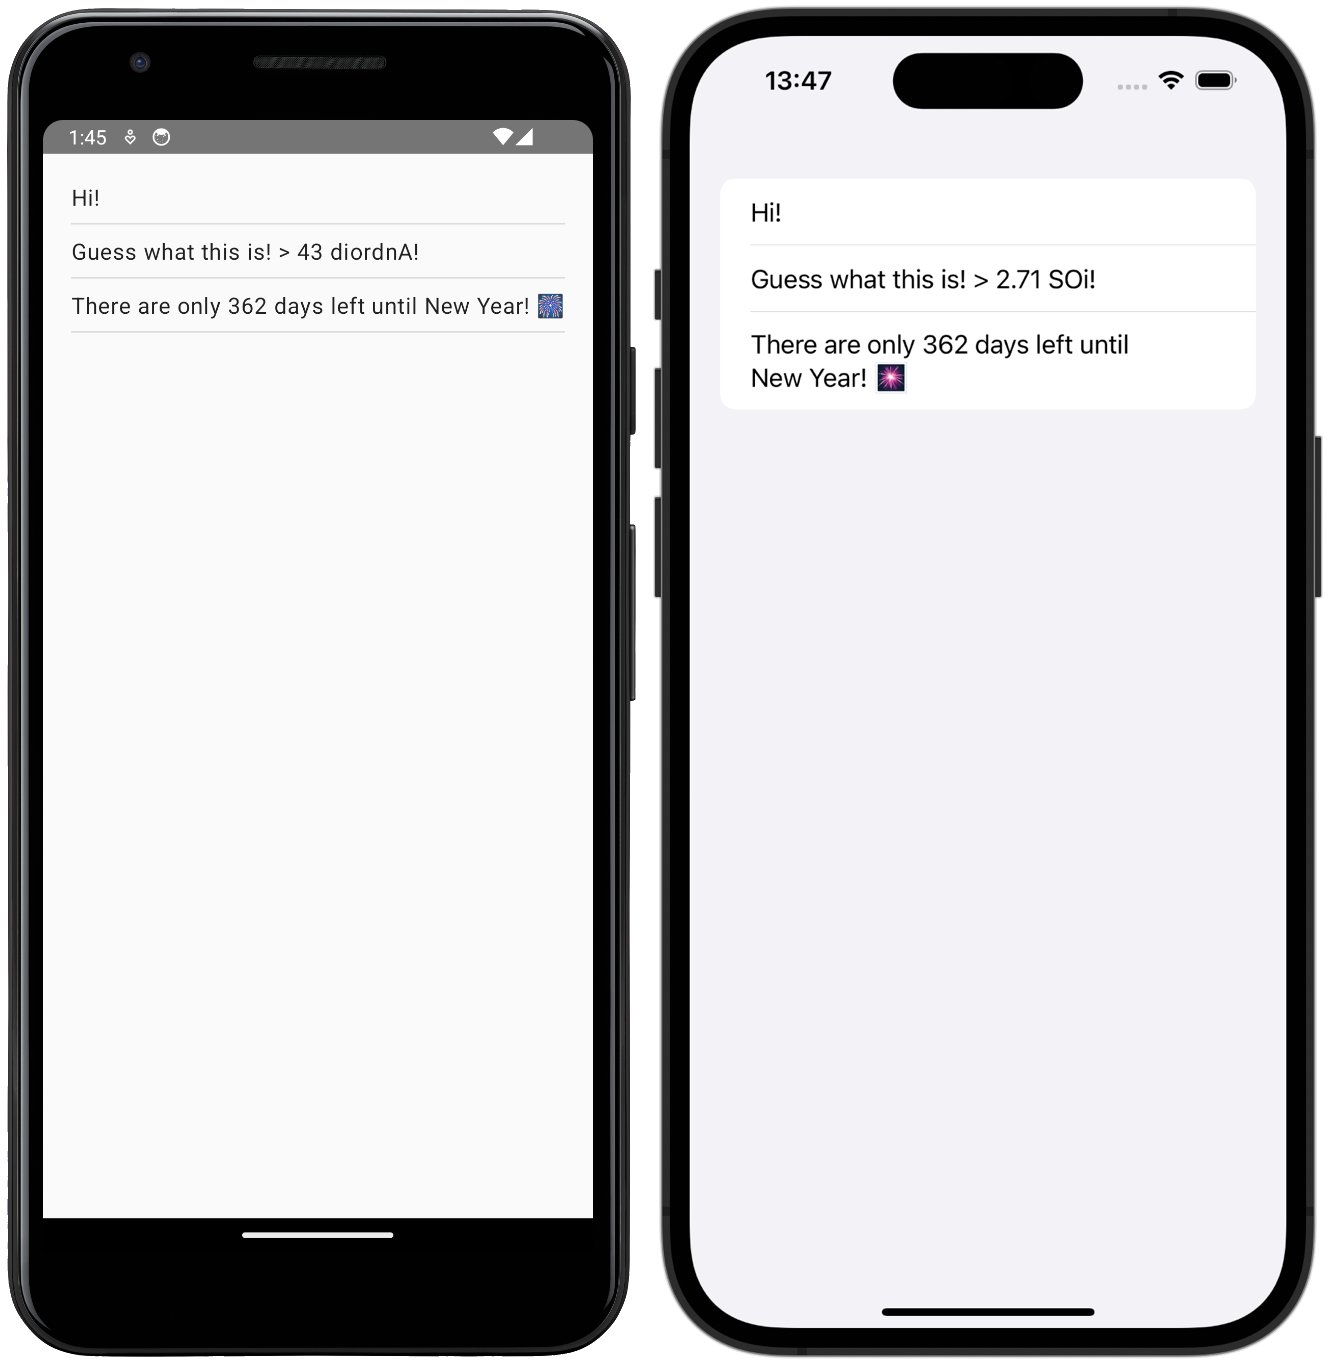
Greeting.kt檔案中,更新Greeting類別以查看結果:kotlinclass Greeting { private val platform: Platform = getPlatform() fun greet(): List<String> = buildList { add(if (Random.nextBoolean()) "Hi!" else "Hello!") add("Guess what this is! > ${platform.name.reversed()}!") add(daysPhrase()) } }要查看結果,請從 IntelliJ IDEA 重新執行您的 androidApp 和 iosApp 執行組態:
下一步
在教學的下一部分中,您將在專案中新增更多相依性和更複雜的邏輯。
延伸閱讀
- 了解如何處理各種類型的多平台相依性:Kotlin 程式庫、Kotlin Multiplatform 程式庫和其他多平台專案。
- 了解如何新增 Android 相依性以及使用或不使用 CocoaPods 新增 iOS 相依性,以便在平台專用的原始碼集中使用。
- 查看範例專案中如何使用 Android 和 iOS 程式庫的範例。
獲取協助
- Kotlin Slack。獲取邀請並加入 #multiplatform 頻道。
- Kotlin 問題追蹤器。回報新問題。