在 iOS 與 Android 之間共享更多邏輯
本教學使用 IntelliJ IDEA,但您也可以在 Android Studio 中進行 —— 這兩款 IDE 共享相同的核心功能與 Kotlin Multiplatform 支援。
這是使用共享邏輯與原生 UI 建立 Kotlin Multiplatform 應用程式教學的第四部分。在繼續之前,請確保您已完成前面的步驟。
![]()
既然您已經使用外部相依性實作了通用邏輯,現在可以開始加入更複雜的邏輯。網路請求與資料序列化是使用 Kotlin Multiplatform 共享程式碼最受歡迎的使用案例。了解如何在您的第一個應用程式中實作這些功能,以便在完成此引導歷程後,將其應用於未來的專案中。
更新後的應用程式將透過網際網路從 LaunchLibrary 2 API 擷取資料,並顯示 SpaceX 火箭最後一次成功發射的日期。
您可以在我們 GitHub 存儲庫的兩個分支中找到專案的最終狀態,分別使用了不同的協同程式解決方案:
新增更多相依性
您需要在專案中新增以下多平台程式庫:
kotlinx.coroutines:用於非同步操作的協同程式。kotlinx.serialization:用於將 SpaceX API 的 JSON 回應反序列化為實體類別的物件,以便處理網路操作。- Ktor:一個用於透過 HTTP 傳送與擷取資料的架構。
更新 Gradle 版本目錄
將以下項目新增至 gradle/libs.versions.toml,然後同步 Gradle 檔案,使這些參考可在組建組態程式碼中使用:
[versions]
coroutinesVersion = "1.10.2"
ktorVersion = "3.3.3"
# A Kotlin version should already be set in the catalog
kotlin = "2.3.0"

[libraries]
kotlinx-coroutines = { module = "org.jetbrains.kotlinx:kotlinx-coroutines-core", version.ref = "coroutinesVersion" }
ktor-client-core = { module = "io.ktor:ktor-client-core", version.ref = "ktorVersion" }
ktor-client-content-negotiation = { module = "io.ktor:ktor-client-content-negotiation", version.ref = "ktorVersion" }
ktor-serialization-kotlinx-json = { module = "io.ktor:ktor-serialization-kotlinx-json", version.ref = "ktorVersion" }
ktor-client-darwin = { module = "io.ktor:ktor-client-darwin", version.ref = "ktor" }
ktor-client-android = { module = "io.ktor:ktor-client-android", version.ref = "ktor" }

[plugins]
kotlinSerialization = { id = "org.jetbrains.kotlin.plugin.serialization", version.ref = "kotlin" }
將相依性新增至對應的原始碼集
將程式庫參考新增至 sharedLogic/build.gradle.kts 檔案中對應的原始碼集:
plugins {
    // ...
    alias(libs.plugins.kotlinSerialization)
}

kotlin {
    sourceSets {
        commonMain.dependencies {
            // ...
            // Kotlin Multiplatform Gradle 外掛程式會自動
            // 新增平台特定的協同程式構件
            implementation(libs.kotlinx.coroutines.core)
            // Ktor 核心相依性
            implementation(libs.ktor.client.core)
            // 允許 Ktor 使用特定格式進行序列化的
            // 相依性
            implementation(libs.ktor.client.content.negotiation)
            implementation(libs.ktor.serialization.kotlinx.json)
        }
        androidMain.dependencies {
            // 提供 Ktor 的 Android 引擎
            implementation(libs.ktor.client.android)
        }
        iosMain.dependencies {
            // 提供 Ktor 的 Darwin 引擎
            implementation(libs.ktor.client.darwin)
        }
    }
}
點擊 Sync Gradle Changes 按鈕同步 Gradle 檔案。
設定 API 請求
您將使用 Launch Library API 來擷取資料,特別是來自 /2.3.0/launches 端點的所有發射清單。
建立資料模型
在 sharedLogic/src/commonMain/.../greetingkmp 目錄中,建立一個新的 RocketLaunch.kt 檔案,並新增一個用於儲存來自 SpaceX API 資料的資料類別:
import kotlinx.serialization.SerialName
import kotlinx.serialization.Serializable

@Serializable
data class RocketLaunch(
    @SerialName("id")
    val id: String,
    @SerialName("name")
    val missionName: String,
    @SerialName("net")
    val launchDateUTC: String,
    @SerialName("status")
    val status: LaunchStatus,
)

@Serializable
data class LaunchStatus(
    @SerialName("id")
    val id: Int,
    @SerialName("name")
    val name: String,
)

@Serializable
data class LaunchListResponse(
    @SerialName("results")
    val results: List<RocketLaunch>,
)RocketLaunch類別標記有@Serializable註解,以便kotlinx.serialization外掛程式可以自動為其產生預設序列化器。@SerialName註解允許您重新定義欄位名稱,從而可以在資料類別中宣告具有更易讀名稱的屬性。
連接 HTTP 用戶端
在
sharedLogic/src/commonMain/.../greetingkmp目錄中,建立一個新的RocketComponent類別。新增
httpClient屬性,透過 HTTP GET 請求擷取火箭發射資訊:kotlinimport io.ktor.client.HttpClient import io.ktor.client.plugins.contentnegotiation.ContentNegotiation import io.ktor.serialization.kotlinx.json.json import kotlinx.serialization.json.Json class RocketComponent { private val httpClient = HttpClient { install(ContentNegotiation) { json(Json { prettyPrint = true isLenient = true ignoreUnknownKeys = true }) } } }- Ktor 的
ContentNegotiation外掛程式與 JSON 序列化器會反序列化 GET 請求的結果。 - 此處的 JSON 序列化器配置為:透過
prettyPrint屬性以更易讀的方式列印 JSON;透過isLenient在讀取格式不良的 JSON 時更具彈性;並透過ignoreUnknownKeys忽略火箭發射模型中未宣告的鍵。
- Ktor 的
在
RocketComponent中新增getDateOfLastSuccessfulLaunch()掛起函式,它將非同步擷取火箭發射資訊:kotlinimport io.ktor.client.request.get import io.ktor.client.call.body class RocketComponent { // ... private suspend fun getDateOfLastSuccessfulLaunch(): String { val rockets: List<RocketLaunch> = httpClient.get("https://api.spacexdata.com/v4/launches").body() // 目前先以虛設常式日期初始化 val date: String = "October 5, 2026" return "$date" } }httpClient.get()也是一個掛起函式,因為它需要透過網路非同步擷取資料而不會阻塞執行緒。- 掛起函式只能從協同程式或其他掛起函式中呼叫。這就是為什麼
getDateOfLastSuccessfulLaunch()被標記了suspend關鍵字。網路請求會在 HTTP 用戶端的執行緒池中執行。
在 HTTP 請求呼叫之後,加入獲取清單中最後一次成功發射的呼叫(發射清單已按日期從最早到最晚排序):
kotlinclass RocketComponent { // ... private suspend fun getDateOfLastSuccessfulLaunch(): String { val response: LaunchListResponse = httpClient.get("https://lldev.thespacedevs.com/2.3.0/launches/previous/?mode=list&limit=10&format=json").body() val lastSuccessLaunch = response.results.first { it.status.id == 3 } val date: String = "October 5, 2026" return "$date" } }將發射的 UTC 日期與時間轉換為您的本機日期,並將結果指派給
date。然後傳回格式化後的輸出:kotlinimport kotlinx.datetime.TimeZone import kotlinx.datetime.toLocalDateTime import kotlin.time.ExperimentalTime import kotlin.time.Instant class RocketComponent { // ... private suspend fun getDateOfLastSuccessfulLaunch(): String { val response: LaunchListResponse = httpClient.get("https://lldev.thespacedevs.com/2.3.0/launches/previous/?mode=list&limit=10&format=json").body() val lastSuccessLaunch = response.results.first { it.status.id == 3 } val date = Instant.parse(lastSuccessLaunch.launchDateUTC) .toLocalDateTime(TimeZone.currentSystemDefault()) return "${date.month} ${date.day}, ${date.year}" } }日期將以 "MMMM DD, YYYY" 格式顯示,例如 "OCTOBER 5, 2022"。
在同一個類別中,新增另一個掛起函式
launchPhrase(),它將使用getDateOfLastSuccessfulLaunch()函式建立訊息:kotlinclass RocketComponent { // ... suspend fun launchPhrase(): String = try { "The last successful launch was on ${getDateOfLastSuccessfulLaunch()} 🚀" } catch (e: Exception) { println("Exception during getting the date of the last successful launch $e") "Error occurred" } }
建立協同程式 Flow
除了簡單地呼叫掛起函式之外,當您需要產生一系列值時,可以使用 Flow。 Flow 可以在產生值時發射一系列值,而不是像掛起函式那樣僅傳回單個值。
開啟
shared/src/commonMain/kotlin目錄中的Greeting.kt檔案。在
Greeting類別中新增一個rocketComponent屬性。該屬性將儲存包含最後一次成功發射日期的訊息:kotlinclass Greeting { private val rocketComponent = RocketComponent() //... }修改
greet()函式以傳回Flow:kotlinimport kotlinx.coroutines.delay import kotlinx.coroutines.flow.Flow import kotlinx.coroutines.flow.flow import kotlin.time.Duration.Companion.seconds class Greeting { // ... fun greet(): Flow<String> = flow { emit(if (Random.nextBoolean()) "Hi!" else "Hello!") delay(1.seconds) emit("Guess what this is! > ${platform.name.reversed()}") delay(1.seconds) emit(daysPhrase()) emit(rocketComponent.launchPhrase()) } }- 此處使用
flow()建構函式建立Flow,它封裝了所有陳述式。 - 此
Flow發射字串,每兩次發射之間延遲 1 秒。最後一個元素僅在網路回應傳回後發射,因此確切的延遲取決於您的網路。
- 此處使用
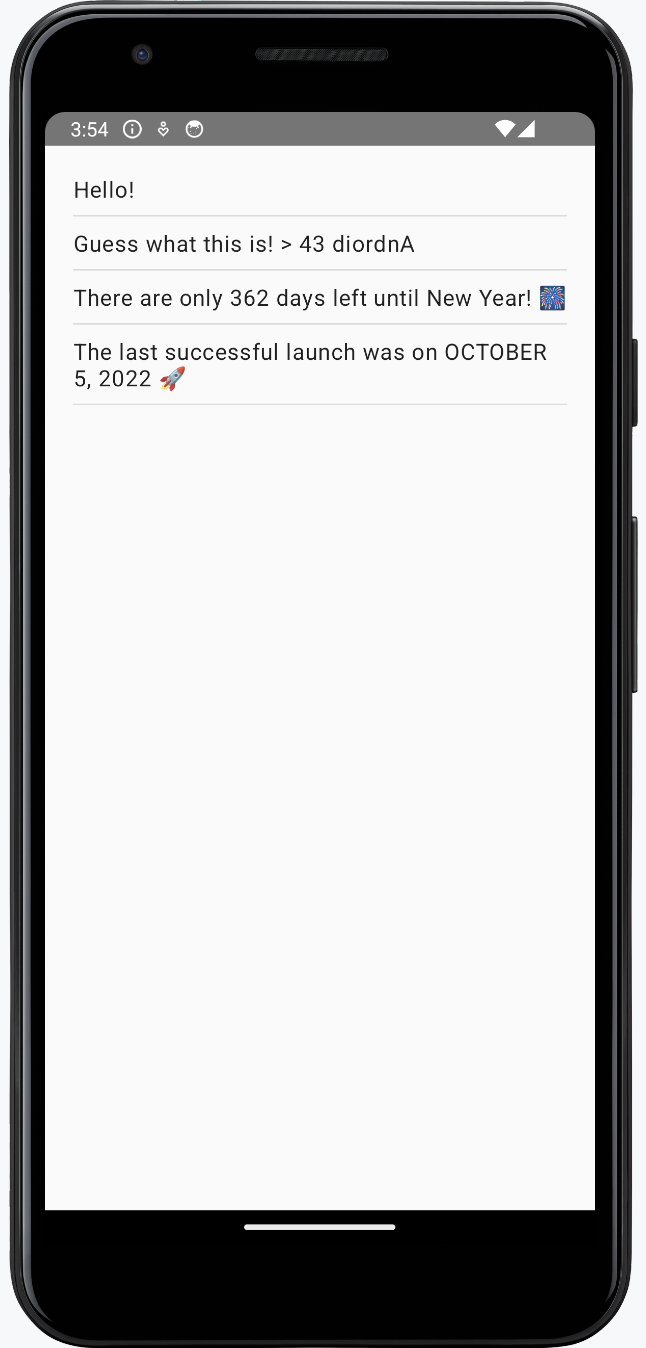
您已經透過將 greet() 函式的傳回型別更改為 Flow 更新了共享模組的 API。現在您需要更新專案的原生部分,以便它們能夠正確處理呼叫 greet() 函式的結果。
更新原生 Android UI
由於共享模組和 Android 應用程式都是用 Kotlin 編寫的,從 Android 使用共享程式碼非常簡單。
引入 ViewModel
ViewModel 是 Android 開發中常見的模式,有助於管理資料與其他應在 Android Activity 生命週期中持續存在的應用程式元件。 現在應用程式變得更加複雜,是時候在我們的應用程式中也引入 ViewModel 了。 它將儲存從 SpaceX API 接收到的資料,並將其提供給 UI。
在 Android 平台程式碼中建立 ViewModel 類別:
在
sharedUI/src/commonMain/.../greetingkmp目錄中,建立一個新的MainViewModelKotlin 類別:kotlinimport androidx.lifecycle.ViewModel class MainViewModel : ViewModel() { // ... }此類別繼承了 Android 的
ViewModel類別,以符合平台對生命週期和組態變更的預期。建立一個 StateFlow 型別的
greetingList值及其支援屬性:kotlinimport kotlinx.coroutines.flow.MutableStateFlow import kotlinx.coroutines.flow.StateFlow class MainViewModel : ViewModel() { private val _greetingList = MutableStateFlow<List<String>>(listOf()) val greetingList: StateFlow<List<String>> get() = _greetingList }- 此處的
StateFlow繼承了Flow介面,但具有單一的值或狀態。 - 私有支援屬性
_greetingList確保只有此類別的用戶端可以存取唯讀的greetingList屬性。
- 此處的
在 ViewModel 的
init函式中,收集來自Greeting().greet()Flow 的所有字串:kotlinimport androidx.lifecycle.viewModelScope import kotlinx.coroutines.launch class MainViewModel : ViewModel() { private val _greetingList = MutableStateFlow<List<String>>(listOf()) val greetingList: StateFlow<List<String>> get() = _greetingList init { viewModelScope.launch { Greeting().greet().collect { phrase -> //... } } } }由於
Flow.collect()函式是掛起的,因此在 ViewModel 的作用域內使用launch協同程式。這代表launch協同程式僅在 ViewModel 生命週期的正確階段執行。在
collect尾隨 Lambda 內部,使用update()函式將收集到的phrase附加到_greetingList中的片語清單:kotlinimport kotlinx.coroutines.flow.update class MainViewModel : ViewModel() { //... init { viewModelScope.launch { Greeting().greet().collect { phrase -> _greetingList.update { list -> list + phrase } } } } }
使用 ViewModel 的 Flow
在
sharedUI/src/commonMain/.../greetingkmp中,開啟App.kt檔案並進行更新,取代之前的實作以使用新實作的 ViewModel:kotlinimport androidx.lifecycle.compose.collectAsStateWithLifecycle import androidx.compose.runtime.getValue import androidx.lifecycle.viewmodel.compose.viewModel @Composable @Preview fun App(mainViewModel: MainViewModel = viewModel()) { MaterialTheme { val greetings by mainViewModel.greetingList.collectAsStateWithLifecycle() Column( modifier = Modifier .safeContentPadding() .fillMaxSize(), verticalArrangement = Arrangement.spacedBy(8.dp), ) { greetings.forEach { greeting -> Text(greeting) HorizontalDivider() } } } }collectAsStateWithLifecycle()函式呼叫greetingList以從 ViewModel 的 Flow 中收集值,並以生命週期感知的方式將其表示為 composable 狀態。- 當新的 Flow 建立時,組合狀態將會改變,並顯示一個可捲動的
Column,其中包含垂直排列並由分隔線隔開的問候片語。
新增網際網路存取權限
為了存取網際網路,Android 應用程式需要適當的權限。由於所有網路請求都是從共享模組發出的,因此在該模組的資訊清單中新增網際網路存取權限是合理的。
使用存取權限更新您的 androidApp/src/main/AndroidManifest.xml 檔案:
<?xml version="1.0" encoding="utf-8"?>
<manifest xmlns:android="http://schemas.android.com/apk/res/android">
    <uses-permission android:name="android.permission.INTERNET"/>
    ...
</manifest>
執行應用程式
若要查看最終結果,請重新執行您的 androidApp 執行組態:
更新原生 iOS UI
對於專案的 iOS 部分,您將利用 Model–view–viewmodel 模式(如同您在 Android 應用程式中所做的那樣),將 UI 連接到 sharedLogic 模組。
該模組已透過 import SharedLogic 宣告匯入到 ContentView.swift 檔案中。
引入 ViewModel
在 iosApp/ContentView.swift 中,為 ContentView 建立一個 ViewModel 類別,它將為其準備與管理資料。在 task() 呼叫中呼叫 startObserving() 函式以支援並行:
import SwiftUI
import SharedLogic

struct ContentView: View {
    @ObservedObject private(set) var viewModel: ViewModel

    var body: some View {
        ListView(phrases: viewModel.greetings)
            .task { await self.viewModel.startObserving() }
    }
}

extension ContentView {
    @MainActor
    class ViewModel: ObservableObject {
        @Published var greetings: Array<String> = []

        func startObserving() {
            // ...
        }
    }
}

struct ListView: View {
    let phrases: Array<String>

    var body: some View {
        List(phrases, id: \.self) {
            Text($0)
        }
    }
}ViewModel被宣告為ContentView的擴充,因為它們緊密相連。ViewModel具有一個greetings屬性,它是一個String片語陣列。
SwiftUI 將視圖模型 (ContentView.ViewModel) 與視圖 (ContentView) 連接起來:
ContentView.ViewModel被宣告為ObservableObject。ContentView中viewModel屬性的@ObservedObject包裝器會將視圖訂閱至視圖模型。- 視圖模型的
greetings屬性使用@Published包裝器。它允許 SwiftUI 在此屬性變更時自動更新視圖。
現在您需要實作 startObserving() 函式來取用 Flow。
選擇一個程式庫在 iOS 中取用 Flow
在本教學中,您可以使用 SKIE 或 KMP-NativeCoroutines 程式庫來協助您在 iOS 中處理 Flow。 兩者都是開源解決方案,支援 Flow 的取消與泛型,而 Kotlin/Native 編譯器目前預設尚未提供這些功能:
- KMP-NativeCoroutines 程式庫透過產生必要的包裝函式,協助您從 iOS 取用掛起函式與 Flow。KMP-NativeCoroutines 支援 Swift 的
async/await功能以及 Combine 和 RxSwift. 使用 KMP-NativeCoroutines 需要在 iOS 專案中新增 SwiftPM 或 CocoaPod 相依性。 - SKIE 程式庫增強了 Kotlin 編譯器產生的 Objective-C API:SKIE 將 Flow 轉換為等同於 Swift 的
AsyncSequence。SKIE 直接支援 Swift 的async/await,無執行緒限制,並具有自動雙向取消功能(Combine 和 RxSwift 需要適配器)。SKIE 提供其他功能,以便從 Kotlin 產生 Swift 友善的 API,包括將各種 Kotlin 型別橋接至 Swift 的對等型別。它也不需要在 iOS 專案中新增額外的相依性。
選項 1. 設定 KMP-NativeCoroutines
我們建議使用程式庫的最新版本。請查看 KMP-NativeCoroutines 存儲庫以確認是否有更新版本的外掛程式可用,以及它是否與您的 Kotlin 版本相容。
將 KMP-NativeCoroutines 版本與外掛程式參考新增至 Gradle 版本目錄:
toml[versions] kmpNativeCoroutines = "1.0.0-ALPHA-45" [plugins] kmpNativeCoroutines = { id = "com.rickclephas.kmp.nativecoroutines", version.ref = "kmpNativeCoroutines" }在您專案的根目錄
build.gradle.kts檔案中(不是shared/build.gradle.kts檔案),將 KMP-NativeCoroutines 外掛程式新增至plugins {}區塊:kotlinplugins { // ... alias(libs.plugins.kmpNativeCoroutines) apply false }在
sharedLogic/build.gradle.kts檔案中,將 KMP-NativeCoroutines 外掛程式新增至plugins {}區塊:kotlinplugins { // ... alias(libs.plugins.kmpNativeCoroutines) }在同一個
sharedLogic/build.gradle.kts檔案中,啟用實驗性的@ObjCName註解:kotlinkotlin { // ... sourceSets{ all { languageSettings { optIn("kotlin.experimental.ExperimentalObjCName") } } // ... } }點擊 Sync Gradle Changes 按鈕同步 Gradle 檔案。
使用 KMP-NativeCoroutines 標記 Flow
開啟
sharedLogic/src/commonMain/kotlin目錄中的Greeting.kt檔案。將
@NativeCoroutines註解新增至greet()函式。這將確保外掛程式產生正確的程式碼,以支援在 iOS 上的正確 Flow 處理:kotlinimport com.rickclephas.kmp.nativecoroutines.NativeCoroutines class Greeting { // ... @NativeCoroutines fun greet(): Flow<String> = flow { // ... } }
在 Xcode 中使用 SwiftPM 匯入程式庫
安裝 KMP-NativeCoroutines Swift 套件中配合 async/await 機制運作所需的部分。
前往 File | Open Project in Xcode。
在 Xcode 中,右鍵點擊左側功能表中的
iosApp專案,然後選擇 Add Package Dependencies。在搜尋列中輸入套件名稱:
nonehttps://github.com/rickclephas/KMP-NativeCoroutines.git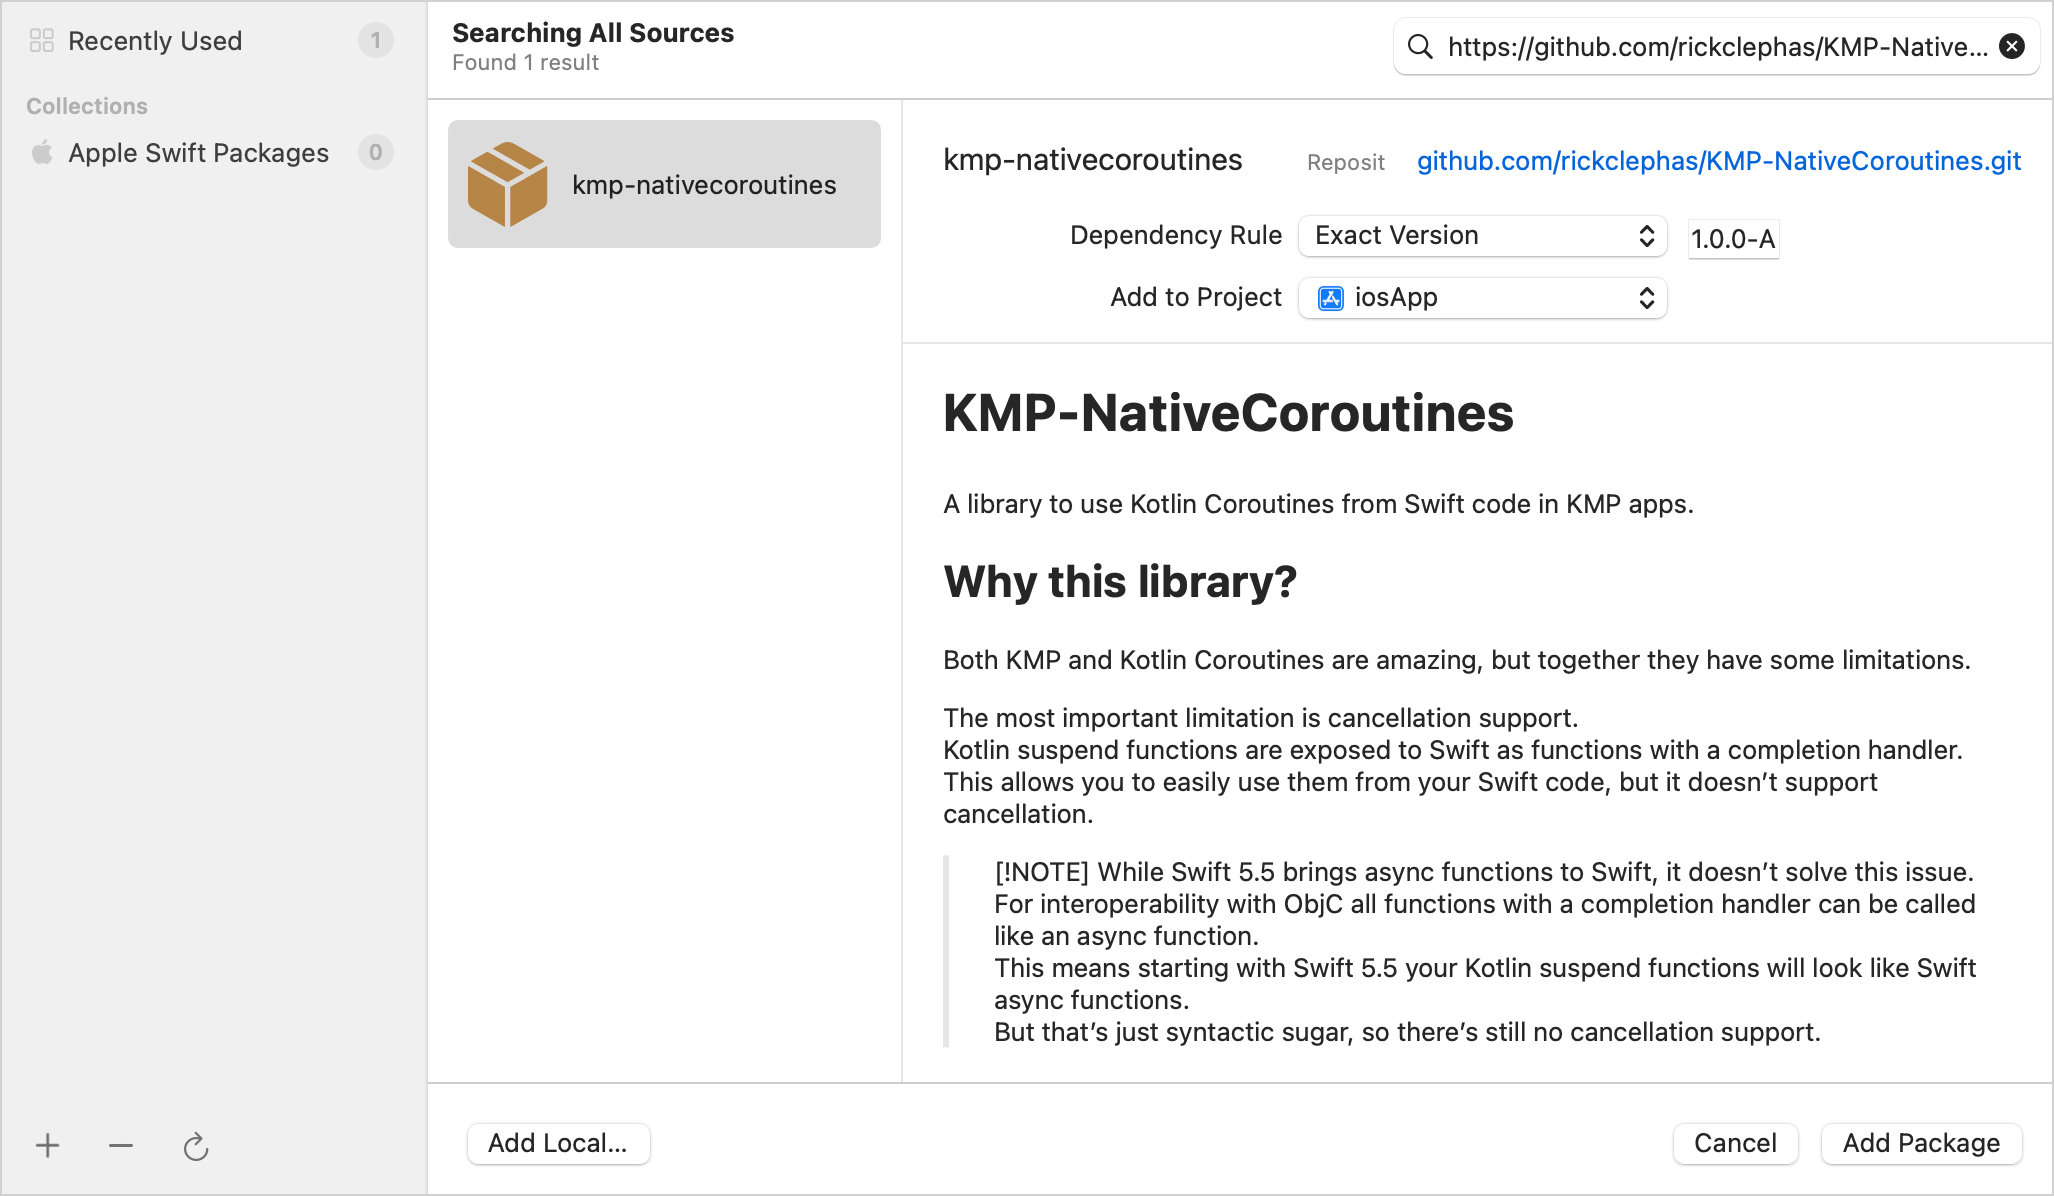
在 Dependency Rule 下拉式功能表中,選擇 Exact Version 項目並在相鄰欄位中輸入
1.0.0-ALPHA-45版本。點擊 Add Package 按鈕。Xcode 將從 GitHub 獲取套件並開啟另一個視窗以選擇套件產品。
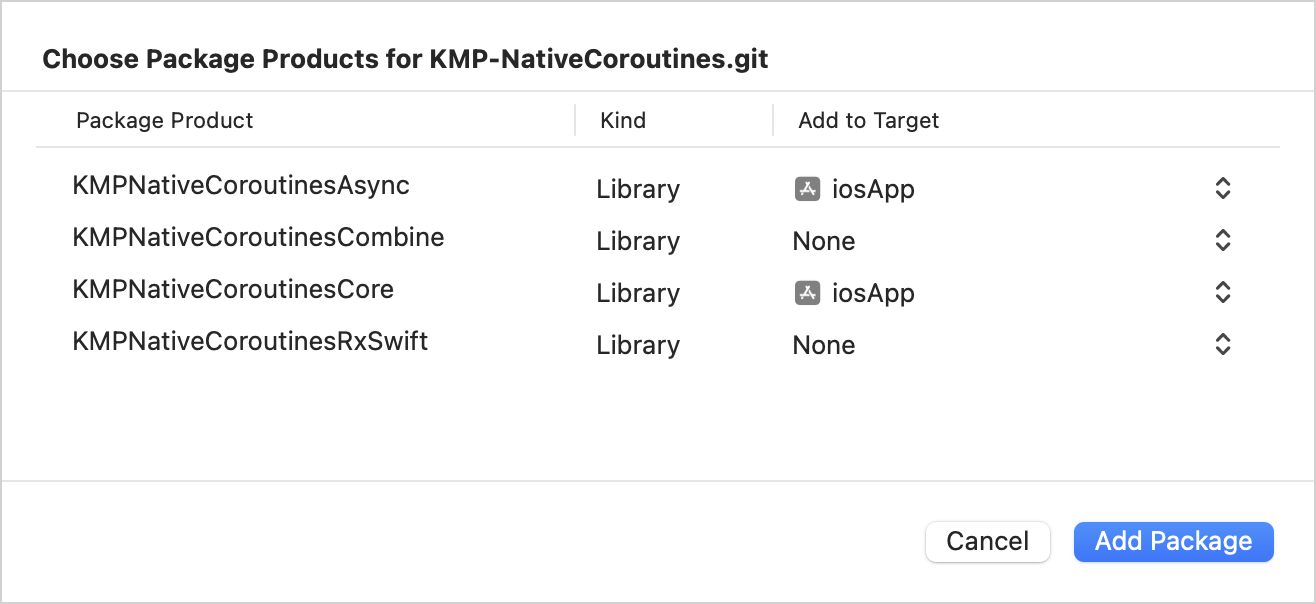
將 "KMPNativeCoroutinesAsync" 和 "KMPNativeCoroutinesCore" 新增至您的應用程式(如下圖所示),然後點擊 Add Package:
返回 IntelliJ IDEA 並選擇 Tools | Swift Package Manager | Resolve Dependencies 選單項目。這會建立一個
Package.resolved鎖定檔案,供 Kotlin 建置使用,並且可以提交到儲存庫中以保持 Swift 套件版本的一致性。
使用 KMP-NativeCoroutines 程式庫取用 Flow
在
iosApp/ContentView.swift中,更新startObserving()函式,對Greeting().greet()函式使用 KMP-NativeCoroutine 的asyncSequence()函式來取用 Flow:Swiftfunc startObserving() async { do { let sequence = asyncSequence(for: Greeting().greet()) for try await phrase in sequence { self.greetings.append(phrase) } } catch { print("Failed with error: \(error)") } }此處使用迴圈與
await機制來逐一查看 Flow,並在 Flow 每次發射值時更新greetings屬性。確保
ViewModel標記有@MainActor註解。該註解確保ViewModel內的所有非同步操作都在主執行緒上執行,以符合 Kotlin/Native 的要求:Swift// ... import KMPNativeCoroutinesAsync import KMPNativeCoroutinesCore // ... extension ContentView { @MainActor class ViewModel: ObservableObject { @Published var greetings: Array<String> = [] func startObserving() async { do { let sequence = asyncSequence(for: Greeting().greet()) for try await phrase in sequence { self.greetings.append(phrase) } } catch { print("Failed with error: \(error)") } } } }
選項 2. 設定 SKIE
若要設定程式庫,請將 SKIE 版本與外掛程式參考新增至您的 Gradle 版本目錄:
[versions]
skie = "0.10.6"

[plugins]
skie = { id = "co.touchlab.skie", version.ref = "skie" }
SKIE 可能不支援最新的 Kotlin 版本。如果您的 Kotlin 版本太新,在 Gradle 同步期間會回報此情況,並附上您可以安全降級到的版本清單。
然後將其新增至 sharedLogic/build.gradle.kts 檔案中的外掛程式清單中,並點擊 Sync Gradle Changes 按鈕:
plugins {
    //...
    alias(libs.plugins.skie)
}
使用 SKIE 取用 Flow
您將使用迴圈與 await 機制來逐一查看 Greeting().greet() Flow,並在 Flow 每次發射值時更新 greetings 屬性。
IntelliJ IDEA 和 Android Studio 在使用 SKIE 時,可能會誤報呼叫 Kotlin 程式碼時的 Swift 錯誤。這是該程式庫的一個已知問題,不會影響應用程式的建置與執行。
確保 ViewModel 標記有 @MainActor 註解。該註解確保 ViewModel 內的所有非同步操作都在主執行緒上執行,以符合 Kotlin/Native 的要求:
// ...
extension ContentView {
    @MainActor
    class ViewModel: ObservableObject {
        @Published var greetings: [String] = []

        func startObserving() async {
            for await phrase in Greeting().greet() {
                self.greetings.append(phrase)
            }
        }
    }
}
取用 ViewModel 並執行 iOS 應用程式
在 iosApp/iOSApp.swift 中,更新您應用程式的進入點:
@main
struct iOSApp: App {
   var body: some Scene {
       WindowGroup {
           ContentView(viewModel: ContentView.ViewModel())
       }
   }
}
從 IntelliJ IDEA 執行 iosApp 組態,以確保您的應用程式邏輯已同步:
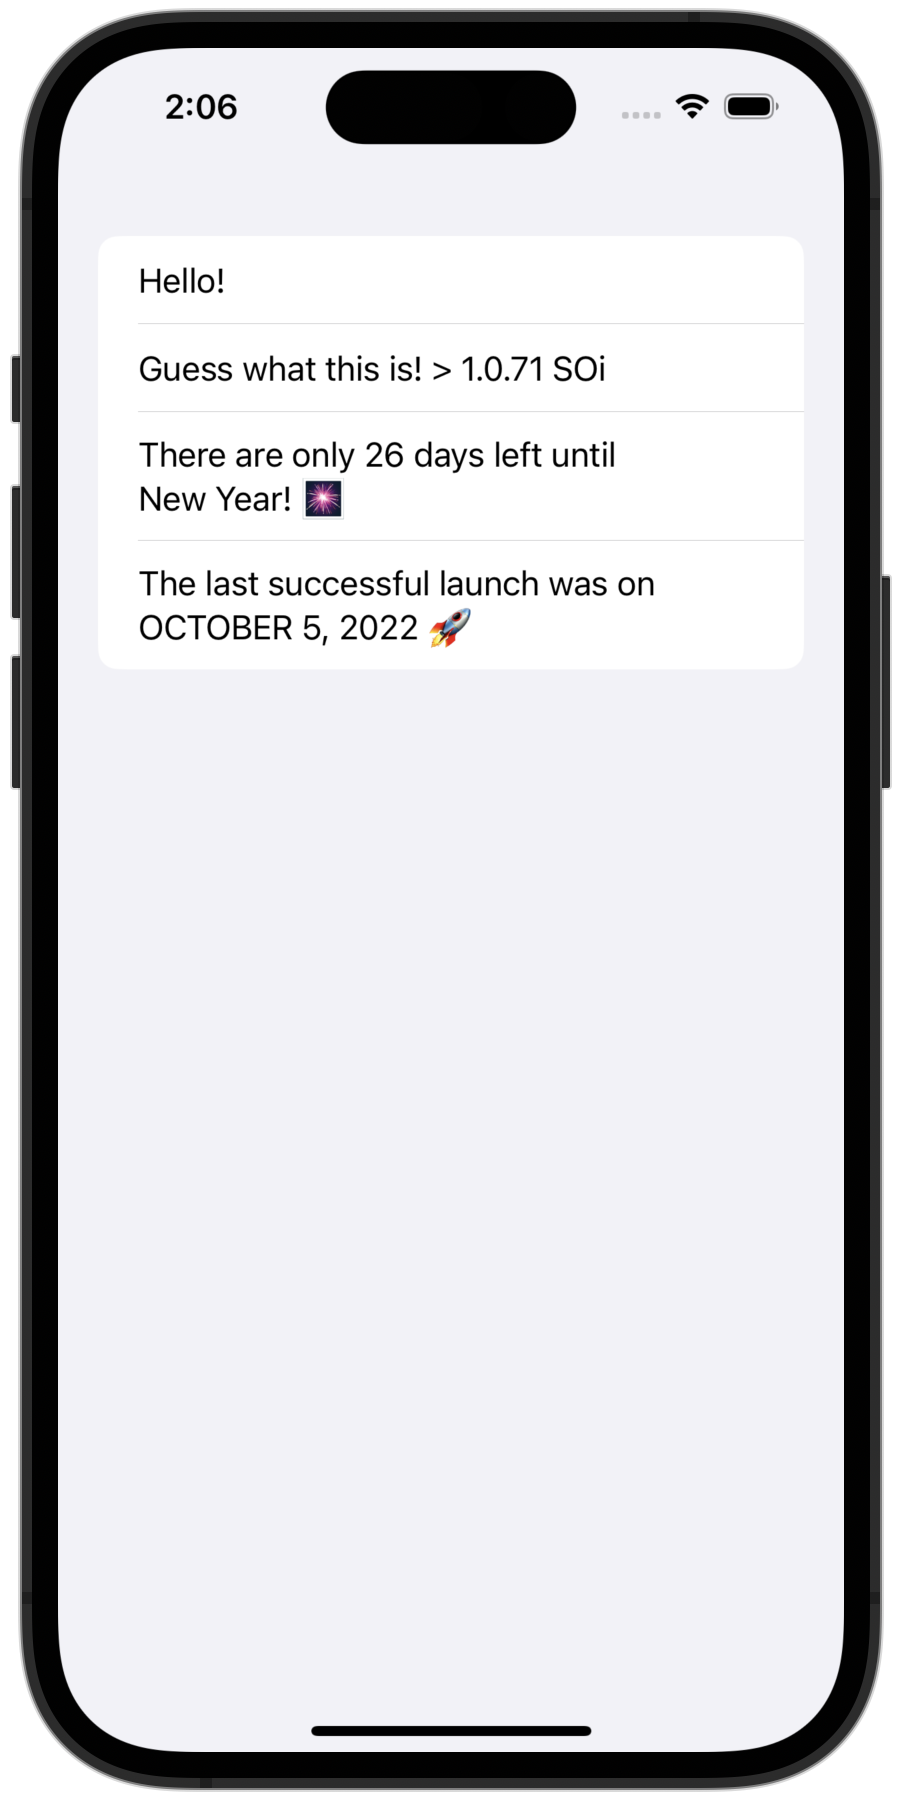
您可以在我們 GitHub 存儲庫的兩個分支中找到專案的最終狀態,分別使用了不同的協同程式解決方案:
下一步
在教學的最後一部分,您將完成您的專案,並瞭解接下來該採取哪些步驟。
延伸閱讀
- 探索組合掛起函式的各種方法。
- 進一步了解與 Objective-C 架構及程式庫的互通性。
- 完成此關於網路與資料儲存的教學。
獲取協助
- Kotlin Slack。獲取邀請並加入 #multiplatform 頻道。
- Kotlin 問題追蹤器。回報新問題。