使用 Ktor 與 SQLDelight 建立多平台應用程式
本教學使用 IntelliJ IDEA,但您也可以在 Android Studio 中進行 —— 這兩款 IDE 共享相同的核心功能與 Kotlin Multiplatform 支援。
本教學將示範如何使用 IntelliJ IDEA 透過 Kotlin Multiplatform 建立適用於 iOS 與 Android 的進階行動應用程式。 此應用程式將會:
- 透過 Ktor 從公開的 SpaceX API 經由網際網路擷取資料。
- 使用 SQLDelight 將資料儲存至本機資料庫。
- 顯示 SpaceX 火箭發射列表,包含發射日期、結果以及發射的詳細描述。
該應用程式將包含一個具有 iOS 與 Android 平台共用程式碼的模組。商業邏輯與資料存取層僅需在共用模組中實作一次,而雙平台的 UI 則將採用原生實作。
您將在專案中使用以下多平台程式庫:
- Ktor 作為 HTTP 用戶端,用於經由網際網路擷取資料。
kotlinx.serialization用於將 JSON 回應還原序列化為實體類別的物件。kotlinx.coroutines用於編寫非同步程式碼。- SQLDelight 用於從 SQL 查詢產生 Kotlin 程式碼,並建立型別安全的資料庫 API。
- Koin 用於透過相依注入提供平台專屬的資料庫驅動程式。
您可以在我們的 GitHub 存儲庫中找到專案範本以及最終應用程式的原始碼。
建立專案
在快速入門指南中,完成設定 Kotlin Multiplatform 開發環境的說明。
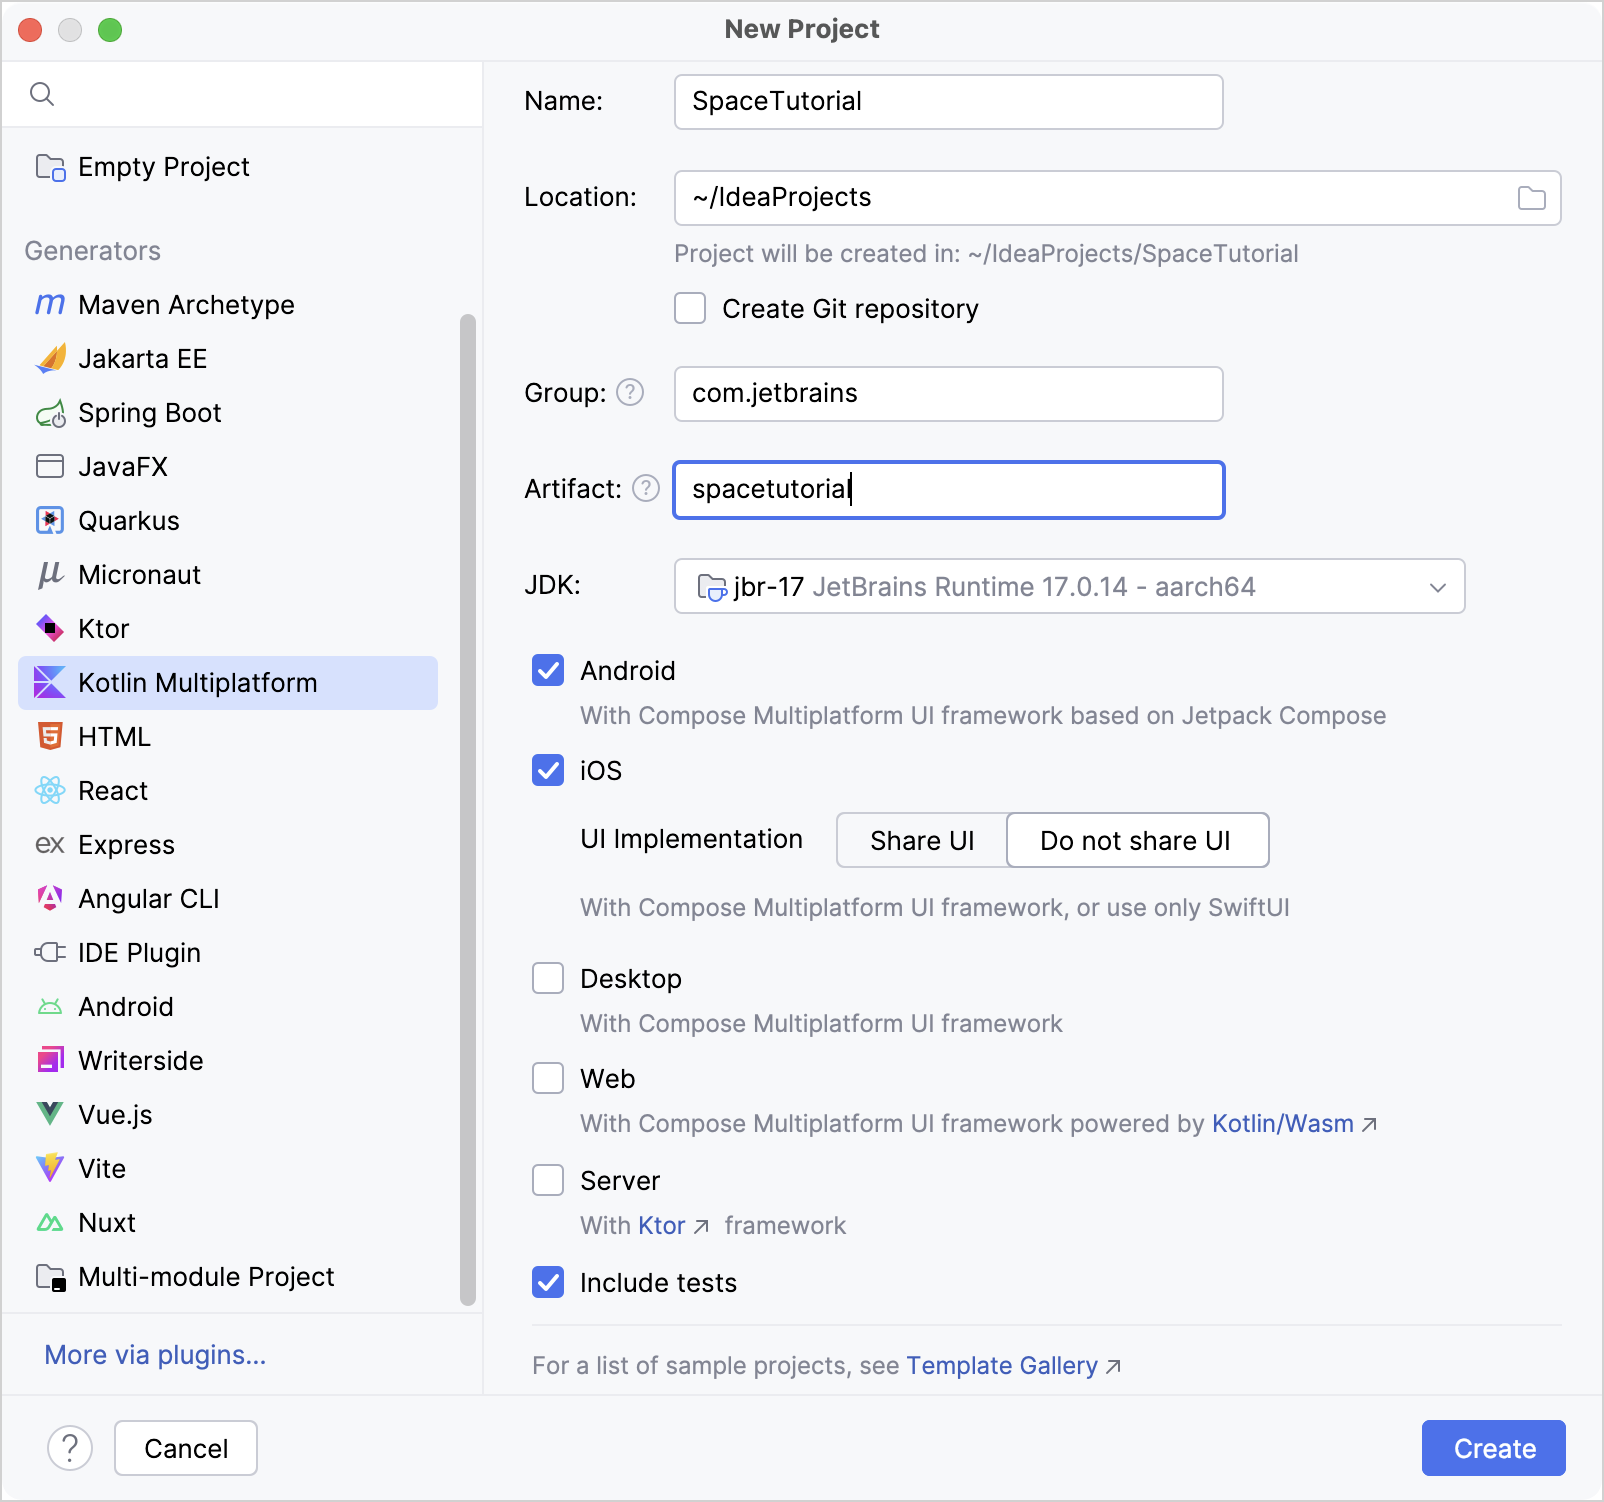
在 IntelliJ IDEA 中,選取 File | New | Project。
在左側面板中選取 Kotlin Multiplatform (在 Android Studio 中,可以在 New Project 精靈的 Generic 索引標籤中找到此範本)。
在 New Project 視窗中指定以下欄位:
- Name: SpaceTutorial
- Project ID: com.jetbrains.spacetutorial
選取 Android 與 iOS 目標。
對於 iOS,選取 Do not share UI 選項。您將為兩個平台實作原生 UI。
指定完所有欄位與目標後,按一下 Create。
新增 Gradle 相依性
若要將多平台程式庫新增至共用模組,您需要將相依性指令 (implementation) 新增至 build.gradle.kts 檔案中相關原始碼集的 dependencies {} 區塊。
kotlinx.serialization 與 SQLDelight 程式庫也需要額外的設定。
更改或新增 gradle/libs.versions.toml 檔案中版本目錄的行,以反映所有需要的相依性:
在
[versions]區塊中,檢查 AGP 版本並新增其餘部分:toml[versions] agp = "9.0.1" material3 = "1.11.0-alpha07" # ... coroutinesVersion = "1.10.2" dateTimeVersion = "0.7.1" koin = "4.1.0" ktor = "3.3.3" sqlDelight = "2.2.1"在
[libraries]區塊中,新增以下程式庫參照:[libraries] ... android-driver = { module = "app.cash.sqldelight:android-driver", version.ref = "sqlDelight" } koin-core = { module = "io.insert-koin:koin-core", version.ref = "koin" } koin-androidx-compose = { module = "io.insert-koin:koin-androidx-compose", version.ref = "koin" } kotlinx-coroutines-core = { module = "org.jetbrains.kotlinx:kotlinx-coroutines-core", version.ref = "coroutinesVersion" } kotlinx-datetime = { module = "org.jetbrains.kotlinx:kotlinx-datetime", version.ref = "dateTimeVersion" } ktor-client-android = { module = "io.ktor:ktor-client-android", version.ref = "ktor" } ktor-client-content-negotiation = { module = "io.ktor:ktor-client-content-negotiation", version.ref = "ktor" } ktor-client-core = { module = "io.ktor:ktor-client-core", version.ref = "ktor" } ktor-client-darwin = { module = "io.ktor:ktor-client-darwin", version.ref = "ktor" } ktor-serialization-kotlinx-json = { module = "io.ktor:ktor-serialization-kotlinx-json", version.ref = "ktor" } native-driver = { module = "app.cash.sqldelight:native-driver", version.ref = "sqlDelight" } runtime = { module = "app.cash.sqldelight:runtime", version.ref = "sqlDelight" }在
[plugins]區塊中,指定必要的 Gradle 外掛程式:toml[plugins] # ... kotlinxSerialization = { id = "org.jetbrains.kotlin.plugin.serialization", version.ref = "kotlin" } sqldelight = { id = "app.cash.sqldelight", version.ref = "sqlDelight" }版本目錄更新後,系統會提示您重新同步專案。 按一下 Sync Gradle Changes 按鈕以同步 Gradle 檔案:

在
sharedLogic/build.gradle.kts檔案的最開頭,將以下幾行新增至plugins {}區塊:kotlinplugins { // ... alias(libs.plugins.kotlinxSerialization) alias(libs.plugins.sqldelight) }通用原始碼集需要每個程式庫的核心構件,以及 Ktor 序列化功能,以便使用
kotlinx.serialization來處理網路請求與回應。 iOS 與 Android 原始碼集也需要 SQLDelight 與 Ktor 的平台驅動程式。在同一個
sharedLogic/build.gradle.kts檔案中,新增所有必要的相依性:kotlinkotlin { // ... sourceSets { commonMain.dependencies { implementation(libs.kotlinx.coroutines.core) implementation(libs.ktor.client.core) implementation(libs.ktor.client.content.negotiation) implementation(libs.ktor.serialization.kotlinx.json) implementation(libs.runtime) implementation(libs.kotlinx.datetime) implementation(libs.koin.core) } androidMain.dependencies { implementation(libs.ktor.client.android) implementation(libs.android.driver) } iosMain.dependencies { implementation(libs.ktor.client.darwin) implementation(libs.native.driver) } } }指定完相依性後,再次按一下 Sync Gradle Changes 按鈕以更新 Gradle 檔案。
Gradle 同步完成後,您就完成了專案組態設定,可以開始編寫程式碼了。
如需多平台相依性的深入指南,請參閱 Kotlin Multiplatform 程式庫的相依性。
建立應用程式資料模型
本教學應用程式將包含公開的 SpaceXSDK 類別,作為網路與快集服務的外觀 (facade)。 應用程式資料模型將具有三個實體類別,包含:
- 關於發射的一般資訊
- 任務徽章圖像的連結
- 發射相關文章的 URL
在本教學結束時,並非所有這些資料都會顯示在 UI 中。 我們使用此資料模型來展示序列化。 但您可以嘗試使用連結與徽章,將此範例擴充為更具資訊量的內容!
建立必要的資料類別:
在
sharedLogic/src/commonMain/kotlin/com/jetbrains/spacetutorial目錄中,建立entity套件,然後在該套件中建立Entity.kt檔案。宣告基本實體的所有資料類別:
kotlin
每個可序列化的類別都必須標記 @Serializable 註解。kotlinx.serialization 外掛程式會自動為 @Serializable 類別產生預設序列化程式,除非您在註解引數中明確傳遞序列化程式的連結。
@SerialName 註解允許您重新定義欄位名稱,這有助於在資料類別中使用更具可讀性的識別符來存取屬性。
設定 SQLDelight 並實作快取邏輯
SQLDelight 程式庫允許您從 SQL 查詢產生型別安全的 Kotlin 資料庫 API。在編譯期間,產生器會驗證 SQL 查詢並將其轉換為可在共用模組中使用的 Kotlin 程式碼。
設定 SQLDelight
SQLDelight 相依性已包含在專案中。 若要設定該程式庫,請開啟 sharedLogic/build.gradle.kts 檔案並在末尾新增 sqldelight {} 區塊。 此區塊包含資料庫及其參數的清單:
sqldelight {
    databases {
        create("AppDatabase") {
            packageName.set("com.jetbrains.spacetutorial.cache")
        }
    }
}
packageName 參數指定產生的 Kotlin 原始碼的套件名稱。
出現提示時同步 Gradle 專案檔案,或按兩下 並搜尋 Sync All Gradle, Swift Package Manager projects 操作。
建議安裝官方的 SQLDelight 外掛程式以處理
.sq檔案。
產生資料庫 API
首先,建立包含所有必要 SQL 查詢的 .sq 檔案。預設情況下,SQLDelight 外掛程式會在原始碼集的 sqldelight 資料夾中尋找 .sq 檔案:
在
sharedLogic/src/commonMain目錄中,建立一個新的sqldelight目錄。在
sqldelight目錄中,建立一個名為com/jetbrains/spacetutorial/cache的新目錄以建立套件的巢狀目錄。在
cache目錄中,建立AppDatabase.sq檔案 (與您在build.gradle.kts檔案中指定的資料庫名稱相同)。 您應用程式的所有 SQL 查詢都將儲存在此檔案中。資料庫將包含一個包含發射資料的資料表。 將以下用於建立資料表並定義稍後使用的數個函式的程式碼新增至
AppDatabase.sq檔案:textimport kotlin.Boolean; CREATE TABLE Launch ( flightNumber INTEGER NOT NULL, missionName TEXT NOT NULL, details TEXT, launchSuccess INTEGER AS Boolean DEFAULT NULL, launchDateUTC TEXT NOT NULL, patchUrlSmall TEXT, patchUrlLarge TEXT, articleUrl TEXT ); -- 向 'Launch' 資料表插入資料 insertLaunch: INSERT INTO Launch(flightNumber, missionName, details, launchSuccess, launchDateUTC, patchUrlSmall, patchUrlLarge, articleUrl) VALUES(?, ?, ?, ?, ?, ?, ?, ?); -- 清除 'Launch' 資料表中的所有資料 removeAllLaunches: DELETE FROM Launch; -- 擷取所有發射的資訊 selectAllLaunchesInfo: SELECT Launch.* FROM Launch;產生相對應的
AppDatabase介面 (稍後您將使用資料庫驅動程式對其進行初始化)。 若要執行此操作,請在終端機中的專案根目錄下執行以下指令:shell./gradlew generateCommonMainAppDatabaseInterface產生的 Kotlin 程式碼儲存在
sharedLogic/build/generated/sqldelight目錄中。
為平台專屬的資料庫驅動程式建立工廠(類)
若要初始化 AppDatabase 介面,您將向其傳遞一個 SqlDriver 執行個體。 SQLDelight 提供了多種平台專屬的 SQLite 驅動程式實作,因此您需要分別為每個平台建立這些執行個體。
雖然您可以透過預期與實際介面來實現這一點,但在本專案中,您將使用 Koin 來嘗試 Kotlin Multiplatform 中的相依注入。
為資料庫驅動程式建立一個介面。若要執行此操作,請在
sharedLogic/src/commonMain/kotlin/com/jetbrains/spacetutorial/目錄中建立cache套件。在
cache套件中建立DatabaseDriverFactory介面:kotlinpackage com.jetbrains.spacetutorial.cache import app.cash.sqldelight.db.SqlDriver interface DatabaseDriverFactory { fun createDriver(): SqlDriver }建立為 Android 實作此介面的類別:在
sharedLogic/src/androidMain/kotlin目錄中,建立com.jetbrains.spacetutorial.cache套件,然後在其中建立DatabaseDriverFactory.kt檔案。在 Android 上,SQLite 驅動程式由
AndroidSqliteDriver類別實作。在DatabaseDriverFactory.kt檔案中,將資料庫資訊與內容連結傳遞給AndroidSqliteDriver類別建構函式:kotlinpackage com.jetbrains.spacetutorial.cache import android.content.Context import app.cash.sqldelight.db.SqlDriver import app.cash.sqldelight.driver.android.AndroidSqliteDriver class AndroidDatabaseDriverFactory(private val context: Context) : DatabaseDriverFactory { override fun createDriver(): SqlDriver { return AndroidSqliteDriver(AppDatabase.Schema, context, "launch.db") } }對於 iOS,在
shared/src/iosMain/kotlin/com/jetbrains/spacetutorial/目錄中建立cache套件。在
cache套件中,建立DatabaseDriverFactory.kt檔案並新增此程式碼:kotlinpackage com.jetbrains.spacetutorial.cache import app.cash.sqldelight.db.SqlDriver import app.cash.sqldelight.driver.native.NativeSqliteDriver class IOSDatabaseDriverFactory : DatabaseDriverFactory { override fun createDriver(): SqlDriver { return NativeSqliteDriver(AppDatabase.Schema, "launch.db") } }
您稍後將在專案的平台專屬部分中使用這些工廠(類)。
實作快取
到目前為止,您已經新增了平台資料庫驅動程式的工廠(類)以及用於執行資料庫操作的 AppDatabase 介面。現在,建立一個 Database 類別,它將封裝 AppDatabase 介面並包含快取邏輯。
在通用原始碼集
sharedLogic/src/commonMain/kotlin中,於com.jetbrains.spacetutorial.cache套件中建立一個新的Database類別。它將包含兩個平台共用的邏輯。若要為
AppDatabase提供驅動程式,請將抽象DatabaseDriverFactory執行個體傳遞給Database類別建構函式:kotlinpackage com.jetbrains.spacetutorial.cache internal class Database(databaseDriverFactory: DatabaseDriverFactory) { private val database = AppDatabase(databaseDriverFactory.createDriver()) private val dbQuery = database.appDatabaseQueries }此類別的可見性設定為 internal,這意味著它僅能從多平台模組內部存取。
在
Database類別中,實作一些資料處理操作。 首先,建立getAllLaunches函式以傳回所有火箭發射的清單。mapLaunchSelecting函式用於將資料庫查詢結果對應至RocketLaunch物件:kotlinimport com.jetbrains.spacetutorial.entity.Links import com.jetbrains.spacetutorial.entity.Patch import com.jetbrains.spacetutorial.entity.RocketLaunch internal class Database(databaseDriverFactory: DatabaseDriverFactory) { // ... internal fun getAllLaunches(): List<RocketLaunch> { return dbQuery.selectAllLaunchesInfo(::mapLaunchSelecting).executeAsList() } private fun mapLaunchSelecting( flightNumber: Long, missionName: String, details: String?, launchSuccess: Boolean?, launchDateUTC: String, patchUrlSmall: String?, patchUrlLarge: String?, articleUrl: String? ): RocketLaunch { return RocketLaunch( flightNumber = flightNumber.toInt(), missionName = missionName, details = details, launchDateUTC = launchDateUTC, launchSuccess = launchSuccess, links = Links( patch = Patch( small = patchUrlSmall, large = patchUrlLarge ), article = articleUrl ) ) } }新增
clearAndCreateLaunches函式以清除資料庫並插入新資料:kotlininternal class Database(databaseDriverFactory: DatabaseDriverFactory) { // ... internal fun clearAndCreateLaunches(launches: List<RocketLaunch>) { dbQuery.transaction { dbQuery.removeAllLaunches() launches.forEach { launch -> dbQuery.insertLaunch( flightNumber = launch.flightNumber.toLong(), missionName = launch.missionName, details = launch.details, launchSuccess = launch.launchSuccess ?: false, launchDateUTC = launch.launchDateUTC, patchUrlSmall = launch.links.patch?.small, patchUrlLarge = launch.links.patch?.large, articleUrl = launch.links.article ) } } } }
實作 API 服務
若要經由網際網路擷取資料,您將使用 SpaceX 公開 API 以及單一方法從 v5/launches 端點擷取所有發射的列表。
建立一個類別來將應用程式連接到 API:
在
sharedLogic/src/commonMain/kotlin/com/jetbrains/spacetutorial/目錄中,建立network套件。在
network目錄中,建立SpaceXApi類別:kotlinpackage com.jetbrains.spacetutorial.network import io.ktor.client.HttpClient import io.ktor.client.plugins.contentnegotiation.ContentNegotiation import io.ktor.serialization.kotlinx.json.json import kotlinx.serialization.json.Json class SpaceXApi { private val httpClient = HttpClient { install(ContentNegotiation) { json(Json { ignoreUnknownKeys = true useAlternativeNames = false }) } } }此類別執行網路請求並將 JSON 回應還原序列化為
com.jetbrains.spacetutorial.entity套件中的實體。 KtorHttpClient執行個體初始化並儲存httpClient屬性。此程式碼使用
ContentNegotiationKtor 外掛程式將GET請求的結果還原序列化。該外掛程式將請求與回應的承載資料作為 JSON 處理,並根據需要進行序列化與還原序列化。宣告傳回火箭發射清單的資料擷取函式:
kotlinimport com.jetbrains.spacetutorial.entity.RocketLaunch import io.ktor.client.request.get import io.ktor.client.call.body class SpaceXApi { // ... suspend fun getAllLaunches(): List<RocketLaunch> { return httpClient.get("https://api.spacexdata.com/v5/launches").body() } }
getAllLaunches 函式具有 suspend 修飾詞,因為它包含對掛起函式 HttpClient.get() 的呼叫。 HttpClient.get() 函式包含一個經由網際網路擷取資料的非同步操作,且只能從協同程式或其他掛起函式中呼叫。網路請求將在 HTTP 用戶端的執行緒池中執行。
發送 GET 請求的 URL 作為引數傳遞給 get() 函式。
組建一個 SDK
您的 iOS 與 Android 應用程式將透過共用模組與 SpaceX API 進行通訊,該模組將提供一個公開類別 SpaceXSDK。
在通用原始碼集
sharedLogic/src/commonMain/kotlin的com.jetbrains.spacetutorial套件中,建立SpaceXSDK類別。 此類別將作為Database與SpaceXApi類別的外觀 (facade)。若要建立
Database類別執行個體,請提供DatabaseDriverFactory執行個體:kotlinpackage com.jetbrains.spacetutorial import com.jetbrains.spacetutorial.cache.Database import com.jetbrains.spacetutorial.cache.DatabaseDriverFactory import com.jetbrains.spacetutorial.network.SpaceXApi class SpaceXSDK(databaseDriverFactory: DatabaseDriverFactory, val api: SpaceXApi) { private val database = Database(databaseDriverFactory) }您將透過
SpaceXSDK類別建構函式在平台專屬程式碼中注入正確的資料庫驅動程式。新增
getLaunches函式,該函式使用建立的資料庫與 API 獲取發射列表:kotlinimport com.jetbrains.spacetutorial.entity.RocketLaunch class SpaceXSDK(databaseDriverFactory: DatabaseDriverFactory, val api: SpaceXApi) { // ... @Throws(Exception::class) suspend fun getLaunches(forceReload: Boolean): List<RocketLaunch> { val cachedLaunches = database.getAllLaunches() return if (cachedLaunches.isNotEmpty() && !forceReload) { cachedLaunches } else { api.getAllLaunches().also { database.clearAndCreateLaunches(it) } } } }
該類別包含一個用於獲取所有發射資訊的函式。根據 forceReload 的值,它會傳回快取值或從網際網路載入資料,然後使用結果更新快取。如果沒有快取資料,無論 forceReload 旗標的值為何,它都會從網際網路載入資料。
您 SDK 的用戶端可以使用 forceReload 旗標來載入最新的發射資訊,為使用者提供下拉重新整理手勢。
所有的 Kotlin 例外都是非受檢的,而 Swift 只有受檢錯誤 (詳情請參閱與 Swift/Objective-C 的互通性)。因此,為了讓您的 Swift 程式碼察覺到預期例外,從 Swift 呼叫的 Kotlin 函式應標記 @Throws 註解,並指定潛在例外類別的清單。
建立 Android 應用程式
IntelliJ IDEA 會為您處理初始的 Gradle 組態,因此 sharedUI 與 sharedLogic 模組已經連接到您的 Android 應用程式 (androidApp)。
在實作 UI 與呈現邏輯之前,將 Koin Android 相依性新增至 sharedUI/build.gradle.kts 檔案:
kotlin {
// ...
    sourceSets {
        androidMain.dependencies {
            implementation(libs.koin.androidx.compose)
        }
    }
}
出現提示時同步 Gradle 專案檔案,或按兩下 並搜尋 Sync All Gradle, Swift Package Manager projects。
為 androidApp 新增網際網路存取權限
若要存取網際網路,Android 應用程式需要適當的權限。 在 androidApp/src/main/AndroidManifest.xml 檔案中,新增 <uses-permission> 標籤:
<?xml version="1.0" encoding="utf-8"?>
<manifest xmlns:android="http://schemas.android.com/apk/res/android">
    <uses-permission android:name="android.permission.INTERNET" />
    <!--...-->
</manifest>
新增相依注入程式碼
Koin 相依注入讓您能夠宣告可在不同情境中使用的模組 (組件集)。 在此專案中,您將建立兩個模組:一個用於 Android 應用程式,另一個用於 iOS 應用程式。 然後,您將使用相對應的模組為每個原生 UI 啟動 Koin。
宣告一個 Koin 模組,該模組將包含 Android 應用程式的組件:
在
sharedUI/src/androidMain/kotlin目錄中,建立AppModule.kt檔案在com.jetbrains.spacetutorial套件中。在該檔案中,將模組宣告為兩個單例,一個用於
SpaceXApi類別,另一個用於SpaceXSDK類別:kotlinpackage com.jetbrains.spacetutorial import com.jetbrains.spacetutorial.cache.AndroidDatabaseDriverFactory import com.jetbrains.spacetutorial.network.SpaceXApi import org.koin.android.ext.koin.androidContext import org.koin.dsl.module val appModule = module { single<SpaceXApi> { SpaceXApi() } single<SpaceXSDK> { SpaceXSDK( databaseDriverFactory = AndroidDatabaseDriverFactory( androidContext() ), api = get() ) } }SpaceXSDK類別建構函式注入了平台專屬的AndroidDatabaseDriverFactory類別。get()函式用於解析模組內的相依性:在SpaceXSDK()的api參數處,Koin 將傳遞早前宣告的SpaceXApi單例。建立一個自訂的
Application類別,它將啟動 Koin 模組。在您建立的
AppModule.kt檔案旁,建立包含以下程式碼的Application.kt檔案,並在modules()函式呼叫中指定您宣告的模組:kotlinpackage com.jetbrains.spacetutorial import android.app.Application import org.koin.android.ext.koin.androidContext import org.koin.core.context.GlobalContext.startKoin class MainApplication : Application() { override fun onCreate() { super.onCreate() startKoin { androidContext(this@MainApplication) modules(appModule) } } }在
AndroidManifest.xml檔案的<application>標籤中指定您建立的MainApplication類別:xml<manifest xmlns:android="http://schemas.android.com/apk/res/android"> ... <application ... android:name="com.jetbrains.spacetutorial.MainApplication"> ... </application> </manifest>
現在,您已準備好實作將使用平台專屬資料庫驅動程式所提供資訊的 UI。
準備包含發射清單的視圖模型
您將使用 Jetpack Compose 與 Material 3 實作 Android UI。首先,您將建立使用 SDK 獲取發射清單的視圖模型。然後,您將設定 Material 主題,最後,您將編寫將一切結合在一起的可組合函式。
在
sharedUI/src/androidMain/kotlin目錄中的com.jetbrains.spacetutorial套件中,建立RocketLaunchViewModel.kt檔案:kotlinpackage com.jetbrains.spacetutorial import androidx.compose.runtime.State import androidx.compose.runtime.mutableStateOf import androidx.lifecycle.ViewModel import com.jetbrains.spacetutorial.entity.RocketLaunch class RocketLaunchViewModel(private val sdk: SpaceXSDK) : ViewModel() { private val _state = mutableStateOf(RocketLaunchScreenState()) val state: State<RocketLaunchScreenState> = _state } data class RocketLaunchScreenState( val isLoading: Boolean = false, val launches: List<RocketLaunch> = emptyList() )RocketLaunchScreenState執行個體將儲存從 SDK 接收的資料以及請求的當前狀態。將
loadLaunches函式新增至RocketLaunchViewModel類別中,該函式將在此視圖模型的協同程式範圍內呼叫 SDK 的getLaunches函式:kotlinimport androidx.lifecycle.viewModelScope import kotlinx.coroutines.launch class RocketLaunchViewModel(private val sdk: SpaceXSDK) : ViewModel() { //... fun loadLaunches() { viewModelScope.launch { _state.value = _state.value.copy(isLoading = true, launches = emptyList()) try { val launches = sdk.getLaunches(forceReload = true) _state.value = _state.value.copy(isLoading = false, launches = launches) } catch (e: Exception) { _state.value = _state.value.copy(isLoading = false, launches = emptyList()) } } } }在
RocketLaunchViewModel類別中新增一個init {}區塊,並在其中呼叫loadLaunches(),以便在RocketLaunchViewModel物件建立時立即從 API 請求資料:kotlinclass RocketLaunchViewModel(private val sdk: SpaceXSDK) : ViewModel() { // ... init { loadLaunches() } }現在,在
AppModule.kt檔案中,在 Koin 模組中指定該視圖模型:kotlinimport org.koin.core.module.dsl.viewModel val appModule = module { // ... viewModel { RocketLaunchViewModel(sdk = get()) } }
組建 Material 主題
您將圍繞 Material 主題提供的 AppTheme 函式來組建您的主 App() 可組合項:
您可以使用 Material 主題產生器 (Material Theme Builder) 為您的 Compose 應用程式產生主題。選取您的顏色、選取您的字型,然後點擊右下角的 Export theme。
在匯出畫面中,按一下 Export 下拉式功能表並選取 Jetpack Compose (Theme.kt) 選項。
解壓縮封存檔案並將
theme資料夾複製到sharedUI/src/androidMain/kotlin/com/jetbrains/spacetutorial目錄中:
在
theme套件內的每個檔案中,更改package行以參照您建立的套件:kotlinpackage com.jetbrains.spacetutorial.theme在
Color.kt檔案中,為成功與失敗的發射新增兩個顏色變數:kotlinval app_theme_successful = Color(0xff4BB543) val app_theme_unsuccessful = Color(0xffFC100D)
實作呈現邏輯
為您的應用程式建立主 App() 可組合項,並從 ComponentActivity 類別中呼叫它:
從
sharedUI模組中刪除commonMain與commonTest原始碼集,因為 Android UI 並未共用。在
sharedUI/src/androidApp/kotlin/com/jetbrains/spacetutorial目錄中建立App.kt檔案。開啟
App.kt檔案並插入以下程式碼:kotlinpackage com.jetbrains.spacetutorial import androidx.compose.material3.pulltorefresh.rememberPullToRefreshState import androidx.compose.runtime.Composable import androidx.compose.runtime.getValue import androidx.compose.runtime.mutableStateOf import androidx.compose.runtime.remember import androidx.compose.runtime.rememberCoroutineScope import androidx.compose.runtime.setValue import androidx.compose.ui.tooling.preview.Preview import org.koin.androidx.compose.koinViewModel import androidx.compose.material3.ExperimentalMaterial3Api @OptIn( ExperimentalMaterial3Api::class ) @Composable @Preview fun App() { val viewModel = koinViewModel<RocketLaunchViewModel>() val state by remember { viewModel.state } val coroutineScope = rememberCoroutineScope() var isRefreshing by remember { mutableStateOf(false) } val pullToRefreshState = rememberPullToRefreshState() }在這裡,您使用的是 Koin ViewModel API 來參照您在 Android Koin 模組中宣告的
viewModel。現在新增 UI 程式碼,實作載入畫面、發射結果欄位以及下拉重新整理動作:
kotlinpackage com.jetbrains.spacetutorial import androidx.compose.foundation.layout.Arrangement import androidx.compose.foundation.layout.Column import androidx.compose.foundation.layout.Spacer import androidx.compose.foundation.layout.fillMaxSize import androidx.compose.foundation.layout.height import androidx.compose.foundation.layout.padding import androidx.compose.foundation.lazy.LazyColumn import androidx.compose.foundation.lazy.items import androidx.compose.material3.HorizontalDivider import androidx.compose.material3.MaterialTheme import androidx.compose.material3.Scaffold import androidx.compose.material3.Text import androidx.compose.material3.TopAppBar import androidx.compose.material3.pulltorefresh.PullToRefreshBox import androidx.compose.ui.Alignment import androidx.compose.ui.Modifier import androidx.compose.ui.unit.dp import com.jetbrains.spacetutorial.entity.RocketLaunch import com.jetbrains.spacetutorial.theme.AppTheme import com.jetbrains.spacetutorial.theme.app_theme_successful import com.jetbrains.spacetutorial.theme.app_theme_unsuccessful import kotlinx.coroutines.launch ... @OptIn( ExperimentalMaterial3Api::class ) @Composable @Preview fun App() { val viewModel = koinViewModel<RocketLaunchViewModel>() val state by remember { viewModel.state } val coroutineScope = rememberCoroutineScope() var isRefreshing by remember { mutableStateOf(false) } val pullToRefreshState = rememberPullToRefreshState() AppTheme { Scaffold( topBar = { TopAppBar( title = { Text( "SpaceX Launches", style = MaterialTheme.typography.headlineLarge ) } ) } ) { padding -> PullToRefreshBox( modifier = Modifier .fillMaxSize() .padding(padding), state = pullToRefreshState, isRefreshing = isRefreshing, onRefresh = { isRefreshing = true coroutineScope.launch { viewModel.loadLaunches() isRefreshing = false } } ) { if (state.isLoading && !isRefreshing) { Column( verticalArrangement = Arrangement.Center, horizontalAlignment = Alignment.CenterHorizontally, modifier = Modifier.fillMaxSize() ) { Text("Loading...", style = MaterialTheme.typography.bodyLarge) } } else { LazyColumn { items(state.launches) { launch: RocketLaunch -> Column(modifier = Modifier.padding(16.dp)) { Text( text = "${launch.missionName} - ${launch.launchYear}", style = MaterialTheme.typography.headlineSmall ) Spacer(Modifier.height(8.dp)) Text( text = if (launch.launchSuccess == true) "Successful" else "Unsuccessful", color = if (launch.launchSuccess == true) app_theme_successful else app_theme_unsuccessful ) Spacer(Modifier.height(8.dp)) val details = launch.details if (details != null && details.isNotBlank()) { Text(details) } } HorizontalDivider() } } } } } } }最後,在
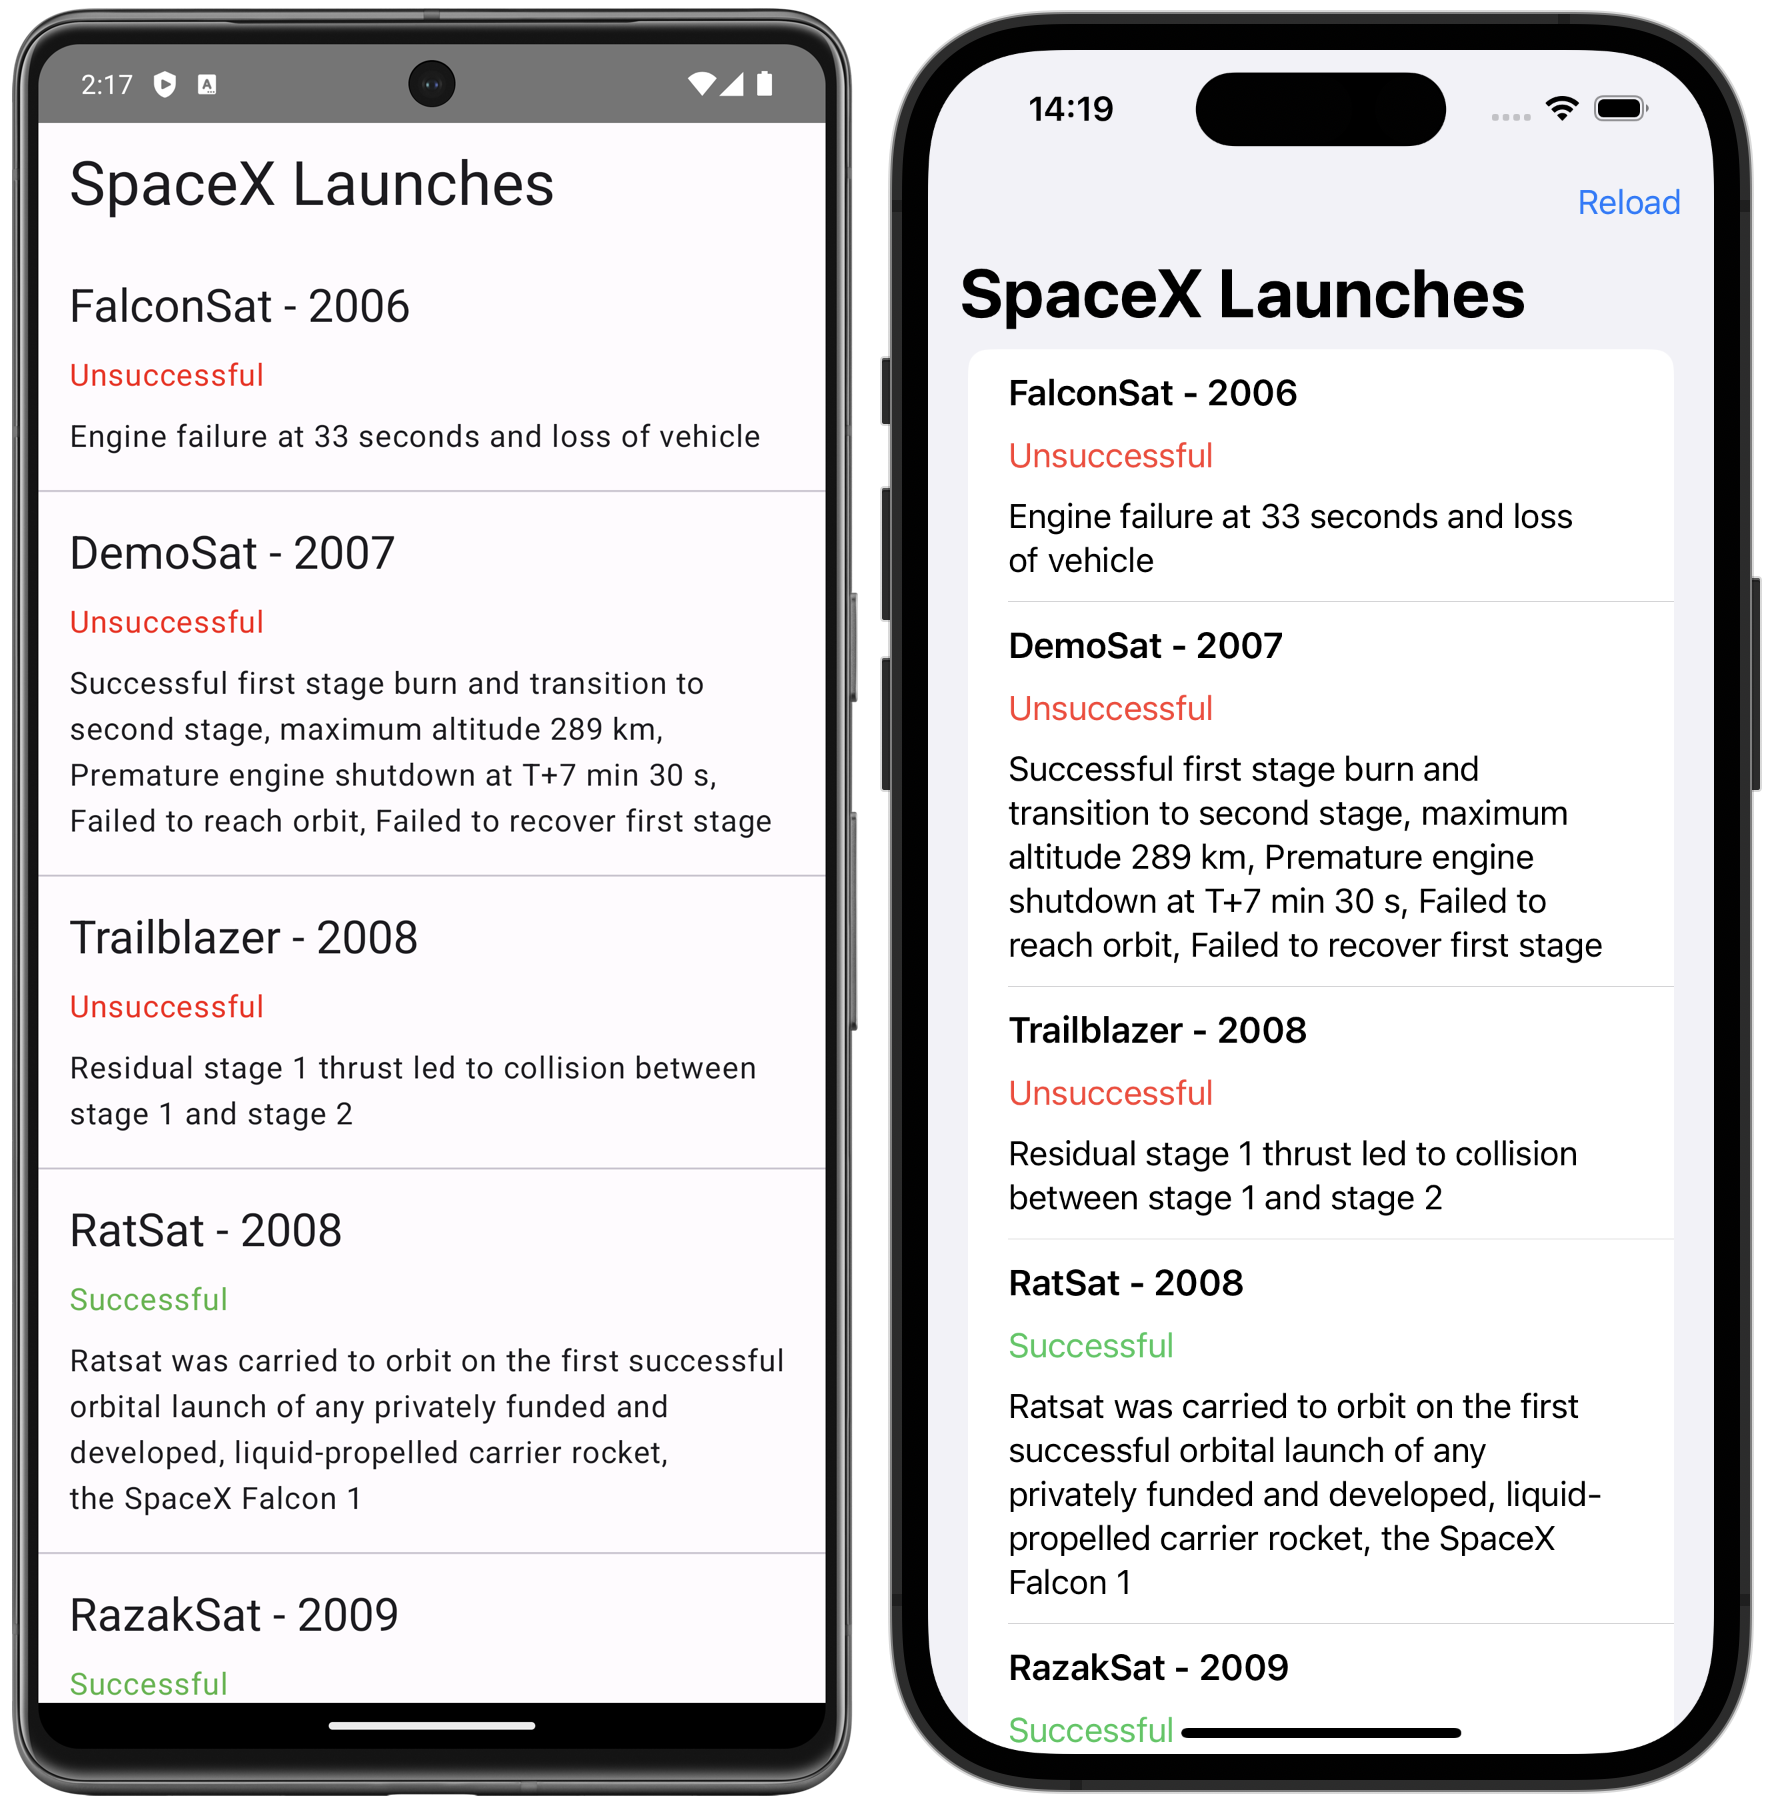
androidApp/src/main/AndroidManifest.xml中,在<activity>標籤中指定您的MainActivity類別:xml<manifest xmlns:android="http://schemas.android.com/apk/res/android"> ... <application ... <activity ... android:name="com.jetbrains.spacetutorial.MainActivity"> ... </activity> </application> </manifest>執行您的 Android 應用程式:從執行配置功能表中選取 composeApp,選擇一個模擬器,然後點擊執行按鈕。 該應用程式會自動執行 API 請求並顯示發射清單 (背景顏色取決於您產生的 Material 主題):
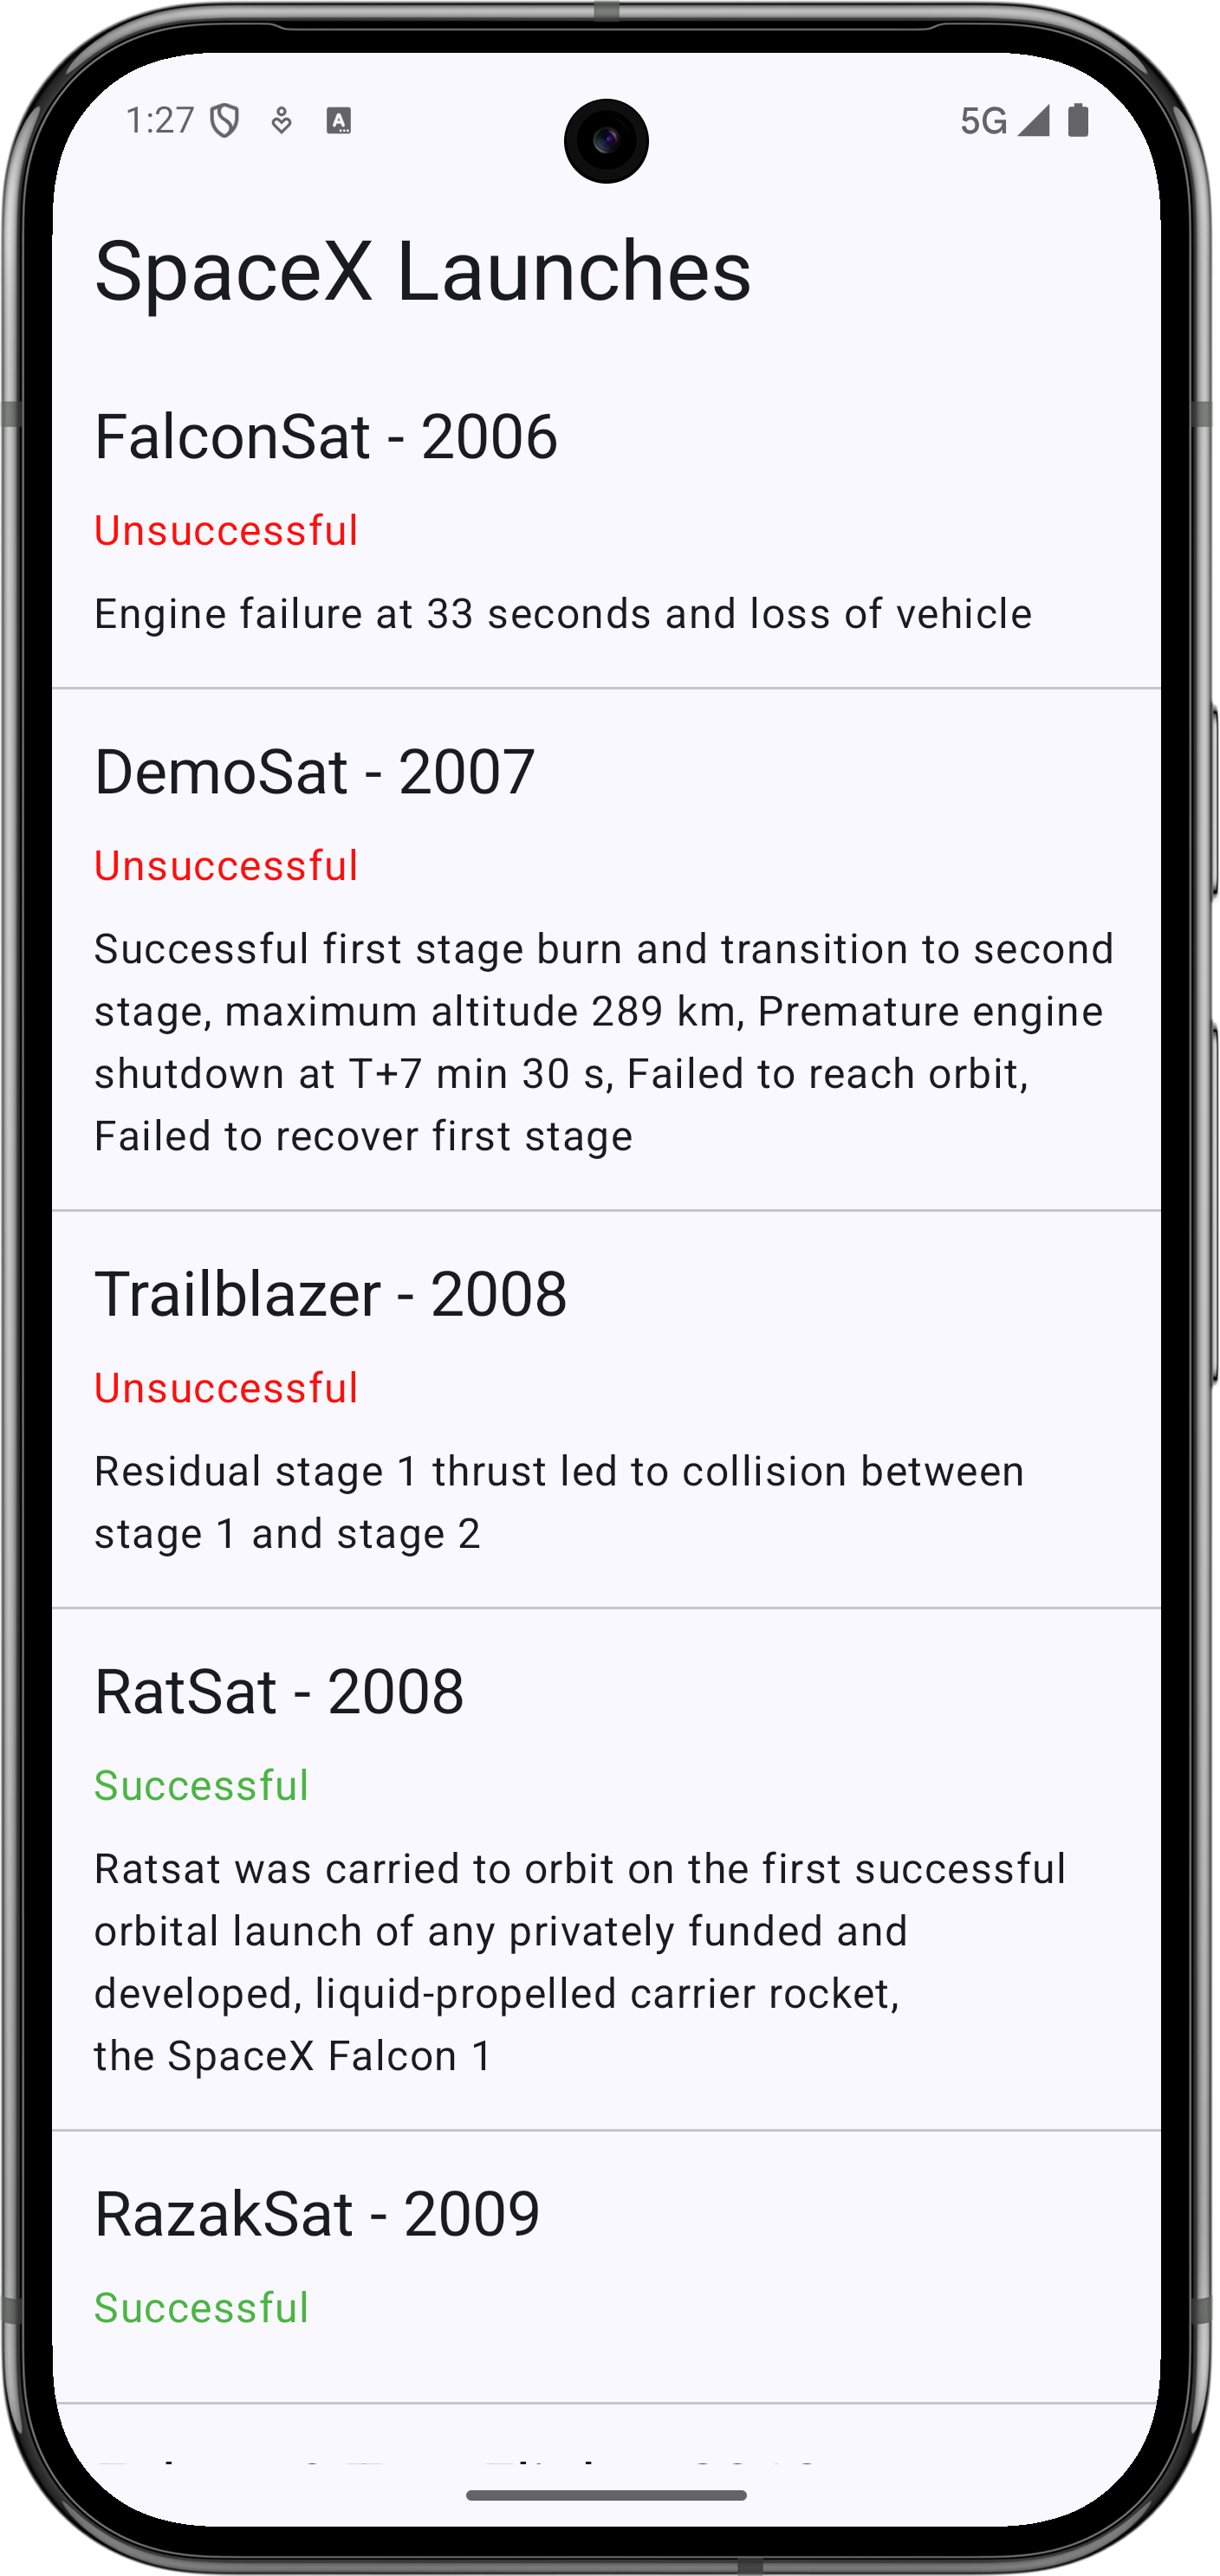
您剛剛建立了一個 Android 應用程式,其商業邏輯在 Kotlin Multiplatform 模組中實作,而 UI 則使用原生 Jetpack Compose 製作。
建立 iOS 應用程式
對於專案的 iOS 部分,您將利用 SwiftUI 來建置使用者介面以及 Model-View-ViewModel 模式。
IntelliJ IDEA 會產生一個已連接到共用模組的 iOS 專案。Kotlin 模組以 sharedLogic/build.gradle.kts 檔案中指定的名稱匯出 (baseName = "SharedLogic"),並使用常規的 import 陳述式匯入:import SharedLogic。
為 SQLDelight 新增動態連結旗標
預設情況下,IntelliJ IDEA 產生的專案設定為 iOS 框架的靜態連結。
若要在 iOS 上使用原生 SQLDelight 驅動程式,請新增動態連結器旗標,以便 Xcode 工具能找到系統提供的 SQLite 二進制檔:
在 IntelliJ IDEA 中,選取 File | Open Project in Xcode 選項以在 Xcode 中開啟您的專案。
在 Xcode 中,按一下專案名稱以開啟其設定。
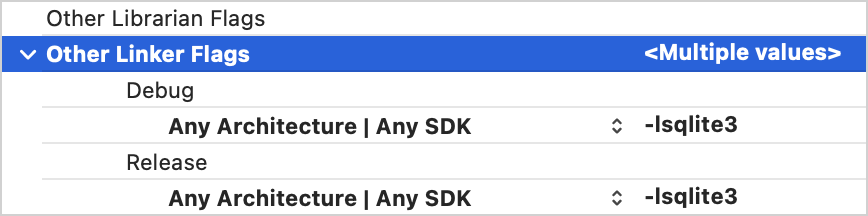
切換至 Build Settings 索引標籤,在該處切換至 All 列表並搜尋 Other Linker Flags 欄位。
展開該欄位,按一下 Debug 欄位旁的加號,並將
-lsqlite3字串貼入 Any Architecture | Any SDK 中。對 Other Linker Flags | Release 欄位重複上述程序。
返回 IntelliJ IDEA。
為 iOS 相依注入準備一個 Koin 類別
若要在 Swift 程式碼中使用 Koin 類別與函式,請建立一個特殊的 KoinComponent 類別並宣告 iOS 的 Koin 模組。
在
sharedLogic/src/iosMain/kotlin/com/jetbrains/spacetutorial目錄中,建立KoinHelper.kt檔案。新增
KoinHelper類別,它將使用消極的 Koin 注入封裝SpaceXSDK類別:kotlinpackage com.jetbrains.spacetutorial import org.koin.core.component.KoinComponent import com.jetbrains.spacetutorial.entity.RocketLaunch import org.koin.core.component.inject class KoinHelper : KoinComponent { private val sdk: SpaceXSDK by inject<SpaceXSDK>() suspend fun getLaunches(forceReload: Boolean): List<RocketLaunch> { return sdk.getLaunches(forceReload = forceReload) } }在
KoinHelper類別下方,新增initKoin()函式,您將在 Swift 中使用它來初始化並啟動 iOS Koin 模組:kotlinimport com.jetbrains.spacetutorial.cache.IOSDatabaseDriverFactory import com.jetbrains.spacetutorial.network.SpaceXApi import org.koin.core.context.startKoin import org.koin.dsl.module fun initKoin() { startKoin { modules(module { single<SpaceXApi> { SpaceXApi() } single<SpaceXSDK> { SpaceXSDK( databaseDriverFactory = IOSDatabaseDriverFactory(), api = get() ) } }) } }
現在,您可以在 iOS 應用程式中啟動 Koin 模組,以便將原生資料庫驅動程式與通用的 SpaceXSDK 類別結合使用。
實作 UI
首先,您將建立一個 RocketLaunchRow SwiftUI 視圖用於顯示清單中的項目。它將基於 HStack 與 VStack 視圖。RocketLaunchRow 結構將具有一些擴充套件,其中包含用於顯示資料的實用幫助程式。
在 IntelliJ IDEA 中,確保您處於 Project 檢視。
在
iosApp/iosApp資料夾中建立一個新的 Swift 檔案,位於ContentView.swift旁,並命名為RocketLaunchRow。使用以下程式碼更新
RocketLaunchRow.swift檔案:Swiftimport SwiftUI import SharedLogic struct RocketLaunchRow: View { var rocketLaunch: RocketLaunch var body: some View { HStack() { VStack(alignment: .leading, spacing: 10.0) { Text("\(rocketLaunch.missionName) - \(String(rocketLaunch.launchYear))").font(.system(size: 18)).bold() Text(launchText).foregroundColor(launchColor) Text("Launch year: \(String(rocketLaunch.launchYear))") Text("\(rocketLaunch.details ?? "")") } Spacer() } } } extension RocketLaunchRow { private var launchText: String { if let isSuccess = rocketLaunch.launchSuccess { return isSuccess.boolValue ? "Successful" : "Unsuccessful" } else { return "No data" } } private var launchColor: Color { if let isSuccess = rocketLaunch.launchSuccess { return isSuccess.boolValue ? Color.green : Color.red } else { return Color.gray } } }發射清單將顯示在專案中已包含的
ContentView視圖中。在
ContentView.swift檔案中,為ContentView類別建立一個擴充套件,包含一個將準備並管理資料的ViewModel類別:Swiftextension ContentView { enum LoadableLaunches { case loading case result([RocketLaunch]) case error(String) } @MainActor class ViewModel: ObservableObject { @Published var launches = LoadableLaunches.loading } }視圖模型 (
ContentView.ViewModel) 透過 Combine 框架與視圖 (ContentView) 連接:ContentView.ViewModel類別被宣告為ObservableObject。@Published屬性用於launches屬性,因此視圖模型將在該屬性變更時發送訊號。
移除
ContentView_Previews結構:您不需要實作與您的視圖模型相容的預覽。更新
ContentView類別的主體以顯示發射清單並新增重新整理功能。- 這是 UI 的基礎工作:您將在教學的下一階段實作
loadLaunches函式。 viewModel屬性標記有@ObservedObject屬性以訂閱視圖模型。
swiftstruct ContentView: View { @ObservedObject private(set) var viewModel: ViewModel var body: some View { NavigationView { listView() .navigationBarTitle("SpaceX Launches") .navigationBarItems(trailing: Button("Reload") { self.viewModel.loadLaunches(forceReload: true) }) } } private func listView() -> AnyView { switch viewModel.launches { case .loading: return AnyView(Text("Loading...").multilineTextAlignment(.center)) case .result(let launches): return AnyView(List(launches) { launch in RocketLaunchRow(rocketLaunch: launch) }) case .error(let description): return AnyView(Text(description).multilineTextAlignment(.center)) } } }- 這是 UI 的基礎工作:您將在教學的下一階段實作
RocketLaunch類別作為初始化List視圖的參數,因此它需要符合Identifiable協定。該類別已經有一個名為id的屬性,所以您只需在ContentView.swift的底部新增擴充套件:Swiftextension RocketLaunch: Identifiable { }
載入資料
若要在視圖模型中擷取關於火箭發射的資料,您將與來自多平台程式庫的 KoinHelper 類別執行個體。 它將允許您使用正確的資料庫驅動程式呼叫 SDK 函式。
在
ContentView.swift檔案中,擴充ViewModel類別以包含KoinHelper物件與loadLaunches函式:Swiftextension ContentView { // ... class ViewModel: ObservableObject { // ... let helper: KoinHelper = KoinHelper() init() { self.loadLaunches(forceReload: false) } func loadLaunches(forceReload: Bool) { // TODO: retrieve data } } }在
loadLaunches()函式中,呼叫KoinHelper.getLaunches()函式 (這會代理對SpaceXSDK類別的呼叫) 並將結果儲存在launches屬性中:Swiftfunc loadLaunches(forceReload: Bool) { Task { do { self.launches = .loading let launches = try await helper.getLaunches(forceReload: forceReload) self.launches = .result(launches) } catch { self.launches = .error(error.localizedDescription) } } }當您將 Kotlin 模組編譯成 Apple 框架時,可以使用 Swift 的
async/await機制來呼叫掛起函式。由於
getLaunches函式在 Kotlin 中標記有@Throws(Exception::class)註解,任何身為Exception類別或其子類別執行個體的例外都將作為NSError傳遞到 Swift 中。因此,所有此類例外都可以被loadLaunches()函式捕獲。進入應用程式的入口點
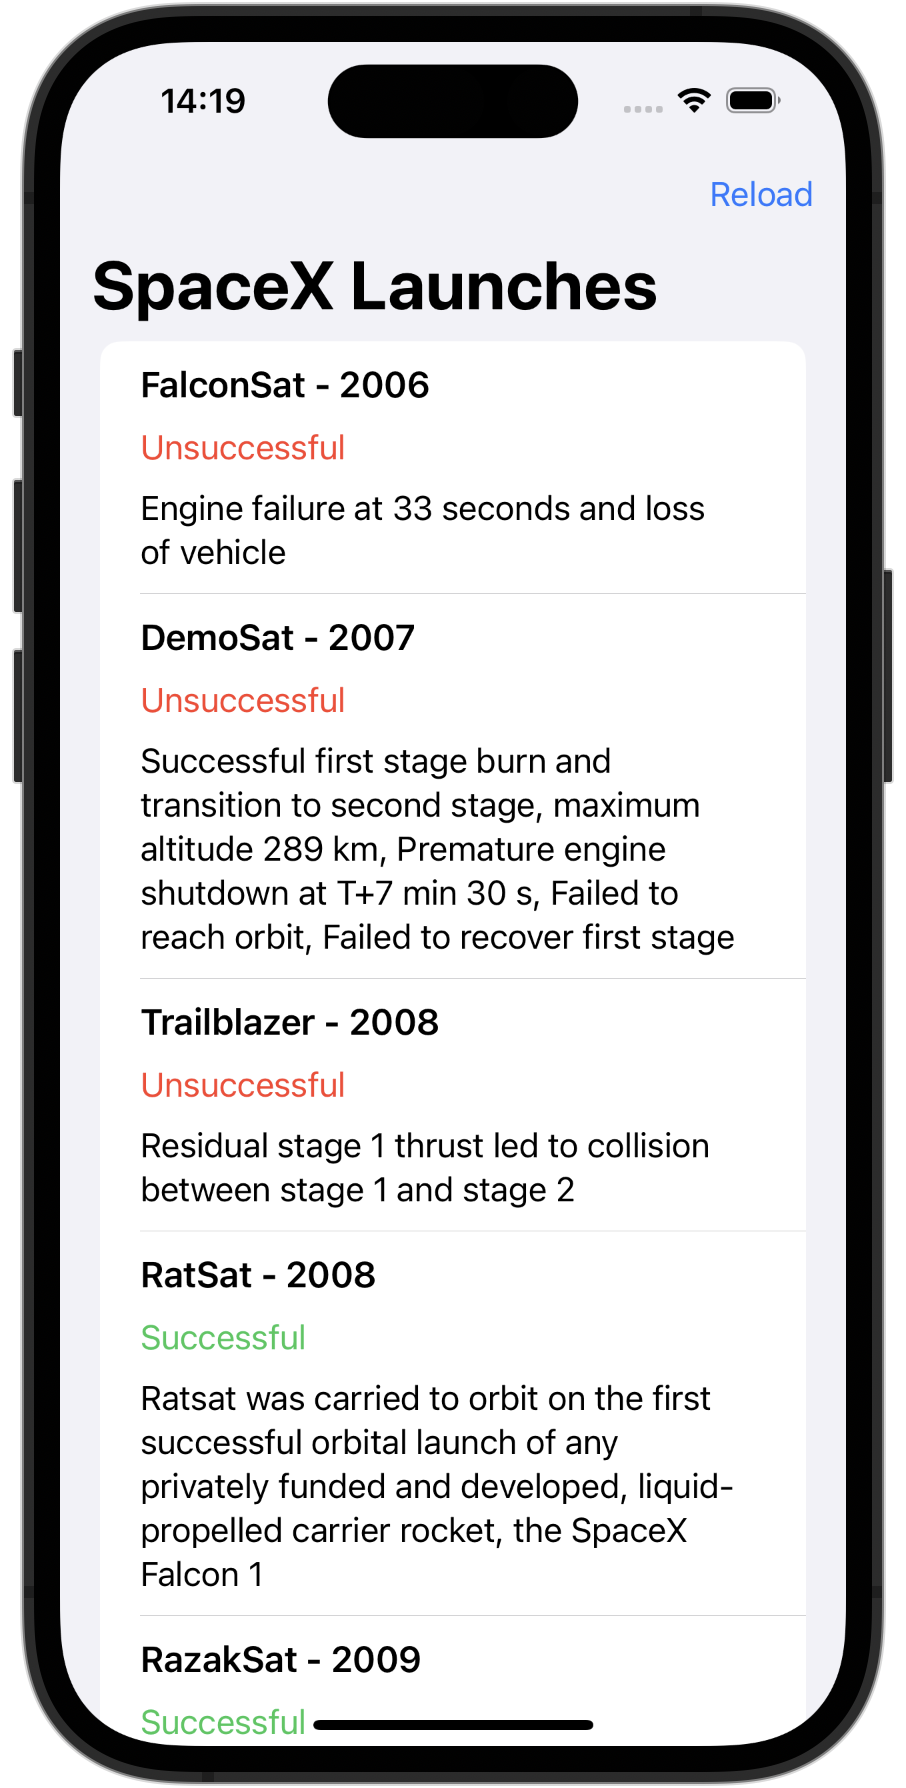
iOSApp.swift檔案,初始化 Koin 模組、視圖與視圖模型:Swiftimport SwiftUI import SharedLogic @main struct iOSApp: App { init() { KoinHelperKt.doInitKoin() } var body: some Scene { WindowGroup { ContentView(viewModel: .init()) } } }在 IntelliJ IDEA 中,切換至 iosApp 組態,選擇一個模擬器並執行,以查看結果:
您可以在
final分支上找到該專案的最終版本。
下一步?
本教學涉及了一些潛在的高資源消耗操作,例如剖析 JSON 以及在主執行緒中向資料庫發出請求。若要了解如何編寫並行程式碼並最佳化您的應用程式,請參閱 協同程式指南。
您也可以查看以下額外的學習資料: