최상위 창 관리
데스크톱용 Compose Multiplatform은 창(window) 관리를 위한 다양한 기능을 제공합니다. 창을 트레이에 숨기거나, 드래그 가능하게 만들고, 크기를 조정하거나, 위치를 변경하는 등의 작업을 할 수 있습니다.
창 열기 및 닫기
Window() 함수를 사용하여 일반적인 창을 만들 수 있습니다. 이를 컴포저블 스코프에 넣으려면 application 진입점(entry point) 내에서 Window()를 사용하세요.
import androidx.compose.ui.window.Window
import androidx.compose.ui.window.application

fun main() = application {
    Window(onCloseRequest = ::exitApplication) {
        // 창의 콘텐츠
    }
}Window()는 컴포저블 함수이므로 속성을 선언적으로 변경할 수 있습니다. 예를 들어, 특정 제목으로 창을 연 다음 나중에 제목을 변경할 수 있습니다.
import androidx.compose.material.Button
import androidx.compose.material.Text
import androidx.compose.runtime.getValue
import androidx.compose.runtime.mutableStateOf
import androidx.compose.runtime.remember
import androidx.compose.runtime.setValue
import androidx.compose.ui.window.Window
import androidx.compose.ui.window.application

fun main() = application {
    var fileName by remember { mutableStateOf("Untitled") }

    Window(onCloseRequest = ::exitApplication, title = "$fileName - Editor") {
        Button(onClick = { fileName = "note.txt" }) {
            Text("Save")
        }
    }
}
조건 추가하기
단순한 if 조건을 사용하여 창을 열고 닫을 수도 있습니다. 다음 코드 샘플에서는 작업을 완료한 후 애플리케이션 창이 자동으로 닫힙니다.
import androidx.compose.material.Text
import androidx.compose.runtime.LaunchedEffect
import androidx.compose.runtime.getValue
import androidx.compose.runtime.mutableStateOf
import androidx.compose.runtime.remember
import androidx.compose.runtime.setValue
import androidx.compose.ui.window.Window
import androidx.compose.ui.window.application
import kotlinx.coroutines.delay

fun main() = application {
    var isPerformingTask by remember { mutableStateOf(true) }

    LaunchedEffect(Unit) {
        // 무거운 작업 수행
        delay(2000)
        isPerformingTask = false
    }
    if (isPerformingTask) {
        Window(
            onCloseRequest = ::exitApplication,
            title = "창 1"
        )
        {
            Text("작업을 수행 중입니다. 잠시만 기다려 주세요!")
        }
    } else {
        Window(
            onCloseRequest = ::exitApplication,
            title = "창 2"
        ) {
            Text("Hello, World!")
        }
    }
}
대화 상자를 표시하는 것과 같이 애플리케이션 종료 시 커스텀 로직을 사용하려는 경우, onCloseRequest 콜백을 사용하여 닫기 동작을 오버라이드할 수 있습니다. 다음 코드 샘플에서는 명령형 방식(window.close()) 대신 선언적 방식을 사용하며, 상태 변경(isOpen = false)에 반응하여 창을 닫습니다.
import androidx.compose.material.Button
import androidx.compose.material.Text
import androidx.compose.runtime.getValue
import androidx.compose.runtime.mutableStateOf
import androidx.compose.runtime.remember
import androidx.compose.runtime.setValue
import androidx.compose.ui.window.DialogWindow
import androidx.compose.ui.window.Window
import androidx.compose.ui.window.application

fun main() = application {
    var isOpen by remember { mutableStateOf(true) }
    var isAskingToClose by remember { mutableStateOf(false) }

    if (isOpen) {
        Window(
            onCloseRequest = { isAskingToClose = true },
            title = "중요한 문서"
        ) {
            if (isAskingToClose) {
                DialogWindow(
                    onCloseRequest = { isAskingToClose = false },
                    title = "저장하지 않고 닫으시겠습니까?"
                ) {
                    Button(
                        onClick = { isOpen = false }
                    ) {
                        Text("예")
                    }
                }
            }
        }
    }
}
"}
다중 창 작업하기
애플리케이션에 여러 개의 창이 있는 경우, 애플리케이션 상태를 위한 별도의 클래스를 만들고 mutableStateListOf의 변경에 반응하여 창을 열거나 닫을 수 있습니다.
import androidx.compose.runtime.Composable
import androidx.compose.runtime.key
import androidx.compose.runtime.mutableStateListOf
import androidx.compose.runtime.remember
import androidx.compose.ui.window.MenuBar
import androidx.compose.ui.window.Window
import androidx.compose.ui.window.application

fun main() = application {
    val applicationState = remember { MyApplicationState() }

    for (window in applicationState.windows) {
        key(window) {
            MyWindow(window)
        }
    }
}

@Composable
private fun MyWindow(
    state: MyWindowState
) = Window(onCloseRequest = state::close, title = state.title) {
    MenuBar {
        Menu("파일") {
            Item("새 창", onClick = state.openNewWindow)
            Item("종료", onClick = state.exit)
        }
    }
}

private class MyApplicationState {
    val windows = mutableStateListOf<MyWindowState>()

    init {
        windows += MyWindowState("첫 번째 창")
    }

    fun openNewWindow() {
        windows += MyWindowState("창 ${windows.size}")
    }

    fun exit() {
        windows.clear()
    }

    private fun MyWindowState(
        title: String
    ) = MyWindowState(
        title,
        openNewWindow = ::openNewWindow,
        exit = ::exit,
        windows::remove
    )
}

private class MyWindowState(
    val title: String,
    val openNewWindow: () -> Unit,
    val exit: () -> Unit,
    private val close: (MyWindowState) -> Unit
) {
    fun close() = close(this)
}
더 복잡한 예제는 Code Viewer 샘플을 참조하세요.
시스템 트레이로 창 최소화하기
창을 닫는 대신 숨기려면 windowState.isVisible 상태를 변경하면 됩니다.
import androidx.compose.material.Text
import androidx.compose.runtime.LaunchedEffect
import androidx.compose.runtime.getValue
import androidx.compose.runtime.mutableStateOf
import androidx.compose.runtime.remember
import androidx.compose.runtime.setValue
import androidx.compose.ui.geometry.Size
import androidx.compose.ui.graphics.Color
import androidx.compose.ui.graphics.drawscope.DrawScope
import androidx.compose.ui.graphics.painter.Painter
import androidx.compose.ui.window.Tray
import androidx.compose.ui.window.Window
import androidx.compose.ui.window.application
import kotlinx.coroutines.delay

fun main() = application {
    var isVisible by remember { mutableStateOf(true) }

    Window(
        onCloseRequest = { isVisible = false },
        visible = isVisible,
        title = "카운터",
    ) {
        var counter by remember { mutableStateOf(0) }
        LaunchedEffect(Unit) {
            while (true) {
                counter++
                delay(1000)
            }
        }
        Text(counter.toString())
    }

    if (!isVisible) {
        Tray(
            TrayIcon,
            tooltip = "카운터",
            onAction = { isVisible = true },
            menu = {
                Item("종료", onClick = ::exitApplication)
            },
        )
    }
}

object TrayIcon : Painter() {
    override val intrinsicSize = Size(256f, 256f)

    override fun DrawScope.onDraw() {
        drawOval(Color(0xFFFFA500))
    }
}
,"}
singleWindowApplication() 함수
singleWindowApplication() 함수를 호출하여 단일 창 애플리케이션을 만들 수 있습니다.
singleWindowApplication() 함수는 사용하기 더 쉽지만 다음과 같은 제한 사항이 있습니다.
- 애플리케이션은 하나의 창만 가질 수 있습니다.
- 커스텀 닫기 로직을 추가할 수 없습니다.
- 런타임에 창의 속성을 변경할 수 없습니다.
import androidx.compose.ui.window.singleWindowApplication

fun main() = singleWindowApplication {
    // 창의 콘텐츠
}
대안으로, application 진입점에서 Window() 컴포저블을 사용할 수 있습니다.
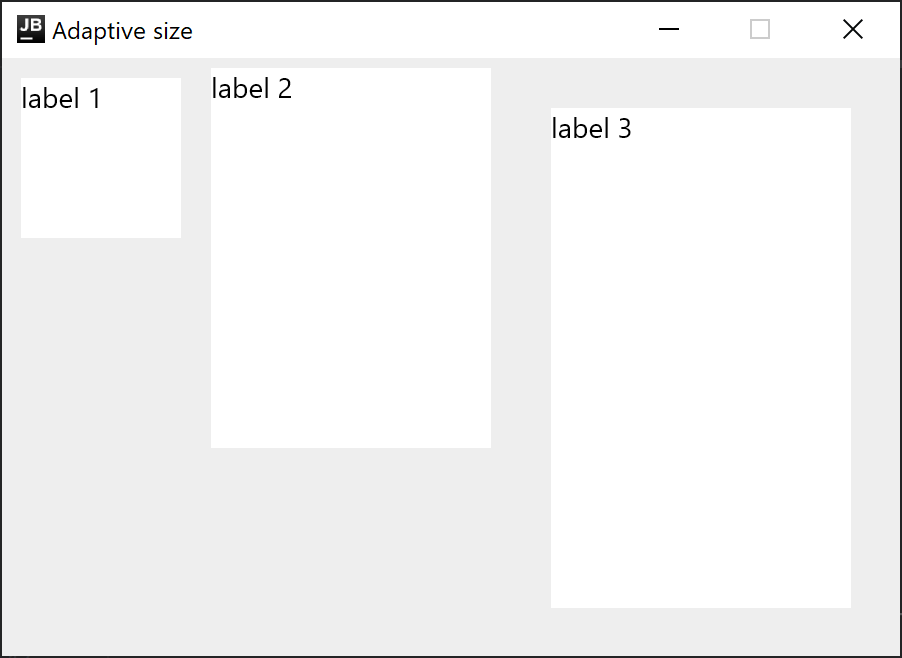
적응형 창 크기
예상되는 콘텐츠의 크기를 모르고 최적의 창 크기를 미리 지정할 수 없는 경우, WindowSize의 한쪽 또는 양쪽 치수를 Dp.Unspecified로 설정할 수 있습니다. 데스크톱용 Compose Multiplatform은 콘텐츠에 맞게 창의 초기 크기를 자동으로 조정합니다.
import androidx.compose.foundation.background
import androidx.compose.foundation.layout.Column
import androidx.compose.foundation.layout.Row
import androidx.compose.foundation.layout.padding
import androidx.compose.foundation.layout.size
import androidx.compose.material.Text
import androidx.compose.ui.Modifier
import androidx.compose.ui.graphics.Color
import androidx.compose.ui.unit.Dp
import androidx.compose.ui.unit.dp
import androidx.compose.ui.window.Window
import androidx.compose.ui.window.application
import androidx.compose.ui.window.rememberWindowState

fun main() = application {
    Window(
        onCloseRequest = ::exitApplication,
        state = rememberWindowState(width = Dp.Unspecified, height = Dp.Unspecified),
        title = "적응형 크기",
        resizable = false
    ) {
        Column(Modifier.background(Color(0xFFEEEEEE))) {
            Row {
                Text("레이블 1", Modifier.size(100.dp, 100.dp).padding(10.dp).background(Color.White))
                Text("레이블 2", Modifier.size(150.dp, 200.dp).padding(5.dp).background(Color.White))
                Text("레이블 3", Modifier.size(200.dp, 300.dp).padding(25.dp).background(Color.White))
            }
        }
    }
}
창 상태 변경하기
WindowState는 창 배치(placement), 현재 위치 및 크기를 관리하는 별도의 API 클래스입니다. 배치 속성을 사용하면 창이 화면에 배치되는 방식(플로팅, 최대화/최소화 또는 전체 화면)을 지정할 수 있습니다. 상태가 변경되면 자동으로 리컴포지션(recomposition)이 트리거됩니다. 창 상태를 변경하려면 콜백을 사용하거나 컴포저블에서 이를 관찰하세요.
import androidx.compose.foundation.clickable
import androidx.compose.foundation.layout.Column
import androidx.compose.foundation.layout.Row
import androidx.compose.material.Checkbox
import androidx.compose.material.Text
import androidx.compose.ui.Alignment
import androidx.compose.ui.Modifier
import androidx.compose.ui.unit.dp
import androidx.compose.ui.window.Window
import androidx.compose.ui.window.WindowPlacement
import androidx.compose.ui.window.WindowPosition
import androidx.compose.ui.window.application
import androidx.compose.ui.window.rememberWindowState

fun main() = application {
    val state = rememberWindowState(placement = WindowPlacement.Maximized)

    Window(onCloseRequest = ::exitApplication, state, title = "창 상태") {
        Column {
            Row(verticalAlignment = Alignment.CenterVertically) {
                Checkbox(
                    state.placement == WindowPlacement.Fullscreen,
                    {
                        state.placement = if (it) {
                            WindowPlacement.Fullscreen
                        } else {
                            WindowPlacement.Floating
                        }
                    }
                )
                Text("전체 화면 여부(isFullscreen)")
            }

            Row(verticalAlignment = Alignment.CenterVertically) {
                Checkbox(
                    state.placement == WindowPlacement.Maximized,
                    {
                        state.placement = if (it) {
                            WindowPlacement.Maximized
                        } else {
                            WindowPlacement.Floating
                        }
                    }
                )
                Text("최대화 여부(isMaximized)")
            }

            Row(verticalAlignment = Alignment.CenterVertically) {
                Checkbox(state.isMinimized, { state.isMinimized = !state.isMinimized })
                Text("최소화 여부(isMinimized)")
            }

            Text(
                "위치 ${state.position}",
                Modifier.clickable {
                    val position = state.position
                    if (position is WindowPosition.Absolute) {
                        state.position = position.copy(x = state.position.x + 10.dp)
                    }
                }
            )

            Text(
                "크기 ${state.size}",
                Modifier.clickable {
                    state.size = state.size.copy(width = state.size.width + 10.dp)
                }
            )
        }
    }
}
창 상태 관찰하기
상태 변경에 반응하여 그 값을 다른 비컴포저블(non-composable) 애플리케이션 레벨로 전달해야 하는 경우(예: 데이터베이스에 기록), snapshotFlow() 함수를 사용할 수 있습니다. 이 함수는 컴포저블 상태의 현재 값을 캡처합니다.
import androidx.compose.runtime.LaunchedEffect
import androidx.compose.runtime.snapshotFlow
import androidx.compose.ui.unit.DpSize
import androidx.compose.ui.window.Window
import androidx.compose.ui.window.WindowPosition
import androidx.compose.ui.window.application
import androidx.compose.ui.window.rememberWindowState
import kotlinx.coroutines.flow.filter
import kotlinx.coroutines.flow.launchIn
import kotlinx.coroutines.flow.onEach

fun main() = application {
    val state = rememberWindowState()

    Window(onCloseRequest = ::exitApplication, state) {
        LaunchedEffect(state) {
            snapshotFlow { state.size }
                .onEach(::onWindowResize)
                .launchIn(this)

            snapshotFlow { state.position }
                .filter { it.isSpecified }
                .onEach(::onWindowRelocate)
                .launchIn(this)
        }
    }
}

private fun onWindowResize(size: DpSize) {
    println("onWindowResize $size")
}

private fun onWindowRelocate(position: WindowPosition) {
    println("onWindowRelocate $position")
}
.onEach(::onWindowResize)"}
대화 상자 (Dialogs)
Window() 컴포저블을 사용하여 일반 창을 만들고, 사용자가 모달 창을 닫을 때까지 부모 창을 잠그는 모달 창에는 DialogWindow() 컴포저블을 사용할 수 있습니다.
다음 코드 샘플은 이러한 컴포저블을 사용하여 일반 창과 모달 창을 결합하는 방법을 보여줍니다.
import androidx.compose.material.Button
import androidx.compose.material.Text
import androidx.compose.runtime.getValue
import androidx.compose.runtime.mutableStateOf
import androidx.compose.runtime.remember
import androidx.compose.runtime.setValue
import androidx.compose.ui.Alignment
import androidx.compose.ui.window.DialogWindow
import androidx.compose.ui.window.Window
import androidx.compose.ui.window.WindowPosition
import androidx.compose.ui.window.application
import androidx.compose.ui.window.rememberDialogState

fun main() = application {
    Window(
        onCloseRequest = ::exitApplication,
    ) {
        var isDialogOpen by remember { mutableStateOf(false) }

        Button(onClick = { isDialogOpen = true }) {
            Text(text = "대화 상자 열기")
        }

        if (isDialogOpen) {
            DialogWindow(
                onCloseRequest = { isDialogOpen = false },
                state = rememberDialogState(position = WindowPosition(Alignment.Center))
            ) {
                // 창의 콘텐츠
            }
        }
    }
}
,"}
드래그 가능한 창 영역
장식되지 않은 창(undecorated window)에 커스텀 드래그 가능 타이틀 바를 추가하거나 창 전체를 드래그 가능하게 만들려면 WindowDraggableArea() 컴포저블을 사용할 수 있습니다.
import androidx.compose.foundation.background
import androidx.compose.foundation.layout.Box
import androidx.compose.foundation.layout.fillMaxWidth
import androidx.compose.foundation.layout.height
import androidx.compose.foundation.window.WindowDraggableArea
import androidx.compose.ui.Modifier
import androidx.compose.ui.graphics.Color
import androidx.compose.ui.unit.dp
import androidx.compose.ui.window.Window
import androidx.compose.ui.window.application

fun main() = application {
    Window(onCloseRequest = ::exitApplication, undecorated = true) {
        WindowDraggableArea {
            Box(Modifier.fillMaxWidth().height(48.dp).background(Color.DarkGray))
        }
    }
}
"}
WindowDraggableArea()는 singleWindowApplication(), Window(), DialogWindow() 컴포저블 내부에서만 사용할 수 있습니다. 다른 컴포저블 함수에서 이를 호출하려면 WindowScope를 리시버 스코프(receiver scope)로 사용하세요.
import androidx.compose.foundation.background
import androidx.compose.foundation.layout.Box
import androidx.compose.foundation.layout.fillMaxWidth
import androidx.compose.foundation.layout.height
import androidx.compose.foundation.window.WindowDraggableArea
import androidx.compose.runtime.Composable
import androidx.compose.ui.Modifier
import androidx.compose.ui.graphics.Color
import androidx.compose.ui.unit.dp
import androidx.compose.ui.window.Window
import androidx.compose.ui.window.WindowScope
import androidx.compose.ui.window.application

fun main() = application {
    Window(onCloseRequest = ::exitApplication, undecorated = true) {
        AppWindowTitleBar()
    }
}

@Composable
private fun WindowScope.AppWindowTitleBar() = WindowDraggableArea {
    Box(Modifier.fillMaxWidth().height(48.dp).background(Color.DarkGray))
}
투명 창 및 기타 커스터마이징
투명한 창을 만들려면 Window() 함수에 transparent=true와 undecorated=true라는 두 개의 파라미터를 전달하세요. 투명한 창은 장식(decorate)할 수 없으므로 반드시 장식되지 않아야(undecorated) 합니다.
다음 코드 샘플은 컴포저블을 결합하여 모서리가 둥근 투명 창을 만드는 방법을 보여줍니다.
import androidx.compose.foundation.layout.fillMaxSize
import androidx.compose.foundation.layout.padding
import androidx.compose.foundation.shape.RoundedCornerShape
import androidx.compose.material.Surface
import androidx.compose.runtime.mutableStateOf
import androidx.compose.runtime.remember
import androidx.compose.ui.Modifier
import androidx.compose.ui.draw.shadow
import androidx.compose.ui.graphics.Color
import androidx.compose.ui.unit.dp
import androidx.compose.ui.window.Window
import androidx.compose.ui.window.application
import androidx.compose.material.Text
import androidx.compose.runtime.*

fun main() = application {
    var isOpen by remember { mutableStateOf(true) }
    if (isOpen) {
        Window(
            onCloseRequest = { isOpen = false },
            title = "투명 창 예제",
            transparent = true,
            // 투명 창은 반드시 undecorated여야 합니다.
            undecorated = true,
        ) {
            Surface(
                modifier = Modifier.fillMaxSize().padding(5.dp).shadow(3.dp, RoundedCornerShape(20.dp)),
                color = Color.Transparent,
                // 모서리가 둥근 창
                shape = RoundedCornerShape(20.dp)
            ) {
                Text("Hello World!", color = Color.White)
            }
        }
    }
}
Swing 상호운용성
데스크톱용 Compose Multiplatform은 내부적으로 Swing을 사용하므로, Swing을 직접 사용하여 창을 만들 수 있습니다.
import androidx.compose.ui.awt.ComposeWindow
import java.awt.Dimension
import javax.swing.JFrame
import javax.swing.SwingUtilities

fun main() = SwingUtilities.invokeLater {
    ComposeWindow().apply {
        size = Dimension(300, 300)
        defaultCloseOperation = JFrame.DISPOSE_ON_CLOSE
        setContent {
            // 창의 콘텐츠
        }
        isVisible = true
    }
}
Window() 컴포저블의 스코프를 사용할 수도 있습니다. 다음 코드 샘플에서 window는 Window() 내부에서 생성된 ComposeWindow입니다.
import androidx.compose.runtime.LaunchedEffect
import androidx.compose.ui.window.singleWindowApplication
import java.awt.datatransfer.DataFlavor
import java.awt.dnd.DnDConstants
import java.awt.dnd.DropTarget
import java.awt.dnd.DropTargetAdapter
import java.awt.dnd.DropTargetDropEvent

fun main() = singleWindowApplication {
    LaunchedEffect(Unit) {
        window.dropTarget = DropTarget().apply {
            addDropTargetListener(object : DropTargetAdapter() {
                override fun drop(event: DropTargetDropEvent) {
                    event.acceptDrop(DnDConstants.ACTION_COPY)
                    val fileName = event.transferable.getTransferData(DataFlavor.javaFileListFlavor)
                    println(fileName)
                }
            })
        }
    }
}
Swing으로 구현된 대화 상자를 사용해야 하는 경우, 이를 컴포저블 함수로 래핑할 수 있습니다.
import androidx.compose.runtime.Composable
import androidx.compose.runtime.getValue
import androidx.compose.runtime.mutableStateOf
import androidx.compose.runtime.remember
import androidx.compose.runtime.setValue
import androidx.compose.ui.window.AwtWindow
import androidx.compose.ui.window.application
import java.awt.FileDialog
import java.awt.Frame

fun main() = application {
    var isOpen by remember { mutableStateOf(true) }

    if (isOpen) {
        FileDialog(
            onCloseRequest = {
                isOpen = false
                println("결과 $it")
            }
        )
    }
}

@Composable
private fun FileDialog(
    parent: Frame? = null,
    onCloseRequest: (result: String?) -> Unit
) = AwtWindow(
    create = {
        object : FileDialog(parent, "파일 선택", LOAD) {
            override fun setVisible(value: Boolean) {
                super.setVisible(value)
                if (value) {
                    onCloseRequest(file)
                }
            }
        }
    },
    dispose = FileDialog::dispose
)
다음 단계
기타 데스크톱 컴포넌트에 관한 튜토리얼을 살펴보세요.