중급: 클래스와 인터페이스
![]() 확장 함수
확장 함수![]() 범위 함수
범위 함수![]() 수신 객체가 있는 람다 식
수신 객체가 있는 람다 식![]() 클래스와 인터페이스
클래스와 인터페이스![]() 객체
객체![]() Open 및 특수 클래스
Open 및 특수 클래스![]() 프로퍼티
프로퍼티![]() Null 안전성
Null 안전성![]() 라이브러리 및 API
라이브러리 및 API
초급 투어에서는 클래스와 데이터 클래스를 사용하여 데이터를 저장하고 코드에서 공유할 수 있는 일련의 특성을 유지하는 방법을 배웠습니다. 결국 프로젝트 내에서 코드를 효율적으로 공유하기 위해 계층 구조를 만들고 싶을 것입니다. 이 장에서는 코드를 공유하기 위해 코틀린이 제공하는 옵션과 이러한 옵션이 코드를 더 안전하고 유지 관리하기 쉽게 만드는 방법을 설명합니다.
클래스 상속
이전 장에서 원본 소스 코드를 수정하지 않고 클래스를 확장하기 위해 확장 함수를 사용하는 방법을 다뤘습니다. 하지만 클래스 간에 코드를 공유하는 것이 유용한 복잡한 작업을 수행한다면 어떨까요? 그런 경우에는 클래스 상속을 사용할 수 있습니다.
기본적으로 코틀린의 클래스는 상속될 수 없습니다. 코틀린은 의도치 않은 상속을 방지하고 클래스를 더 쉽게 유지 관리할 수 있도록 이와 같이 설계되었습니다.
코틀린 클래스는 단일 상속만 지원합니다. 즉, 한 번에 하나의 클래스만 상속받을 수 있습니다. 이 클래스를 부모(parent) 클래스라고 합니다.
클래스의 부모가 다른 클래스(조부모)로부터 상속받아 계층 구조를 형성할 수 있습니다. 코틀린 클래스 계층 구조의 최상위에는 공통 부모 클래스인 Any가 있습니다. 모든 클래스는 궁극적으로 Any 클래스를 상속받습니다.
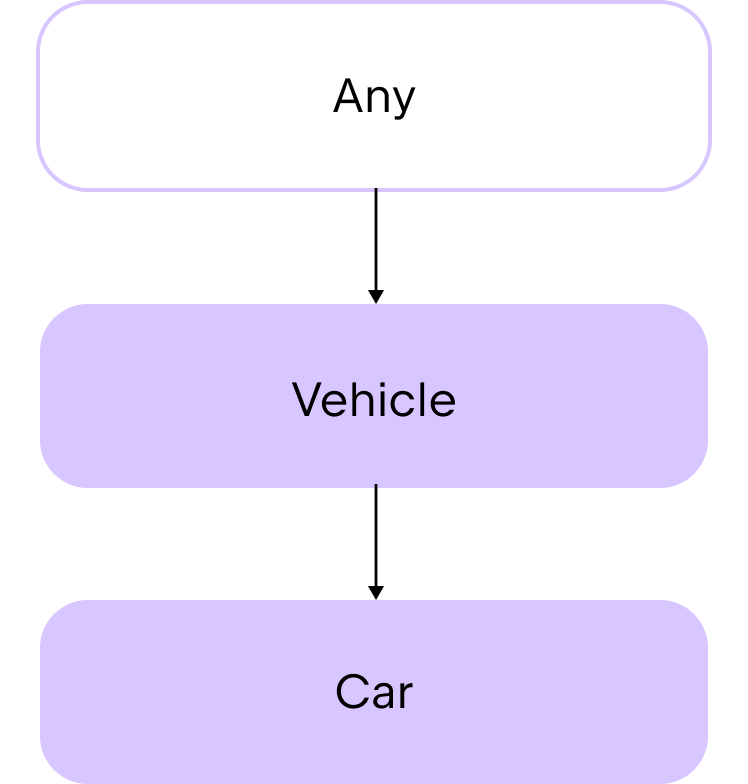
Any 클래스는 toString() 함수를 멤버 함수로 자동 제공합니다. 따라서 여러분이 만드는 모든 클래스에서 이 상속된 함수를 사용할 수 있습니다. 예시는 다음과 같습니다.
class Car(val make: String, val model: String, val numberOfDoors: Int)

fun main() {
    val car1 = Car("Toyota", "Corolla", 4)

    // 문자열 템플릿을 통해 .toString() 함수를 사용하여 클래스 프로퍼티를 출력합니다.
    println("Car1: make=${car1.make}, model=${car1.model}, numberOfDoors=${car1.numberOfDoors}")
    // Car1: make=Toyota, model=Corolla, numberOfDoors=4
}
상속을 사용하여 클래스 간에 코드를 공유하고 싶다면 먼저 추상 클래스 사용을 고려해 보세요.
추상 클래스 (Abstract classes)
추상 클래스는 기본적으로 상속이 가능합니다. 추상 클래스의 목적은 다른 클래스가 상속하거나 구현할 멤버를 제공하는 것입니다. 따라서 생성자를 가질 수 있지만, 추상 클래스로부터 인스턴스를 직접 생성할 수는 없습니다. 자식 클래스 내에서는 override 키워드를 사용하여 부모의 프로퍼티와 함수의 동작을 정의합니다. 이런 방식으로 자식 클래스가 부모 클래스의 멤버를 "재정의(override)"한다고 말할 수 있습니다.
상속된 함수나 프로퍼티의 동작을 정의하는 것을 구현(implementation)이라고 합니다.
추상 클래스는 구현이 있는 함수와 프로퍼티뿐만 아니라, 추상 함수 및 추상 프로퍼티라고 불리는 구현이 없는 함수와 프로퍼티를 모두 포함할 수 있습니다.
추상 클래스를 만들려면 abstract 키워드를 사용합니다.
abstract class Animal구현 없이 함수나 프로퍼티를 선언하려면 역시 abstract 키워드를 사용합니다.
abstract fun makeSound()
abstract val sound: String
예를 들어, 서로 다른 제품 카테고리를 정의하기 위해 자식 클래스를 만들 수 있는 Product라는 추상 클래스를 생성한다고 가정해 보겠습니다.
abstract class Product(val name: String, var price: Double) {
    // 제품 카테고리를 위한 추상 프로퍼티
    abstract val category: String

    // 모든 제품이 공유할 수 있는 함수
    fun productInfo(): String {
        return "Product: $name, Category: $category, Price: $price"
    }
}
추상 클래스에서:
- 생성자는 제품의
name과price를 위한 두 개의 매개변수를 가집니다. - 제품 카테고리를 문자열로 담는 추상 프로퍼티가 있습니다.
- 제품 정보를 출력하는 함수가 있습니다.
전자 제품을 위한 자식 클래스를 만들어 보겠습니다. 자식 클래스에서 category 프로퍼티의 구현을 정의하기 전에 반드시 override 키워드를 사용해야 합니다.
class Electronic(name: String, price: Double, val warranty: Int) : Product(name, price) {
    override val category = "Electronic"
}
Electronic 클래스는:
Product추상 클래스를 상속받습니다.- 생성자에 전자 제품에 특화된
warranty라는 추가 매개변수를 가집니다. category프로퍼티를"Electronic"문자열을 포함하도록 재정의합니다.
이제 이 클래스들을 다음과 같이 사용할 수 있습니다.
abstract class Product(val name: String, var price: Double) {
    // 제품 카테고리를 위한 추상 프로퍼티
    abstract val category: String

    // 모든 제품이 공유할 수 있는 함수
    fun productInfo(): String {
        return "Product: $name, Category: $category, Price: $price"
    }
}

class Electronic(name: String, price: Double, val warranty: Int) : Product(name, price) {
    override val category = "Electronic"
}

fun main() {
    // Electronic 클래스의 인스턴스를 생성합니다.
    val laptop = Electronic(name = "Laptop", price = 1000.0, warranty = 2)

    println(laptop.productInfo())
    // Product: Laptop, Category: Electronic, Price: 1000.0
}
추상 클래스는 이러한 방식으로 코드를 공유하는 데 훌륭하지만, 코틀린의 클래스는 단일 상속만 지원한다는 제약이 있습니다. 만약 여러 소스로부터 상속을 받아야 한다면 인터페이스 사용을 고려해 보세요.
인터페이스 (Interfaces)
인터페이스는 클래스와 비슷하지만 몇 가지 차이점이 있습니다.
- 인터페이스의 인스턴스를 직접 생성할 수 없습니다. 생성자나 헤더를 가질 수 없기 때문입니다.
- 인터페이스의 함수와 프로퍼티는 기본적으로 상속 가능합니다. 코틀린에서는 이를 "열려 있다(open)"고 표현합니다.
- 구현을 제공하지 않는 경우 함수에
abstract표시를 할 필요가 없습니다.
추상 클래스와 유사하게, 인터페이스를 사용하여 나중에 클래스가 상속받고 구현할 일련의 함수와 프로퍼티를 정의합니다. 이 접근 방식은 구체적인 구현 세부 사항보다는 인터페이스가 설명하는 추상화에 집중하도록 도와줍니다. 인터페이스를 사용하면 코드를 다음과 같이 만들 수 있습니다.
- 각 부분을 격리하여 독립적으로 발전할 수 있게 하므로 더 모듈화됩니다.
- 관련 함수를 응집력 있는 세트로 그룹화하여 이해하기 쉬워집니다.
- 테스트를 위해 구현을 모의 객체(mock)로 빠르게 교체할 수 있으므로 테스트하기 쉬워집니다.
인터페이스를 선언하려면 interface 키워드를 사용합니다.
interface PaymentMethod인터페이스 구현
인터페이스는 다중 상속을 지원하므로 하나의 클래스가 한 번에 여러 인터페이스를 구현할 수 있습니다. 먼저 클래스가 하나의 인터페이스를 구현하는 시나리오를 살펴보겠습니다.
인터페이스를 구현하는 클래스를 만들려면 클래스 헤더 뒤에 콜론을 추가하고, 구현하려는 인터페이스 이름을 적습니다. 인터페이스는 생성자가 없으므로 인터페이스 이름 뒤에 괄호 ()를 사용하지 않습니다.
class CreditCardPayment : PaymentMethod예시는 다음과 같습니다.
interface PaymentMethod {
    // 함수는 기본적으로 상속 가능합니다.
    fun initiatePayment(amount: Double): String
}

class CreditCardPayment(val cardNumber: String, val cardHolderName: String, val expiryDate: String) : PaymentMethod {
    override fun initiatePayment(amount: Double): String {
        // 신용카드로 결제 처리를 시뮬레이션합니다.
        return "Payment of $amount initiated using Credit Card ending in ${cardNumber.takeLast(4)}."
    }
}

fun main() {
    val paymentMethod = CreditCardPayment("1234 5678 9012 3456", "John Doe", "12/25")
    println(paymentMethod.initiatePayment(100.0))
    // Payment of $100.0 initiated using Credit Card ending in 3456.
}
이 예제에서:
PaymentMethod는 구현이 없는initiatePayment()함수를 가진 인터페이스입니다.CreditCardPayment는PaymentMethod인터페이스를 구현하는 클래스입니다.CreditCardPayment클래스는 상속된initiatePayment()함수를 재정의합니다.paymentMethod는CreditCardPayment클래스의 인스턴스입니다.- 재정의된
initiatePayment()함수가100.0매개변수와 함께paymentMethod인스턴스에서 호출됩니다.
여러 인터페이스를 구현하는 클래스를 만들려면 클래스 헤더 뒤에 콜론을 추가하고, 구현하려는 인터페이스들의 이름을 쉼표로 구분하여 적습니다.
class CreditCardPayment : PaymentMethod, PaymentType예시는 다음과 같습니다.
interface PaymentMethod {
    fun initiatePayment(amount: Double): String
}

interface PaymentType {
    val paymentType: String
}

class CreditCardPayment(val cardNumber: String, val cardHolderName: String, val expiryDate: String) : PaymentMethod,
    PaymentType {
    override fun initiatePayment(amount: Double): String {
        // 신용카드로 결제 처리를 시뮬레이션합니다.
        return "Payment of $amount initiated using Credit Card ending in ${cardNumber.takeLast(4)}."
    }

    override val paymentType: String = "Credit Card"
}

fun main() {
    val paymentMethod = CreditCardPayment("1234 5678 9012 3456", "John Doe", "12/25")
    println(paymentMethod.initiatePayment(100.0))
    // Payment of $100.0 initiated using Credit Card ending in 3456.

    println("Payment is by ${paymentMethod.paymentType}")
    // Payment is by Credit Card
}
이 예제에서:
PaymentMethod는 구현이 없는initiatePayment()함수를 가진 인터페이스입니다.PaymentType은 초기화되지 않은paymentType프로퍼티를 가진 인터페이스입니다.CreditCardPayment는PaymentMethod와PaymentType인터페이스를 구현하는 클래스입니다.CreditCardPayment클래스는 상속된initiatePayment()함수와paymentType프로퍼티를 재정의합니다.paymentMethod는CreditCardPayment클래스의 인스턴스입니다.- 재정의된
initiatePayment()함수가100.0매개변수와 함께paymentMethod인스턴스에서 호출됩니다. - 재정의된
paymentType프로퍼티가paymentMethod인스턴스에서 접근됩니다.
인터페이스 및 인터페이스 상속에 대한 자세한 정보는 Interfaces를 참조하세요.
위임 (Delegation)
인터페이스는 유용하지만, 인터페이스에 많은 함수가 포함되어 있으면 자식 클래스에 많은 상용구 코드가 생길 수 있습니다. 클래스 동작의 아주 일부분만 재정의하고 싶은 경우에도 많은 코드를 반복해서 작성해야 합니다.
상용구 코드(Boilerplate code)는 소프트웨어 프로젝트의 여러 부분에서 거의 또는 전혀 수정하지 않고 재사용되는 코드 덩어리입니다.
예를 들어, 여러 개의 함수와 color라는 하나의 프로퍼티를 포함하는 DrawingTool 인터페이스가 있다고 가정해 보겠습니다.
interface DrawingTool {
    val color: String
    fun draw(shape: String)
    fun erase(area: String)
    fun getToolInfo(): String
}
DrawingTool 인터페이스를 구현하고 모든 멤버에 대한 구현을 제공하는 PenTool 클래스를 만듭니다.
class PenTool : DrawingTool {
    override val color: String = "black"

    override fun draw(shape: String) {
        println("Drawing $shape using a pen in $color")
    }

    override fun erase(area: String) {
        println("Erasing $area with pen tool")
    }

    override fun getToolInfo(): String {
        return "PenTool(color=$color)"
    }
}
여러분은 PenTool과 동일한 동작을 가지지만 color 값만 다른 클래스를 만들고 싶습니다. 한 가지 방법은 PenTool 클래스 인스턴스처럼 DrawingTool 인터페이스를 구현하는 객체를 매개변수로 받는 새 클래스를 만드는 것입니다. 그런 다음 클래스 내부에서 color 프로퍼티를 재정의할 수 있습니다.
하지만 이 시나리오에서는 DrawingTool 인터페이스의 각 멤버에 대한 구현을 직접 추가해야 합니다.
interface DrawingTool {
    val color: String
    fun draw(shape: String)
    fun erase(area: String)
    fun getToolInfo(): String
}

class PenTool : DrawingTool {
    override val color: String = "black"

    override fun draw(shape: String) {
        println("Drawing $shape using a pen in $color")
    }

    override fun erase(area: String) {
        println("Erasing $area with pen tool")
    }

    override fun getToolInfo(): String {
        return "PenTool(color=$color)"
    }
}
class CanvasSession(val tool: DrawingTool) : DrawingTool {
    override val color: String = "blue"

    override fun draw(shape: String) {
        tool.draw(shape)
    }

    override fun erase(area: String) {
        tool.erase(area)
    }

    override fun getToolInfo(): String {
        return tool.getToolInfo()
    }
}
fun main() {
    val pen = PenTool()
    val session = CanvasSession(pen)

    println("Pen color: ${pen.color}")
    // Pen color: black

    println("Session color: ${session.color}")
    // Session color: blue

    session.draw("circle")
    // Drawing circle with pen in black

    session.erase("top-left corner")
    // Erasing top-left corner with pen tool

    println(session.getToolInfo())
    // PenTool(color=black)
}
만약 DrawingTool 인터페이스에 많은 수의 멤버 함수가 있다면, CanvasSession 클래스의 상용구 코드 양이 매우 방대해질 것임을 알 수 있습니다. 하지만 대안이 있습니다.
코틀린에서는 by 키워드를 사용하여 인터페이스 구현을 클래스 인스턴스에 위임할 수 있습니다. 예시는 다음과 같습니다.
class CanvasSession(val tool: DrawingTool) : DrawingTool by tool여기서 tool은 멤버 함수의 구현이 위임될 PenTool 클래스 인스턴스의 이름입니다.
이제 CanvasSession 클래스에 멤버 함수에 대한 구현을 직접 추가할 필요가 없습니다. 컴파일러가 PenTool 클래스를 바탕으로 이를 자동으로 처리해 줍니다. 이를 통해 많은 상용구 코드를 작성해야 하는 수고를 덜 수 있습니다. 대신, 자식 클래스에서 변경하고 싶은 동작에 대해서만 코드를 추가하면 됩니다.
예를 들어, color 프로퍼티의 값을 변경하고 싶은 경우:
interface DrawingTool {
    val color: String
    fun draw(shape: String)
    fun erase(area: String)
    fun getToolInfo(): String
}

class PenTool : DrawingTool {
    override val color: String = "black"

    override fun draw(shape: String) {
        println("Drawing $shape using a pen in $color")
    }

    override fun erase(area: String) {
        println("Erasing $area with pen tool")
    }

    override fun getToolInfo(): String {
        return "PenTool(color=$color)"
    }
}

class CanvasSession(val tool: DrawingTool) : DrawingTool by tool {
    // 상용구 코드가 없습니다!
    override val color: String = "blue"
}
fun main() {
    val pen = PenTool()
    val session = CanvasSession(pen)

    println("Pen color: ${pen.color}")
    // Pen color: black

    println("Session color: ${session.color}")
    // Session color: blue

    session.draw("circle")
    // Drawing circle with pen in black

    session.erase("top-left corner")
    // Erasing top-left corner with pen tool

    println(session.getToolInfo())
    // PenTool(color=black)
}
원한다면 CanvasSession 클래스에서 상속된 멤버 함수의 동작을 재정의할 수도 있지만, 이제는 모든 상속된 멤버 함수마다 새로운 코드를 추가할 필요가 없습니다.
더 자세한 정보는 Delegation을 참조하세요.
연습 문제
연습 문제 1
스마트 홈 시스템을 구축하고 있다고 가정해 보겠습니다. 스마트 홈에는 일반적으로 기본적인 기능은 공유하지만 고유한 동작을 가진 다양한 유형의 장치가 있습니다. 아래 코드 샘플에서 SmartLight 자식 클래스가 성공적으로 컴파일될 수 있도록 SmartDevice라는 abstract 클래스를 완성하세요.
그런 다음, SmartDevice 클래스를 상속받는 SmartThermostat이라는 다른 자식 클래스를 만드세요. 이 클래스는 어떤 온도 조절기가 가열 중인지 또는 꺼져 있는지를 설명하는 출력문을 반환하는 turnOn() 및 turnOff() 함수를 구현해야 합니다. 마지막으로, 온도 측정값을 입력으로 받아 $name thermostat set to $temperature°C.를 출력하는 adjustTemperature()라는 함수를 추가하세요.
힌트
SmartDevice 클래스에 turnOn() 및 turnOff() 함수를 추가하여 나중에 SmartThermostat 클래스에서 그 동작을 재정의할 수 있도록 하세요. |--|--|
abstract class // 코드를 여기에 작성하세요

class SmartLight(name: String) : SmartDevice(name) {
    override fun turnOn() {
        println("$name is now ON.")
    }

    override fun turnOff() {
        println("$name is now OFF.")
    }

   fun adjustBrightness(level: Int) {
        println("Adjusting $name brightness to $level%.")
    }
}

class SmartThermostat // 코드를 여기에 작성하세요

fun main() {
    val livingRoomLight = SmartLight("Living Room Light")
    val bedroomThermostat = SmartThermostat("Bedroom Thermostat")

    livingRoomLight.turnOn()
    // Living Room Light is now ON.
    livingRoomLight.adjustBrightness(10)
    // Adjusting Living Room Light brightness to 10%.
    livingRoomLight.turnOff()
    // Living Room Light is now OFF.

    bedroomThermostat.turnOn()
    // Bedroom Thermostat thermostat is now heating.
    bedroomThermostat.adjustTemperature(5)
    // Bedroom Thermostat thermostat set to 5°C.
    bedroomThermostat.turnOff()
    // Bedroom Thermostat thermostat is now off.
}abstract class SmartDevice(val name: String) {
abstract fun turnOn()
abstract fun turnOff()
}
class SmartLight(name: String) : SmartDevice(name) {
override fun turnOn() {
println("$name is now ON.")
}
override fun turnOff() {
println("$name is now OFF.")
}
fun adjustBrightness(level: Int) {
println("Adjusting $name brightness to $level%.")
}
}
class SmartThermostat(name: String) : SmartDevice(name) {
override fun turnOn() {
println("$name thermostat is now heating.")
}
override fun turnOff() {
println("$name thermostat is now off.")
}
fun adjustTemperature(temperature: Int) {
println("$name thermostat set to $temperature°C.")
}
}
fun main() {
val livingRoomLight = SmartLight("Living Room Light")
val bedroomThermostat = SmartThermostat("Bedroom Thermostat")
livingRoomLight.turnOn()
// Living Room Light is now ON.
livingRoomLight.adjustBrightness(10)
// Adjusting Living Room Light brightness to 10%.
livingRoomLight.turnOff()
// Living Room Light is now OFF.
bedroomThermostat.turnOn()
// Bedroom Thermostat thermostat is now heating.
bedroomThermostat.adjustTemperature(5)
// Bedroom Thermostat thermostat set to 5°C.
bedroomThermostat.turnOff()
// Bedroom Thermostat thermostat is now off.
}연습 문제 2
Audio, Video 또는 Podcast와 같은 특정 미디어 클래스를 구현하는 데 사용할 수 있는 Media 인터페이스를 만드세요. 인터페이스에는 다음이 포함되어야 합니다.
- 미디어의 제목을 나타내는
title프로퍼티. - 미디어를 재생하는
play()함수.
그런 다음, Media 인터페이스를 구현하는 Audio 클래스를 만드세요. Audio 클래스는 생성자에서 title 프로퍼티를 사용해야 하며, String 타입의 composer라는 추가 프로퍼티를 가져야 합니다. 클래스 내에서 play() 함수를 구현하여 "Playing audio: $title, composed by $composer"를 출력하도록 하세요.
힌트
override 키워드를 사용하여 생성자에서 인터페이스의 프로퍼티를 구현할 수 있습니다. interface // 코드를 여기에 작성하세요
class // 코드를 여기에 작성하세요
fun main() {
val audio = Audio("Symphony No. 5", "Beethoven")
audio.play()
// Playing audio: Symphony No. 5, composed by Beethoven
}모범 답안
interface Media {
    val title: String
    fun play()
}

class Audio(override val title: String, val composer: String) : Media {
    override fun play() {
        println("Playing audio: $title, composed by $composer")
    }
}

fun main() {
    val audio = Audio("Symphony No. 5", "Beethoven")
    audio.play()
   // Playing audio: Symphony No. 5, composed by Beethoven
}
연습 문제 3
이커머스 애플리케이션을 위한 결제 처리 시스템을 구축하고 있습니다. 각 결제 수단은 결제를 승인하고 트랜잭션을 처리할 수 있어야 합니다. 일부 결제는 환불 처리도 가능해야 합니다.
Refundable인터페이스에 환불 처리를 위한refund()함수를 추가하세요.PaymentMethod추상 클래스에서:- 금액을 인자로 받아 금액을 포함한 메시지를 출력하는
authorize()함수를 추가하세요. - 마찬가지로 금액을 인자로 받는
processPayment()추상 함수를 추가하세요.
- 금액을 인자로 받아 금액을 포함한 메시지를 출력하는
Refundable인터페이스와PaymentMethod추상 클래스를 구현하는CreditCard클래스를 만드세요. 이 클래스에서refund()및processPayment()함수를 구현하여 다음 문장이 출력되도록 하세요."Refunding $amount to the credit card.""Processing credit card payment of $amount."
interface Refundable {
    // 코드를 여기에 작성하세요
}

abstract class PaymentMethod(val name: String) {
    // 코드를 여기에 작성하세요
}

class CreditCard // 코드를 여기에 작성하세요

fun main() {
    val visa = CreditCard("Visa")

    visa.authorize(100.0)
    // Authorizing payment of $100.0.
    visa.processPayment(100.0)
    // Processing credit card payment of $100.0.
    visa.refund(50.0)
    // Refunding $50.0 to the credit card.
}
모범 답안
interface Refundable {
    fun refund(amount: Double)
}

abstract class PaymentMethod(val name: String) {
    fun authorize(amount: Double) {
        println("Authorizing payment of $amount.")
    }

    abstract fun processPayment(amount: Double)
}

class CreditCard(name: String) : PaymentMethod(name), Refundable {
    override fun processPayment(amount: Double) {
        println("Processing credit card payment of $amount.")
    }

    override fun refund(amount: Double) {
        println("Refunding $amount to the credit card.")
    }
}

fun main() {
    val visa = CreditCard("Visa")

    visa.authorize(100.0)
    // Authorizing payment of $100.0.
    visa.processPayment(100.0)
    // Processing credit card payment of $100.0.
    visa.refund(50.0)
    // Refunding $50.0 to the credit card.
}
연습 문제 4
기본적인 기능이 있는 간단한 메시징 앱이 있습니다. 상당한 코드 중복 없이 스마트 메시지를 위한 기능을 추가하려고 합니다.
아래 코드에서 Messenger 인터페이스를 상속받되, 구현을 BasicMessenger 클래스의 인스턴스에 위임하는 SmartMessenger 클래스를 정의하세요.
SmartMessenger 클래스에서 sendMessage() 함수를 재정의하여 스마트 메시지를 보내도록 하세요. 함수는 message를 입력으로 받아 "Sending a smart message: $message"라는 출력문을 반환해야 합니다. 또한, BasicMessenger 클래스의 sendMessage() 함수를 호출하고 메시지 앞에 [smart]를 붙여야 합니다.
SmartMessenger클래스에서receiveMessage()함수를 다시 작성할 필요는 없습니다.
|--|--|
interface Messenger {
    fun sendMessage(message: String)
    fun receiveMessage(): String
}

class BasicMessenger : Messenger {
    override fun sendMessage(message: String) {
        println("Sending message: $message")
    }

    override fun receiveMessage(): String {
        return "You've got a new message!"
    }
}

class SmartMessenger // 코드를 여기에 작성하세요

fun main() {
    val basicMessenger = BasicMessenger()
    val smartMessenger = SmartMessenger(basicMessenger)

    basicMessenger.sendMessage("Hello!")
    // Sending message: Hello!
    println(smartMessenger.receiveMessage())
    // You've got a new message!
    smartMessenger.sendMessage("Hello from SmartMessenger!")
    // Sending a smart message: Hello from SmartMessenger!
    // Sending message: [smart] Hello from SmartMessenger!
}interface Messenger {
fun sendMessage(message: String)
fun receiveMessage(): String
}
class BasicMessenger : Messenger {
override fun sendMessage(message: String) {
println("Sending message: $message")
}
override fun receiveMessage(): String {
return "You've got a new message!"
}
}
class SmartMessenger(val basicMessenger: BasicMessenger) : Messenger by basicMessenger {
override fun sendMessage(message: String) {
println("Sending a smart message: $message")
basicMessenger.sendMessage("[smart] $message")
}
}
fun main() {
val basicMessenger = BasicMessenger()
val smartMessenger = SmartMessenger(basicMessenger)
basicMessenger.sendMessage("Hello!")
// Sending message: Hello!
println(smartMessenger.receiveMessage())
// You've got a new message!
smartMessenger.sendMessage("Hello from SmartMessenger!")
// Sending a smart message: Hello from SmartMessenger!
// Sending message: [smart] Hello from SmartMessenger!
}