協同程式上下文與分派器
協同程式總是在由 Kotlin 標準函式庫中定義的 CoroutineContext 型別值所代表的某種上下文中執行。
協同程式上下文是一組各種元素的集合。主要元素是協同程式的 Job(我們之前見過)以及它的分派器(本節將介紹)。
分派器與執行緒
協同程式上下文包含一個 協同程式分派器(參見 CoroutineDispatcher),它決定了對應的協同程式使用哪個或哪些執行緒來執行。協同程式分派器可以將協同程式的執行限制在特定的執行緒中、將其分派到執行緒池中,或讓其不受限地執行。
所有協同程式建置器(如 launch 和 async)都接受一個選用的 CoroutineContext 參數,該參數可用於為新協同程式顯式指定分派器和其他上下文元素。
嘗試以下範例:
import kotlinx.coroutines.*

fun main() = runBlocking<Unit> {
    launch { // context of the parent, main runBlocking coroutine
        println("main runBlocking      : I'm working in thread ${Thread.currentThread().name}")
    }
    launch(Dispatchers.Unconfined) { // not confined -- will work with main thread
        println("Unconfined            : I'm working in thread ${Thread.currentThread().name}")
    }
    launch(Dispatchers.Default) { // will get dispatched to DefaultDispatcher
        println("Default               : I'm working in thread ${Thread.currentThread().name}")
    }
    launch(newSingleThreadContext("MyOwnThread")) { // will get its own new thread
        println("newSingleThreadContext: I'm working in thread ${Thread.currentThread().name}")
    }
}您可以在此處獲取完整程式碼。
它會產生以下輸出(順序可能不同):
Unconfined            : I'm working in thread main
Default               : I'm working in thread DefaultDispatcher-worker-1
newSingleThreadContext: I'm working in thread MyOwnThread
main runBlocking      : I'm working in thread main
當 launch { ... } 不帶參數使用時,它會從啟動它的 CoroutineScope 繼承上下文(以及分派器)。在這種情況下,它繼承了在 main 執行緒中執行的 runBlocking 主協同程式的上下文。
Dispatchers.Unconfined 是一個特殊的分派器,它似乎也在 main 執行緒中執行,但實際上,它是一種稍後會解釋的不同機制。
當作用域中沒有顯式指定其他分派器時,會使用預設分派器。它由 Dispatchers.Default 表示,並使用共享的背景執行緒池。
newSingleThreadContext 會為協同程式建立一個執行緒來執行。專用執行緒是非常昂貴的資源。在實際應用程式中,當不再需要時,必須使用 close 函式將其釋放,或者將其儲存在頂層變數中並在整個應用程式中重複使用。
不受限與受限分派器
Dispatchers.Unconfined 協同程式分派器會在呼叫者執行緒中啟動協同程式,但僅持續到第一個掛起點。掛起之後,它會在由所調用的掛起函式完全決定的執行緒中恢復協同程式。不受限分派器適用於既不消耗 CPU 時間,也不更新受限於特定執行緒的任何共享資料(如 UI)的協同程式。
另一方面,分派器預設是從外部 CoroutineScope 繼承的。特別是 runBlocking 協同程式的預設分派器受限於呼叫者執行緒,因此繼承它會產生將執行限制在該執行緒的效果,並具有可預測的 FIFO 排程。
import kotlinx.coroutines.*

fun main() = runBlocking<Unit> {
    launch(Dispatchers.Unconfined) { // not confined -- will work with main thread
        println("Unconfined      : I'm working in thread ${Thread.currentThread().name}")
        delay(500)
        println("Unconfined      : After delay in thread ${Thread.currentThread().name}")
    }
    launch { // context of the parent, main runBlocking coroutine
        println("main runBlocking: I'm working in thread ${Thread.currentThread().name}")
        delay(1000)
        println("main runBlocking: After delay in thread ${Thread.currentThread().name}")
    }
}您可以在此處獲取完整程式碼。
產生的輸出為:
Unconfined      : I'm working in thread main
main runBlocking: I'm working in thread main
Unconfined      : After delay in thread kotlinx.coroutines.DefaultExecutor
main runBlocking: After delay in thread main
因此,繼承自 runBlocking {...} 上下文的協同程式會繼續在 main 執行緒中執行,而不受限的協同程式則在 delay 函式使用的預設執行器執行緒中恢復。
不受限分派器是一種進階機制,在某些不需要為以後執行而分派協同程式或會產生不良副作用的邊緣情況下可能會有所幫助,因為協同程式中的某些操作必須立即執行。在一般程式碼中不應使用不受限分派器。
偵錯協同程式與執行緒
協同程式可以在一個執行緒上掛起,並在另一個執行緒上恢復。如果沒有專門的工具,即使使用單執行緒分派器,也可能很難弄清楚協同程式在何時、何地、正在做什麼。
使用 IDEA 偵錯
Kotlin 外掛程式的協同程式偵錯工具簡化了在 IntelliJ IDEA 中偵錯協同程式的過程。
偵錯功能適用於
kotlinx-coroutines-core1.3.8 或更高版本。
Debug 工具視窗包含 Coroutines 頁籤。在此頁籤中,您可以找到有關當前正在執行和已掛起的協同程式的資訊。協同程式會根據它們執行的分派器進行分組。
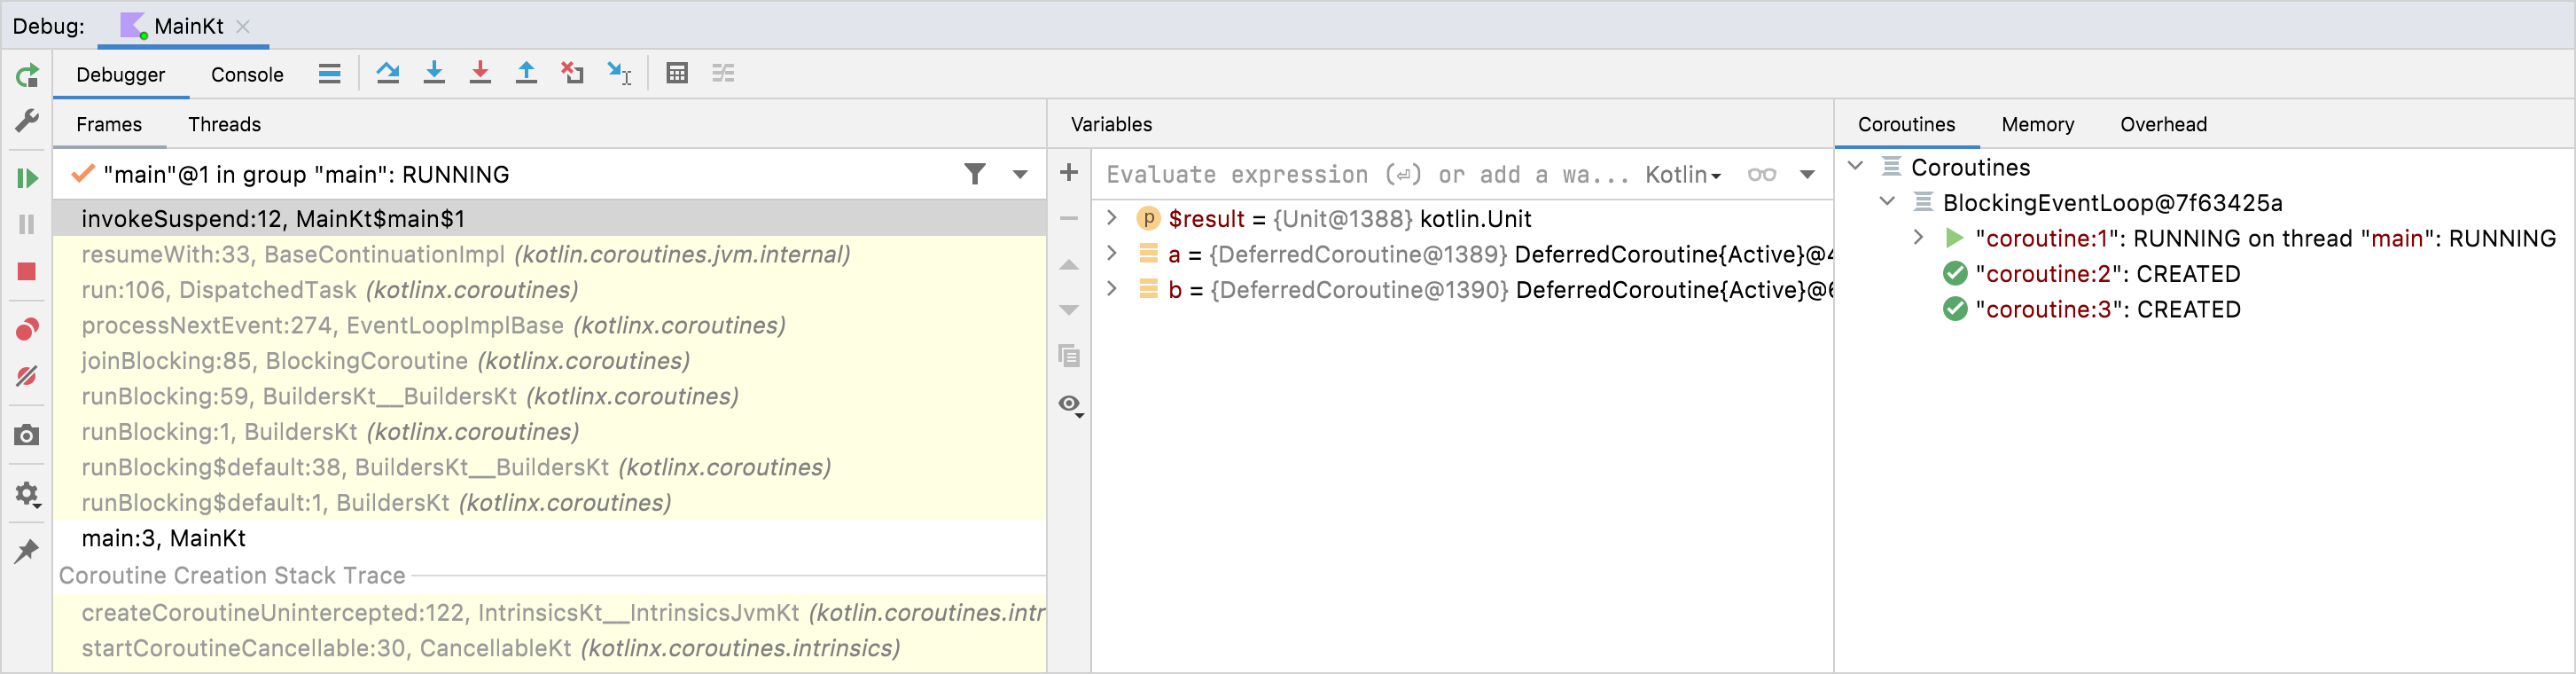
使用協同程式偵錯工具,您可以:
- 檢查每個協同程式的狀態。
- 查看正在執行和已掛起的協同程式的局部變數和擷取變數的值。
- 查看完整的協同程式建立堆疊,以及協同程式內部的呼叫堆疊。該堆疊包含所有帶有變數值的框架,甚至是那些在標準偵錯期間會丟失的框架。
- 獲取包含每個協同程式狀態及其堆疊的完整報告。要獲取該報告,請在 Coroutines 頁籤內按右鍵,然後點擊 Get Coroutines Dump。
要開始協同程式偵錯,您只需要設置中斷點並在偵錯模式下執行應用程式。
在教學中進一步了解協同程式偵錯。
使用日誌偵錯
在沒有協同程式偵錯工具的情況下,另一種偵錯帶有執行緒的應用程式的方法是在每條日誌陳述式的日誌檔案中印出執行緒名稱。日誌架構普遍支援此功能。在使用協同程式時,僅憑執行緒名稱無法提供太多上下文,因此 kotlinx.coroutines 包含了一些偵錯功能使其更容易。
使用 -Dkotlinx.coroutines.debug JVM 選項執行以下程式碼:
import kotlinx.coroutines.*

fun log(msg: String) = println("[${Thread.currentThread().name}] $msg")

fun main() = runBlocking<Unit> {
    val a = async {
        log("I'm computing a piece of the answer")
        6
    }
    val b = async {
        log("I'm computing another piece of the answer")
        7
    }
    log("The answer is ${a.await() * b.await()}")
}您可以在此處獲取完整程式碼。
這裡有三個協同程式。在 runBlocking 內部的主要協同程式 (#1),以及計算延遲值 a (#2) 和 b (#3) 的兩個協同程式。它們都在 runBlocking 的上下文中執行,並受限於主執行緒。這段程式碼的輸出是:
[main @coroutine#2] I'm computing a piece of the answer
[main @coroutine#3] I'm computing another piece of the answer
[main @coroutine#1] The answer is 42
log 函式在方括號中印出執行緒名稱,您可以看到它是 main 執行緒,後面附加了當前執行的協同程式識別碼。當開啟偵錯模式時,該識別碼會連續分配給所有建立的協同程式。
當 JVM 使用
-ea選項執行時,偵錯模式也會開啟。您可以在 DEBUG_PROPERTY_NAME 屬性的文件中閱讀更多關於偵錯功能的資訊。
在執行緒之間跳轉
使用 -Dkotlinx.coroutines.debug JVM 選項執行以下程式碼(參見偵錯):
import kotlinx.coroutines.*

fun log(msg: String) = println("[${Thread.currentThread().name}] $msg")

fun main() {
    newSingleThreadContext("Ctx1").use { ctx1 ->
        newSingleThreadContext("Ctx2").use { ctx2 ->
            runBlocking(ctx1) {
                log("Started in ctx1")
                withContext(ctx2) {
                    log("Working in ctx2")
                }
                log("Back to ctx1")
            }
        }
    }
}您可以在此處獲取完整程式碼。
上面的範例展示了協同程式用法中的新技術。
第一種技術展示了如何使用帶有指定內容的 runBlocking。 第二種技術涉及呼叫 withContext,它可能會掛起當前協同程式並切換到新上下文——前提是新上下文與現有上下文不同。具體來說,如果您指定不同的 CoroutineDispatcher,則需要額外的分派:區塊被排程在新的分派器上,一旦完成,執行就會返回到原始分派器。
結果,上述程式碼的輸出為:
[Ctx1 @coroutine#1] Started in ctx1
[Ctx2 @coroutine#1] Working in ctx2
[Ctx1 @coroutine#1] Back to ctx1
上面的範例使用了 Kotlin 標準函式庫中的 use 函式,以便在不再需要時正確釋放由 newSingleThreadContext 建立的執行緒資源。
上下文中的 Job
協同程式的 Job 是其上下文的一部分,可以使用 coroutineContext[Job] 運算式從中檢索:
import kotlinx.coroutines.*

fun main() = runBlocking<Unit> {
    println("My job is ${coroutineContext[Job]}")
}您可以在此處獲取完整程式碼。
在偵錯模式下,它會輸出如下內容:
My job is "coroutine#1":BlockingCoroutine{Active}@6d311334請注意,CoroutineScope 中的 isActive 只是 coroutineContext[Job]?.isActive == true 的便捷簡寫。
協同程式的子協同程式
當一個協同程式在另一個協同程式的 CoroutineScope 中啟動時,它會透過 CoroutineScope.coroutineContext 繼承其上下文,並且新協同程式的 Job 會成為父協同程式 Job 的 子項。當父協同程式被取消時,它的所有子項也會被遞歸取消。
然而,這種父子關係可以透過以下兩種方式之一顯式覆寫:
- 當啟動協同程式時顯式指定了不同的作用域(例如
GlobalScope.launch),它不會從父作用域繼承Job。 - 當一個不同的
Job物件被作為新協同程式的上下文傳遞時(如下例所示),它會覆寫父作用域的Job。
在上述兩種情況下,啟動的協同程式都不會與啟動它的作用域綁定,並獨立執行。
import kotlinx.coroutines.*

fun main() = runBlocking<Unit> {
    // launch a coroutine to process some kind of incoming request
    val request = launch {
        // it spawns two other jobs
        launch(Job()) {
            println("job1: I run in my own Job and execute independently!")
            delay(1000)
            println("job1: I am not affected by cancellation of the request")
        }
        // and the other inherits the parent context
        launch {
            delay(100)
            println("job2: I am a child of the request coroutine")
            delay(1000)
            println("job2: I will not execute this line if my parent request is cancelled")
        }
    }
    delay(500)
    request.cancel() // cancel processing of the request
    println("main: Who has survived request cancellation?")
    delay(1000) // delay the main thread for a second to see what happens
}您可以在此處獲取完整程式碼。
這段程式碼的輸出是:
job1: I run in my own Job and execute independently!
job2: I am a child of the request coroutine
main: Who has survived request cancellation?
job1: I am not affected by cancellation of the request
父協同程式的職責
父協同程式總是等待其所有子項完成。父協同程式不必顯式追蹤它啟動的所有子項,也不必在結束時使用 Job.join 來等待它們:
import kotlinx.coroutines.*

fun main() = runBlocking<Unit> {
    // launch a coroutine to process some kind of incoming request
    val request = launch {
        repeat(3) { i -> // launch a few children jobs
            launch  {
                delay((i + 1) * 200L) // variable delay 200ms, 400ms, 600ms
                println("Coroutine $i is done")
            }
        }
        println("request: I'm done and I don't explicitly join my children that are still active")
    }
    request.join() // wait for completion of the request, including all its children
    println("Now processing of the request is complete")
}您可以在此處獲取完整程式碼。
結果將會是:
request: I'm done and I don't explicitly join my children that are still active
Coroutine 0 is done
Coroutine 1 is done
Coroutine 2 is done
Now processing of the request is complete
為偵錯命名的協同程式
當協同程式頻繁記錄日誌,而您只需要關聯來自同一個協同程式的日誌記錄時,自動分配的 ID 很好用。然而,當協同程式與特定請求的處理相關聯或執行某些特定的背景任務時,最好為了偵錯目的顯式命名它。CoroutineName 上下文元素與執行緒名稱具有相同的作用。當偵錯模式開啟時,它會包含在執行此協同程式的執行緒名稱中。
以下範例示範了這個概念:
import kotlinx.coroutines.*

fun log(msg: String) = println("[${Thread.currentThread().name}] $msg")

fun main() = runBlocking(CoroutineName("main")) {
    log("Started main coroutine")
    // run two background value computations
    val v1 = async(CoroutineName("v1coroutine")) {
        delay(500)
        log("Computing v1")
        6
    }
    val v2 = async(CoroutineName("v2coroutine")) {
        delay(1000)
        log("Computing v2")
        7
    }
    log("The answer for v1 * v2 = ${v1.await() * v2.await()}")
}您可以在此處獲取完整程式碼。
使用 -Dkotlinx.coroutines.debug JVM 選項產生的輸出類似於:
[main @main#1] Started main coroutine
[main @v1coroutine#2] Computing v1
[main @v2coroutine#3] Computing v2
[main @main#1] The answer for v1 * v2 = 42
組合上下文元素
有時我們需要為協同程式上下文定義多個元素。我們可以使用 + 運算子來實現這一點。例如,我們可以同時啟動一個具有顯式指定分派器和顯式指定名稱的協同程式:
import kotlinx.coroutines.*

fun main() = runBlocking<Unit> {
    launch(Dispatchers.Default + CoroutineName("test")) {
        println("I'm working in thread ${Thread.currentThread().name}")
    }
}您可以在此處獲取完整程式碼。
使用 -Dkotlinx.coroutines.debug JVM 選項執行的程式碼輸出為:
I'm working in thread DefaultDispatcher-worker-1 @test#2協同程式作用域
讓我們將關於上下文、子項和 Job 的知識放在一起。假設我們的應用程式有一個具有生命週期的物件,但該物件不是協同程式。例如,我們正在編寫一個 Android 應用程式,並在 Android activity 的上下文中啟動各種協同程式,以執行非同步操作來獲取和更新資料、執行動畫等。當 activity 被銷毀時,必須取消這些協同程式,以避免記憶體洩漏。
當然,我們可以手動操作上下文和 Job 來綁定 activity 及其協同程式的生命週期,但 kotlinx.coroutines 提供了一個封裝該操作的抽象:CoroutineScope。您應該已經熟悉協同程式作用域,因為所有協同程式建置器都被宣告為它的擴充功能。
我們透過建立一個與 activity 生命週期綁定的 CoroutineScope 執行個體來管理協同程式的生命週期。CoroutineScope 執行個體可以透過 CoroutineScope() 或 MainScope() 工廠函式建立。前者建立一個通用作用域,而後者為 UI 應用程式建立一個作用域,並使用 Dispatchers.Main 作為預設分派器:
class Activity {
    private val mainScope = MainScope()

    fun destroy() {
        mainScope.cancel()
    }
    // to be continued ...
現在,我們可以使用定義的 mainScope 在此 Activity 的作用域內啟動協同程式。為了演示,我們啟動了十個延遲時間不同的協同程式:
    // class Activity continues
    fun doSomething() {
        // launch ten coroutines for a demo, each working for a different time
        repeat(10) { i ->
            mainScope.launch {
                delay((i + 1) * 200L) // variable delay 200ms, 400ms, ... etc
                println("Coroutine $i is done")
            }
        }
    }
} // class Activity ends
在我們的主函式中,我們建立 activity,呼叫我們的測試 doSomething 函式,並在 500 ms 後銷毀 activity。這會取消所有從 doSomething 啟動的協同程式。我們可以看到這一點,因為在銷毀 activity 之後,即使我們再等一會兒,也不會再印出訊息。
import kotlinx.coroutines.*

class Activity {
    private val mainScope = CoroutineScope(Dispatchers.Default) // use Default for test purposes

    fun destroy() {
        mainScope.cancel()
    }

    fun doSomething() {
        // launch ten coroutines for a demo, each working for a different time
        repeat(10) { i ->
            mainScope.launch {
                delay((i + 1) * 200L) // variable delay 200ms, 400ms, ... etc
                println("Coroutine $i is done")
            }
        }
    }
} // class Activity ends

fun main() = runBlocking<Unit> {
    val activity = Activity()
    activity.doSomething() // run test function
    println("Launched coroutines")
    delay(500L) // delay for half a second
    println("Destroying activity!")
    activity.destroy() // cancels all coroutines
    delay(1000) // visually confirm that they don't work
}您可以在此處獲取完整程式碼。
這個範例的輸出是:
Launched coroutines
Coroutine 0 is done
Coroutine 1 is done
Destroying activity!
如您所見,只有前兩個協同程式印出了訊息,其他協同程式都被 Activity.destroy() 中對 mainScope.cancel() 的單次調用取消了。
請注意,Android 在所有具有生命週期的實體中都對協同程式作用域提供了一方支援。參見對應的文件。
執行緒區域資料
有時能夠將某些執行緒區域資料傳遞給協同程式或在協同程式之間傳遞是很方便的。然而,由於它們不綁定到任何特定的執行緒,如果手動完成,這可能會導致樣板程式碼。
對於 ThreadLocal,asContextElement 擴充函式可以提供幫助。它建立一個額外的上下文元素,該元素保留給定的 ThreadLocal 的值,並在協同程式每次切換其上下文時還原它。
這很容易在實踐中演示:
import kotlinx.coroutines.*

val threadLocal = ThreadLocal<String?>() // declare thread-local variable

fun main() = runBlocking<Unit> {
    threadLocal.set("main")
    println("Pre-main, current thread: ${Thread.currentThread()}, thread local value: '${threadLocal.get()}'")
    val job = launch(Dispatchers.Default + threadLocal.asContextElement(value = "launch")) {
        println("Launch start, current thread: ${Thread.currentThread()}, thread local value: '${threadLocal.get()}'")
        yield()
        println("After yield, current thread: ${Thread.currentThread()}, thread local value: '${threadLocal.get()}'")
    }
    job.join()
    println("Post-main, current thread: ${Thread.currentThread()}, thread local value: '${threadLocal.get()}'")
}您可以在此處獲取完整程式碼。
在此範例中,我們使用 Dispatchers.Default 在背景執行緒池中啟動一個新協同程式,因此它在執行緒池的不同執行緒上運作,但它仍然具有我們使用 threadLocal.asContextElement(value = "launch") 指定的執行緒區域變數的值,無論協同程式在哪个執行緒上執行。因此,輸出(帶有偵錯)為:
Pre-main, current thread: Thread[main @coroutine#1,5,main], thread local value: 'main'
Launch start, current thread: Thread[DefaultDispatcher-worker-1 @coroutine#2,5,main], thread local value: 'launch'
After yield, current thread: Thread[DefaultDispatcher-worker-2 @coroutine#2,5,main], thread local value: 'launch'
Post-main, current thread: Thread[main @coroutine#1,5,main], thread local value: 'main'
很容易忘記設置對應的上下文元素。如果執行協同程式的執行緒不同,從協同程式訪問的執行緒區域變數可能會具有非預期的值。為了避免這種情況,建議使用 ensurePresent 方法並在不當使用時快速失敗。
ThreadLocal 具有一等支持,可以與 kotlinx.coroutines 提供的任何原語一起使用。不過,它有一個關鍵限制:當執行緒區域變數被變更時,新值不會傳播到協同程式呼叫者(因為上下文元素無法追蹤所有 ThreadLocal 物件訪問),並且更新後的值會在下一次掛起時丟失。使用 withContext 在協同程式中更新執行緒區域變數的值,詳見 asContextElement。
或者,值可以儲存在像 class Counter(var i: Int) 這樣的可變盒子中,而該盒子又儲存在執行緒區域變數中。然而,在這種情況下,您需要完全負責同步對此可變盒子中變數的潛在並行修改。
對於進階用法,例如與日誌 MDC 整合、事務上下文或內部使用執行緒區域變數傳遞資料的任何其他程式庫整合,請參閱應實作的 ThreadContextElement 介面文件。