開始使用 Kotlin 自訂指令碼 – 教學
Kotlin 自訂指令碼目前處於實驗性階段。它隨時可能被捨棄或更改。 請僅用於評估目的。我們非常歡迎您在 YouTrack 提供相關回饋。
「Kotlin 指令碼」是一項技術,讓開發人員無需事先編譯或封裝成可執行檔,即可將 Kotlin 程式碼作為指令碼執行。
如需查看 Kotlin 指令碼的概覽與範例,請觀看 KotlinConf'19 中由 Rodrigo Oliveira 帶來的演講:《實作 Gradle Kotlin DSL》。
在本教學中,您將建立一個 Kotlin 指令碼專案,該專案可以使用 Maven 相依性執行任意的 Kotlin 程式碼。您將能夠執行如下所示的指令碼:
@file:Repository("https://maven.pkg.jetbrains.space/public/p/kotlinx-html/maven")
@file:DependsOn("org.jetbrains.kotlinx:kotlinx-html-jvm:0.7.3")

import kotlinx.html.*
import kotlinx.html.stream.*
import kotlinx.html.attributes.*

val addressee = "World"

print(
    createHTML().html {
        body {
            h1 { +"Hello, $addressee!" }
        }
    }
)
指定的 Maven 相依性(本範例中為 kotlinx-html-jvm)將在執行期間從指定的 Maven 儲存庫或本機快取中解析,並用於指令碼的其餘部分。
專案結構
一個最小的 Kotlin 自訂指令碼專案包含兩個部分:
- 指令碼定義 (Script definition) – 一組參數和配置,定義了該指令碼類型應如何被識別、處理、編譯及執行。
- 指令碼主機 (Scripting host) – 負責處理指令碼編譯與執行的應用程式或組件 – 實際執行該類型的指令碼。
考慮到這些因素,最好將專案拆分為兩個模組。
在您開始之前
下載並安裝最新版本的 IntelliJ IDEA。
建立專案
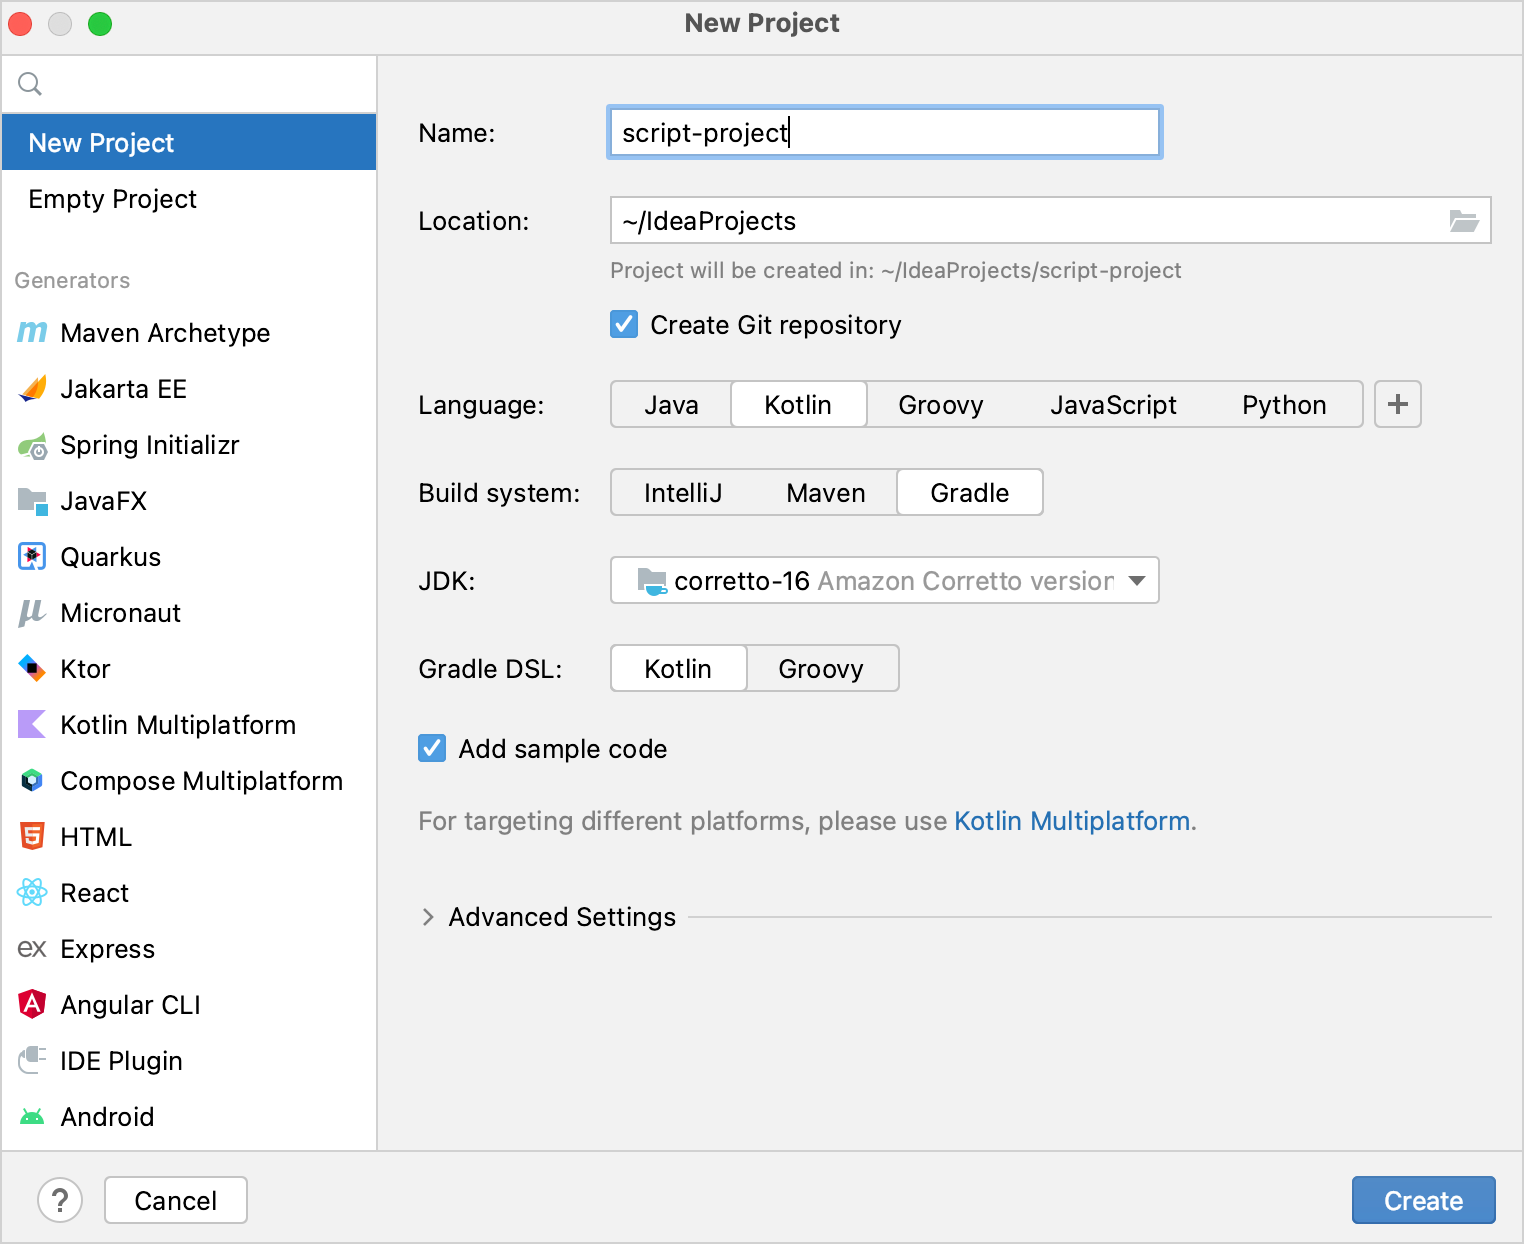
在 IntelliJ IDEA 中,選取 File | New | Project。
在左側面板中,選取 New Project。
為新專案命名,並在必要時更改其位置。
選取 Create Git repository 核取方塊,將新專案置於版本控制之下。您之後也可以隨時進行此操作。
從 Language 清單中,選取 Kotlin。
選取 Gradle 建構系統。
從 JDK 清單中,選取您想要在專案中使用的 JDK。
- 如果您的電腦上已安裝 JDK,但尚未在 IDE 中定義,請選取 Add JDK 並指定 JDK 目錄的路徑。
- 如果您的電腦上沒有所需的 JDK,請選取 Download JDK。
針對 Gradle DSL,選取 Kotlin 或 Gradle 語言。
點擊 Create。
加入指令碼模組
現在您已有一個空的 Kotlin/JVM Gradle 專案。請加入必要的模組:指令碼定義與指令碼主機:
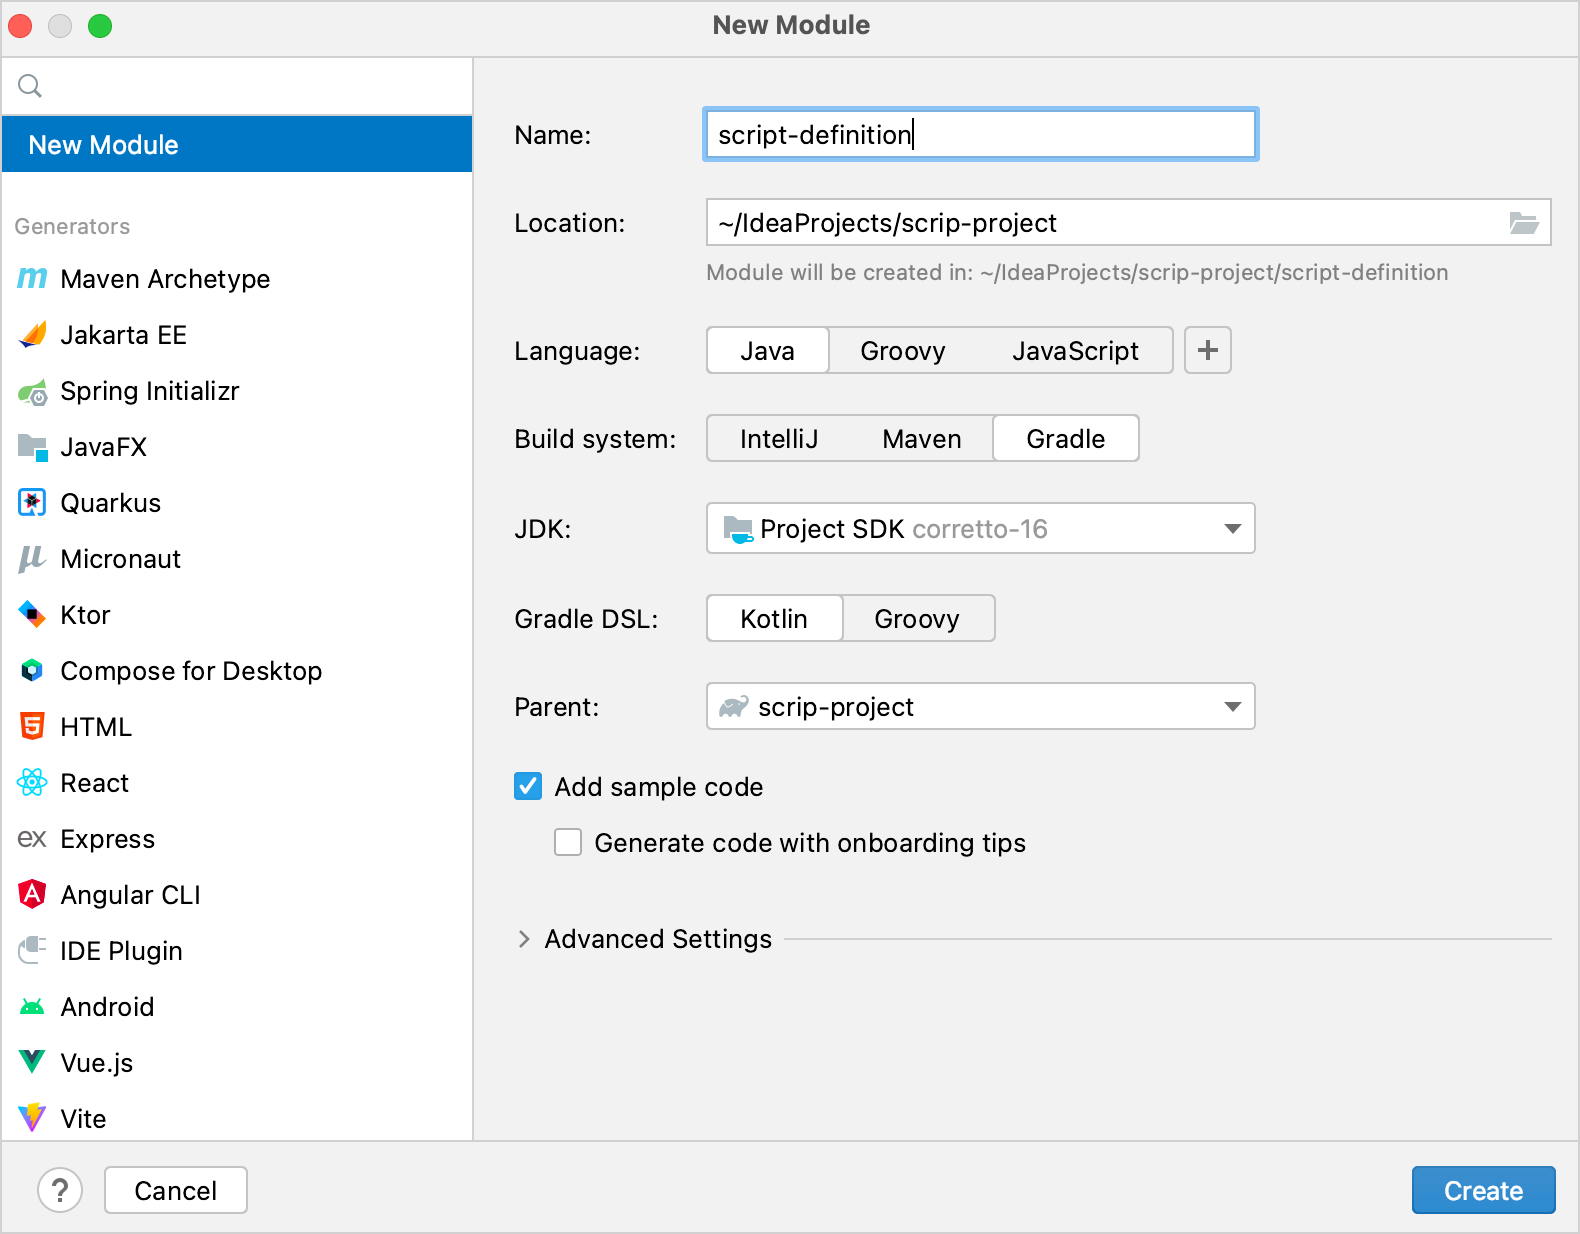
在 IntelliJ IDEA 中,選取 File | New | Module。
在左側面板中,選取 New Module。此模組將作為指令碼定義。
為新模組命名,並在必要時更改其位置。
從 Language 清單中,選取 Java。
選取 Gradle 建構系統;如果您想用 Kotlin 編寫建置指令碼,請在 Gradle DSL 選取 Kotlin。
選取根模組作為模組的父代 (parent)。
點擊 Create。
在模組的
build.gradle(.kts)檔案中,移除 Kotlin Gradle 外掛程式的version。該版本已在根專案的建置指令碼中定義。再次重複上述步驟,為指令碼主機建立一個模組。
專案應具有以下結構:

您可以在 kotlin-script-examples GitHub 儲存庫中找到此類專案的範例以及更多 Kotlin 指令碼範例。
建立指令碼定義
首先,定義指令碼類型:開發人員可以在此類指令碼中編寫什麼內容,以及它將如何被處理。在本教學中,這包括支援指令碼中的 @Repository 和 @DependsOn 註解。
在指令碼定義模組中,於
build.gradle(.kts)的dependencies區塊中加入對 Kotlin 指令碼組件的相依性。這些相依性提供了指令碼定義所需的 API:kotlindependencies { implementation("org.jetbrains.kotlin:kotlin-scripting-common") implementation("org.jetbrains.kotlin:kotlin-scripting-jvm") implementation("org.jetbrains.kotlin:kotlin-scripting-dependencies") implementation("org.jetbrains.kotlin:kotlin-scripting-dependencies-maven") // 此特定定義需要協同程式相依性 implementation("org.jetbrains.kotlinx:kotlinx-coroutines-core:1.11.0") }groovydependencies { implementation 'org.jetbrains.kotlin:kotlin-scripting-common' implementation 'org.jetbrains.kotlin:kotlin-scripting-jvm' implementation 'org.jetbrains.kotlin:kotlin-scripting-dependencies' implementation 'org.jetbrains.kotlin:kotlin-scripting-dependencies-maven' // 此特定定義需要協同程式相依性 implementation 'org.jetbrains.kotlinx:kotlinx-coroutines-core:1.11.0' }在模組中建立
src/main/kotlin/目錄,並加入一個 Kotlin 原始碼檔案,例如scriptDef.kt。在
scriptDef.kt中建立一個類別。它將作為此類型指令碼的父類別,因此請將其宣告為abstract或open。kotlin// 此類型指令碼的 abstract (或 open) 父類別 abstract class ScriptWithMavenDeps稍後此類別也將作為指令碼定義的參考。
為了將該類別設為指令碼定義,請使用
@KotlinScript註解標記它。向該註解傳遞兩個參數:fileExtension– 以.kts結尾的字串,定義此類型指令碼的副檔名。compilationConfiguration– 一個繼承自ScriptCompilationConfiguration的 Kotlin 類別,定義此指令碼定義的編譯細節。您將在下一步建立它。
kotlin// @KotlinScript 註解標記一個指令碼定義類別 @KotlinScript( // 指令碼類型的副檔名 fileExtension = "scriptwithdeps.kts", // 指令碼類型的編譯配置 compilationConfiguration = ScriptWithMavenDepsConfiguration::class ) abstract class ScriptWithMavenDeps object ScriptWithMavenDepsConfiguration: ScriptCompilationConfiguration()在本教學中,我們僅提供可運行的程式碼,而不詳細解釋 Kotlin 指令碼 API。 您可以在 GitHub 上找到帶有詳細解釋的相同程式碼。
定義指令碼編譯配置,如下所示。
kotlinobject ScriptWithMavenDepsConfiguration : ScriptCompilationConfiguration( { // 此類型所有指令碼的隱式匯入 defaultImports(DependsOn::class, Repository::class) jvm { // 從上下文類別載入器中提取整個 classpath 並將其用作相依性 dependenciesFromCurrentContext(wholeClasspath = true) } // 回呼 (Callbacks) refineConfiguration { // 使用提供的處理常式處理指定的註解 onAnnotations(DependsOn::class, Repository::class, handler = ::configureMavenDepsOnAnnotations) } } )configureMavenDepsOnAnnotations函式如下:kotlin// 即時重新配置編譯的處理常式 fun configureMavenDepsOnAnnotations(context: ScriptConfigurationRefinementContext): ResultWithDiagnostics<ScriptCompilationConfiguration> { val annotations = context.collectedData?.get(ScriptCollectedData.collectedAnnotations)?.takeIf { it.isNotEmpty() } ?: return context.compilationConfiguration.asSuccess() return runBlocking { resolver.resolveFromScriptSourceAnnotations(annotations) }.onSuccess { context.compilationConfiguration.with { dependencies.append(JvmDependency(it)) }.asSuccess() } } private val resolver = CompoundDependenciesResolver(FileSystemDependenciesResolver(), MavenDependenciesResolver())您可以在此處找到完整程式碼。
建立指令碼主機
下一步是建立指令碼主機 – 處理指令碼執行的組件。
在指令碼主機模組中,於
build.gradle(.kts)的dependencies區塊中加入相依性:- 提供指令碼主機所需 API 的 Kotlin 指令碼組件
- 您先前建立的指令碼定義模組
kotlindependencies { implementation("org.jetbrains.kotlin:kotlin-scripting-common") implementation("org.jetbrains.kotlin:kotlin-scripting-jvm") implementation("org.jetbrains.kotlin:kotlin-scripting-jvm-host") implementation(project(":script-definition")) // 指令碼定義模組 }groovydependencies { implementation 'org.jetbrains.kotlin:kotlin-scripting-common' implementation 'org.jetbrains.kotlin:kotlin-scripting-jvm' implementation 'org.jetbrains.kotlin:kotlin-scripting-jvm-host' implementation project(':script-definition') // 指令碼定義模組 }在模組中建立
src/main/kotlin/目錄,並加入一個 Kotlin 原始碼檔案,例如host.kt。為應用程式定義
main函式。在其主體中,檢查是否有一個引數(指令碼檔案的路徑),然後執行該指令碼。您將在下一步的單獨函式evalFile中定義指令碼執行。目前先將其宣告為空。main看起來可能如下所示:kotlinfun main(vararg args: String) { if (args.size != 1) { println("usage: <app> <script file>") } else { val scriptFile = File(args[0]) println("Executing script $scriptFile") evalFile(scriptFile) } }定義指令碼求值函式。這就是您將使用指令碼定義的地方。透過呼叫
createJvmCompilationConfigurationFromTemplate並將指令碼定義類別作為型別參數來獲取它。接著呼叫BasicJvmScriptingHost().eval,並傳遞指令碼程式碼及其編譯配置。eval會回傳ResultWithDiagnostics的執行個體,因此將其設為函式的回傳型別。kotlinfun evalFile(scriptFile: File): ResultWithDiagnostics<EvaluationResult> { val compilationConfiguration = createJvmCompilationConfigurationFromTemplate<ScriptWithMavenDeps>() return BasicJvmScriptingHost().eval(scriptFile.toScriptSource(), compilationConfiguration, null) }調整
main函式以列印有關指令碼執行的資訊:kotlinfun main(vararg args: String) { if (args.size != 1) { println("usage: <app> <script file>") } else { val scriptFile = File(args[0]) println("Executing script $scriptFile") val res = evalFile(scriptFile) res.reports.forEach { if (it.severity > ScriptDiagnostic.Severity.DEBUG) { println(" : ${it.message}" + if (it.exception == null) "" else ": ${it.exception}") } } } }
您可以在此處找到完整程式碼。
執行指令碼
為了檢查指令碼主機的運作情況,請準備一個要執行的指令碼和一個執行配置。
在專案根目錄中建立名為
html.scriptwithdeps.kts的檔案,內容如下:kotlin@file:Repository("https://maven.pkg.jetbrains.space/public/p/kotlinx-html/maven") @file:DependsOn("org.jetbrains.kotlinx:kotlinx-html-jvm:0.7.3") import kotlinx.html.*; import kotlinx.html.stream.*; import kotlinx.html.attributes.* val addressee = "World" print( createHTML().html { body { h1 { +"Hello, $addressee!" } } } )它使用了來自
kotlinx-html-jvm程式庫的函式,該程式庫已在@DependsOn註解引數中被參照。建立一個執行配置來啟動指令碼主機並執行此檔案:
開啟
host.kt並導覽至main函式。其左側有一個 Run 裝訂邊圖示。右鍵點擊該裝訂邊圖示,並選取 Modify Run Configuration。
在 Create Run Configuration 對話方塊中,將指令碼檔案名稱加入至 Program arguments,然後點擊 OK。
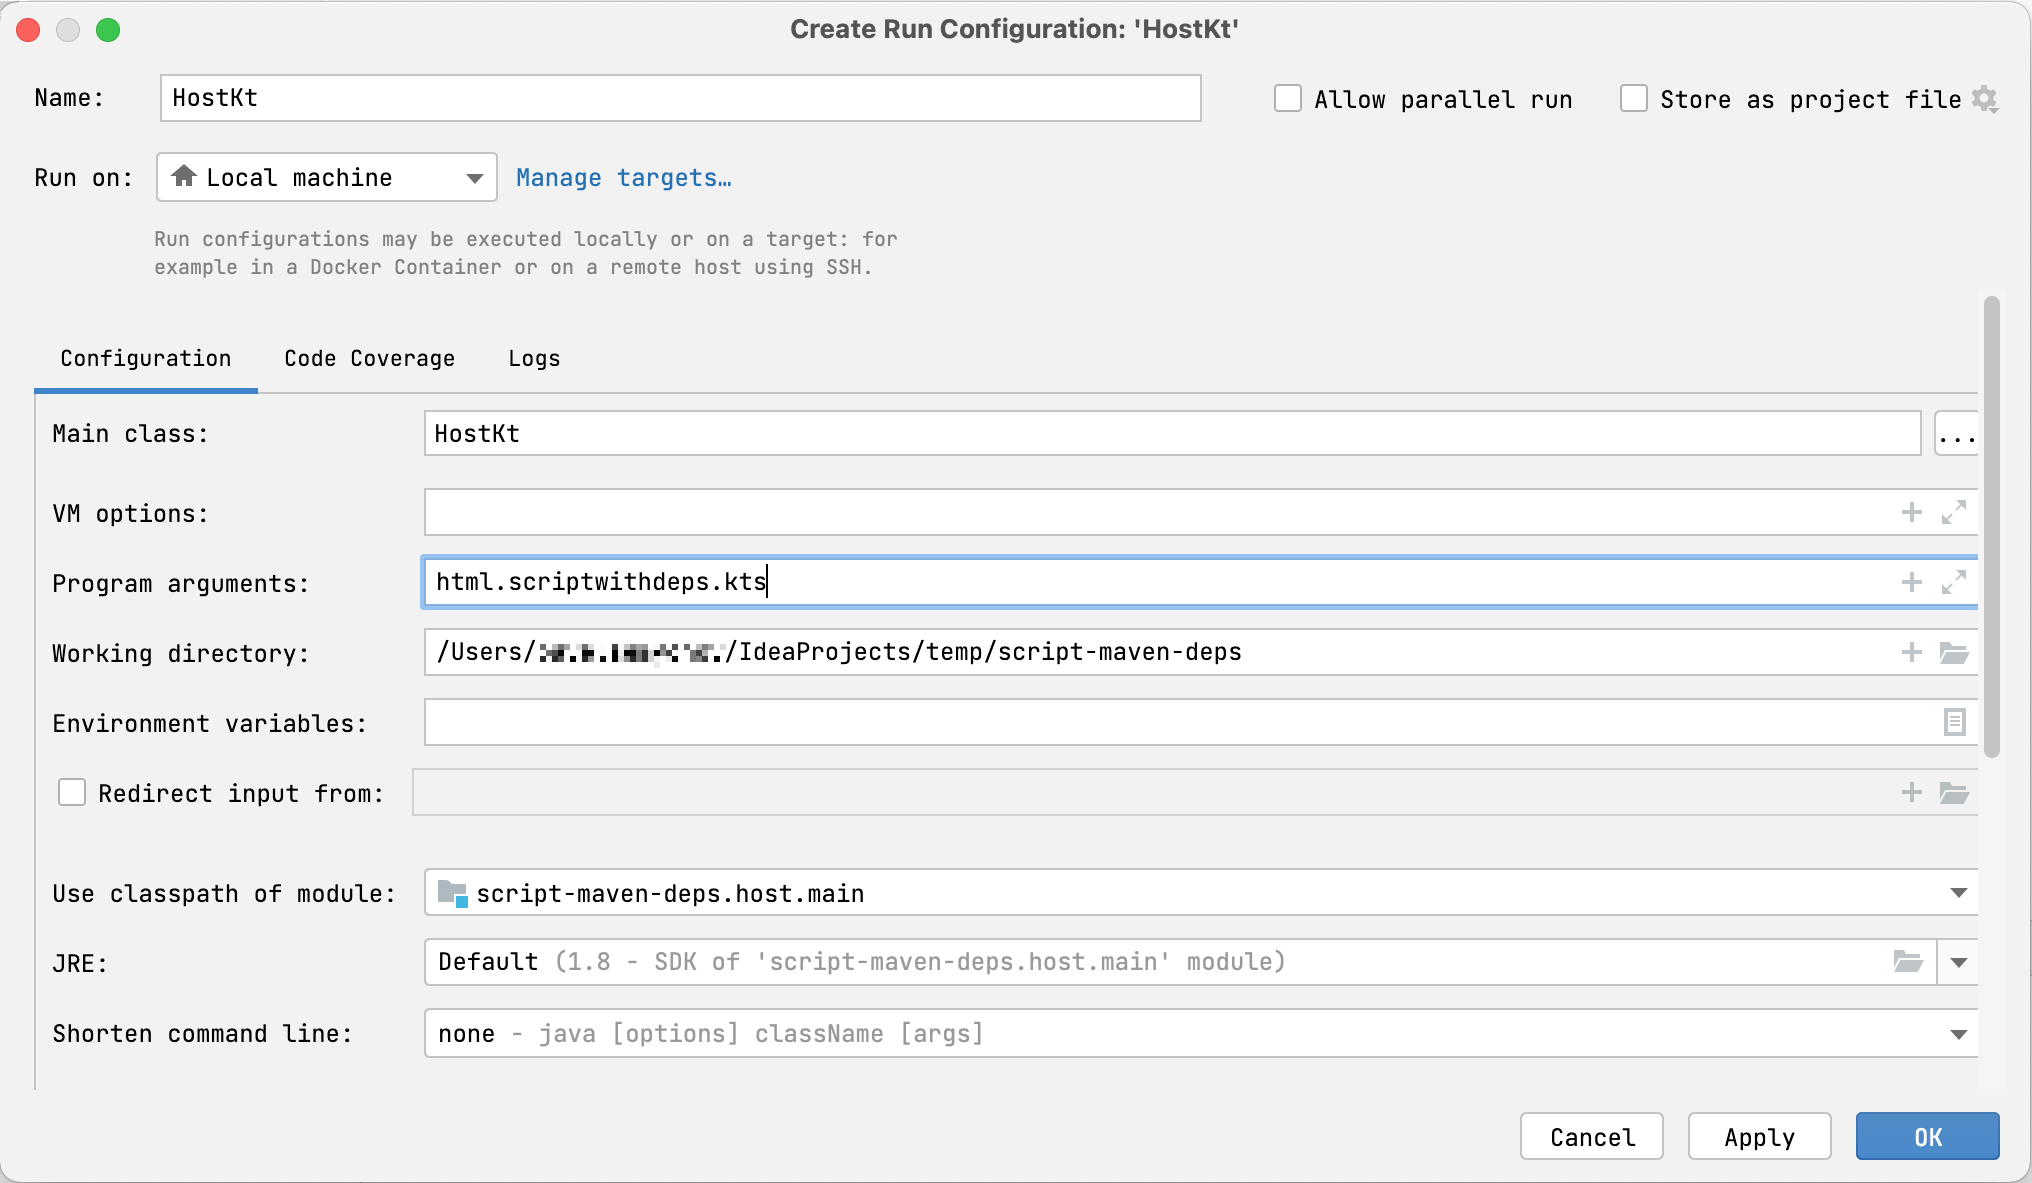
執行所建立的配置。
您將看到指令碼如何執行、解析指定儲存庫中對 kotlinx-html-jvm 的相依性,並列印呼叫其函式的結果:
<html>
  <body>
    <h1>Hello, World!</h1>
  </body>
</html>
第一次執行時,解析相依性可能需要一些時間。後續執行將會快得多,因為它們會使用從本機 Maven 儲存庫下載的相依性。
接續步驟
建立簡單的 Kotlin 指令碼專案後,您可以尋找有關此主題的更多資訊:
- 閱讀 Kotlin 指令碼 KEEP
- 瀏覽更多 Kotlin 指令碼範例
- 觀看 Rodrigo Oliveira 的演講 《實作 Gradle Kotlin DSL》